vSphere with Nimble and Veeam Replica
29 Jul 2023
vSphere is VMware’s virtualization platform, which transforms data centers into aggregated computing infrastructures that include CPU, storage, and networking resources. vSphere manages these infrastructures as a unified operating environment, and provides you with the tools to administer the data centers that participate in that environment. - VMware vSphere Documentation
The two core components of vSphere are ESXi and vCenter Server.
- ESXi is the virtualization platform, the bare metal server opearting system, where you create and run virtual machines and virtual appliances.
- vCenter Server is the virtual machine service through which you manage multiple ESXi hosts connected in a network and pool host resources.
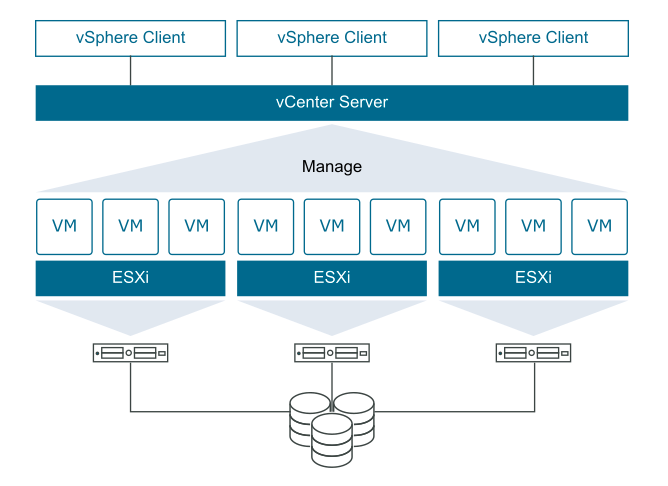
vSphere is a sophisticated product with multiple components to install and set up.
-
Install ESXi on at least one host
- Verify that the system meets minimum hardware requirements
- Determine installation option: Interactive, Scripted or vSphere Auto Deploy
- Determine where you want to locate and boot the ESXi installer, VMware does not support software raiding, therefore you’ll need a hardware RAID card to create a RAID1 or 10.
- Create a data sheet, which contains the ESXi servers and vCenter information, this is helpful for documentation.
-
Setup ESXi
- Verify the server:
- hardware clock is set to UTC
- is using UEFI
- Secure boot is enabled
- TPM is enabled - greater version 2 supported
- Verify the server:
- Deploy vCenter Server Appliance
- Log in to the vSphere Client to create and organise your vCenter Server Inventory
Hardware
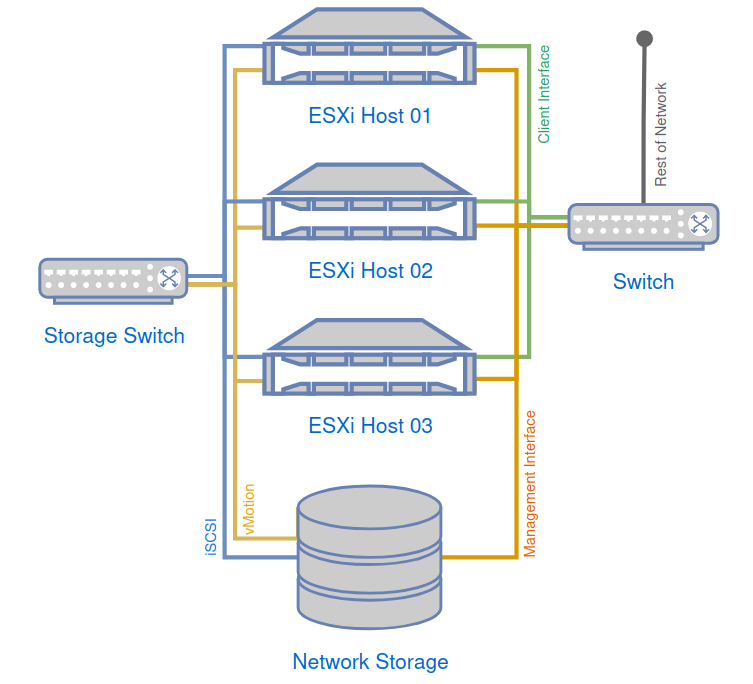
The server hardware being used within this installation are three DELL PowerEdge R630 servers with a solid state drive.
The CPUs used within these servers are not listed on the compatibility list and only support TPM 1.2, and therefore I will need to force the installation. - vSphere 8 Compatibility
The diagram below shows a crude physical topology, this will create the basis of my network configuration.
Secure ESXi Configuration
Securing the ESXi Configuration (vmware.com)
Secrets
- Before vSphere 7.0 Update 2, the archived ESXi configuration file is not encrypted. In vSphere 7.0 Update 2 and later, the archived configuration file is encrypted.
TPM
- TPM can save virtual machine encryption keys across reboots.
- TPM is used to “seal” the configuration to the host, providing a strong security guarantee.
- As a result, encrypted workloads can continue to function when a key server is unavailable or unreachable.
Network Traffic
- Isolation of network traffic is essential to a secure ESXi environment.
- vSphere Infrastructure networks: vMotion, Fault Tolerance, vSAN and Storage.
- Management network, choose a network adapter, traffic for this includes vCenter Server and SNMP client data.
- The autoconfiguration phase will select
vmnic0for management traffic.
- The autoconfiguration phase will select
- Virtual machine traffic can be enhanced by using a virtual firewall to create rules.
Preparation
Download Files
VMware ESXi Installation and Setup - VMware vSphere 8.0
Login to VMware Customer Connect and download the appropriate files, I will be installing Essentials Plus.
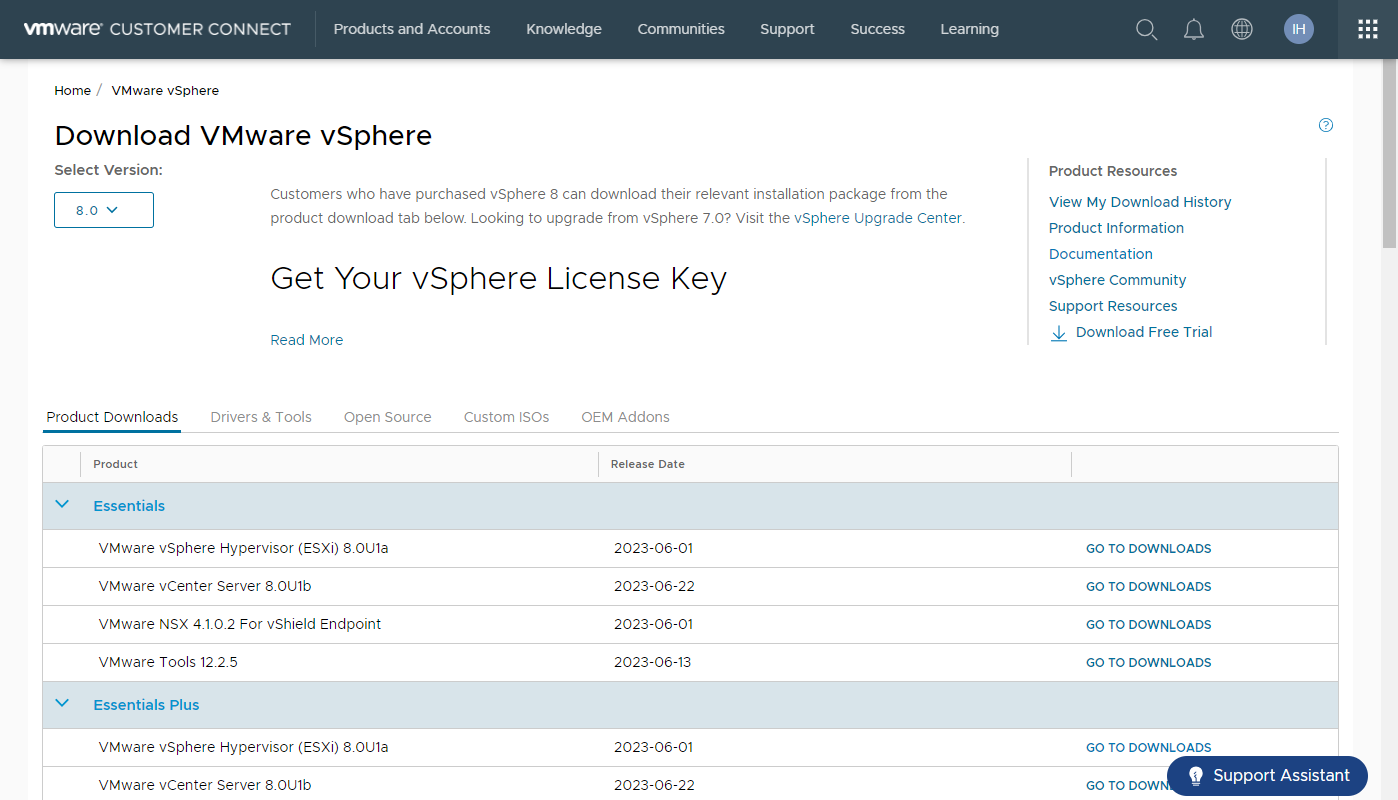
Download VMware vSphere - VMware Customer Connect
- VMware vSphere Hypervisor (ESXi) 8.0U1a - VMware vSphere Hypervisor (ESXi ISO) image
- Boot your server with this image in order to install or upgrade to ESXi (ESXi requires 64-bit capable servers). This ESXi image includes VMware Tools.
- VMware vCenter Server 8.0U1b - VMware vCenter Server Appliance
- VMware vCenter Server Appliance ISO. It includes the UI and CLI installer for install, upgrade and migration for VMware vCenter Server Appliance, VMware vSphere Update Manager and Update Manager Download Service (UMDS).
- VMware vSphere Replication 8.7.0.1 - VMware vSphere Replication 8.7.0.1 Appliance - *.iso disk image
- VMware vSphere Replication 8.7.0.1 Appliance - .iso disk image
Create a bootable USB
Format a USB Flash Drive to Boot the ESXi Installation
VMware have provided instructions on how to create a bootable USB using Linux.
To create a bootable USB in Windows, its recommended to use a piece of software, such as; Rufus or UNetbootin.
The example screenshot below is using Rufus. When the warning for an obsolete version of menu.c32 appears you want to select ‘No’ and use the VMware provided version.

Install ESXi
The acutal installation is incredibly simple, and I do not feel this needs to be covered.
-
After installation, restart the host.
- Initial ESXI configuration
- On first boot ESXi autoconfiguration will configure the system network (enable DHCP) and storage (blank internal disks are formatted to VMFS).
-
Set an administrative password, as the administrative password is not set by default.
- Configure networking information, most likely to be static IP configuration or reserved DHCP.
- UEFI systems may require additional steps, if you receive the error
No boot device available: Host fails to boot after installing in UEFI mode
While installing I made note of all the networking information, such as NIC MAC addresses, port layout and connections. This is to make the network configuration section easier, as I will not be physically in the same location, and again this is useful information for documentation.
Configure ESXi
NTP
After the initial installation and configuration was complete, the rest of the steps can be performed via the web console.
Set the Time & Date to utilise NTP servers, this can be found under “Manage” > “System” > “Time & Date”.

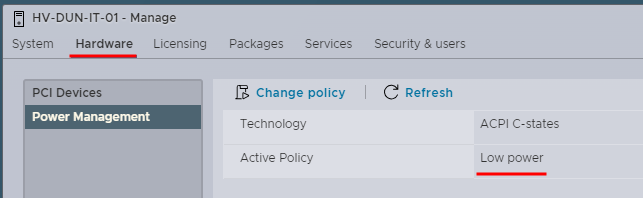
Power
Because these servers will be only used for a few non-mission critical services I can set the Power Management to “Low power”, this combined with the UEFI power setting “Dense Configuration”, will ensure that I am saving energy compared to the default values.
The power management option can be found under the “Hardware” tab.
Networking
- VMkernel NICs - handles traffic for ESXi services such as vSphere vMotion, iSCSI, NFS, FCoE, Fault Tolerance, vSAN and host management.
- Port Groups - handles the virtual machine traffic on a standard switch.
- Physical Network Adapter - handles the network traffic to other hosts on the network.
On our DELL storage switches I needed to enable Jumbo packets, this could be verified by using show system mtu and to change use system jumbo mtu 9216, which is the maximum allowed.
Next I will configure the networking elements. I will be creating the following:
Virtual Switches
- vSwitch0 - Client traffic
- MTU 1500
- VMNIC 3, 4 (Active/Active)
- vSwitch1 - vMotion
- MTU 9000
- VMNIC 2, 5 (Active/Active)
- vSwitch2 - iSCSI
- MTU 9000
- VMNIC 1, 6 (Active/Active)
- vSwitch3 - Management
- MTU 1500
- VMNIC 0, 7 (Active/Active)
Port Groups
- VM Network - Client traffic
- VLAN 20
- vSwitch0
- vMotion - vMotion to the Storage
- VLAN 0
- vSwitch1
- iSCSI1 - VM datastore traffic
- VLAN 0
- vSwitch2
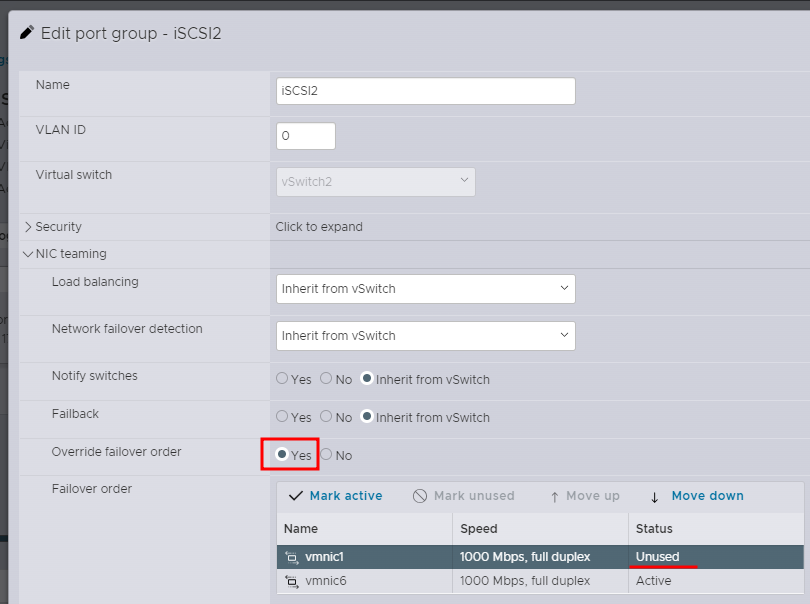
- Override failover order: Yes
- vmnic1 - Active
- vmnic6 - Unused
- iSCSI2 - VM datastore traffic
- VLAN 0
- vSwitch2
- Override failover order: Yes
- vmnic1 - Unused
- vmnic6 - Active
- Management Network - Management including SNMP traffic
- VLAN 20
- vSwitch3
The screenshot below shows overriding the failover order, to ensure that one vmnic is marked as un-used. If this is not completed, adding the iSCSI block storage will fail.
VMKernel NICs
- vmk0 - Management Network
- MTU 1500
- IPv4 Static IP
- TCP/IP Stack: Default
- Services: Management
- vmk1 - vMotion
- MTU 9000
- IPv4 Static IP
- TCP/IP Stack: vMotion stack
- vmk2 - iSCSI1
- MTU 9000
- IPv4 Static IP
- TCP/IP Stack: Default
- Services: None
- vmk3 - iSCSI2
- MTU 9000
- IPv4 Static IP
- TCP/IP Stack: Default
- Services: None
Storage
Add your storage, I will be adding an iSCSI block storage. Start by creating a new software iSCSI.
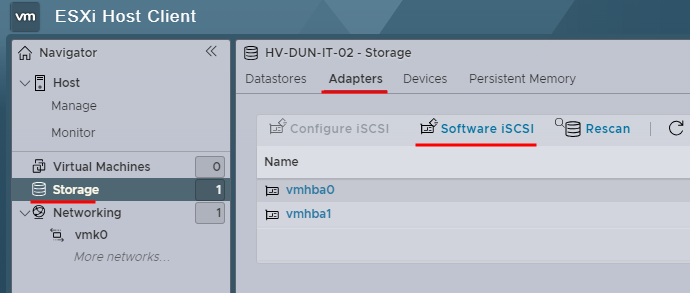
Take note of the IQN, as this will be required for configuring our storage.
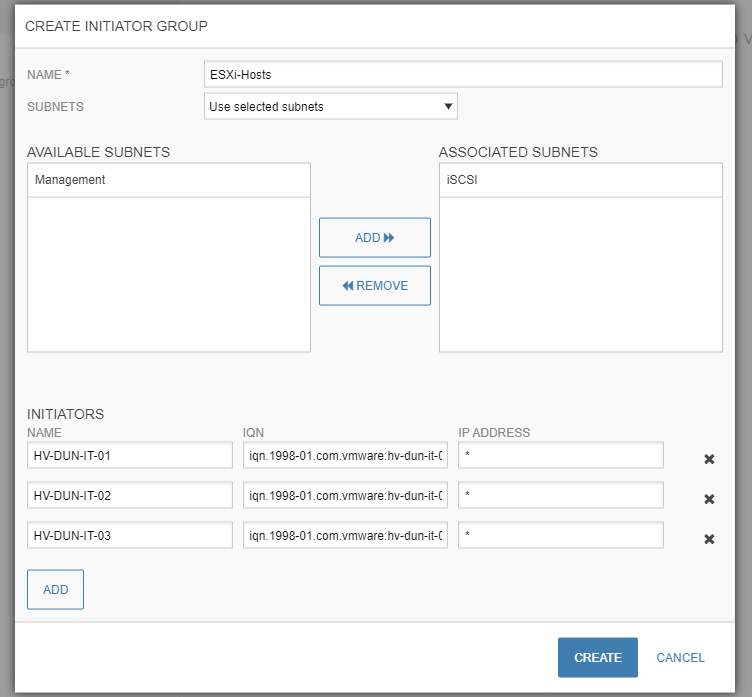
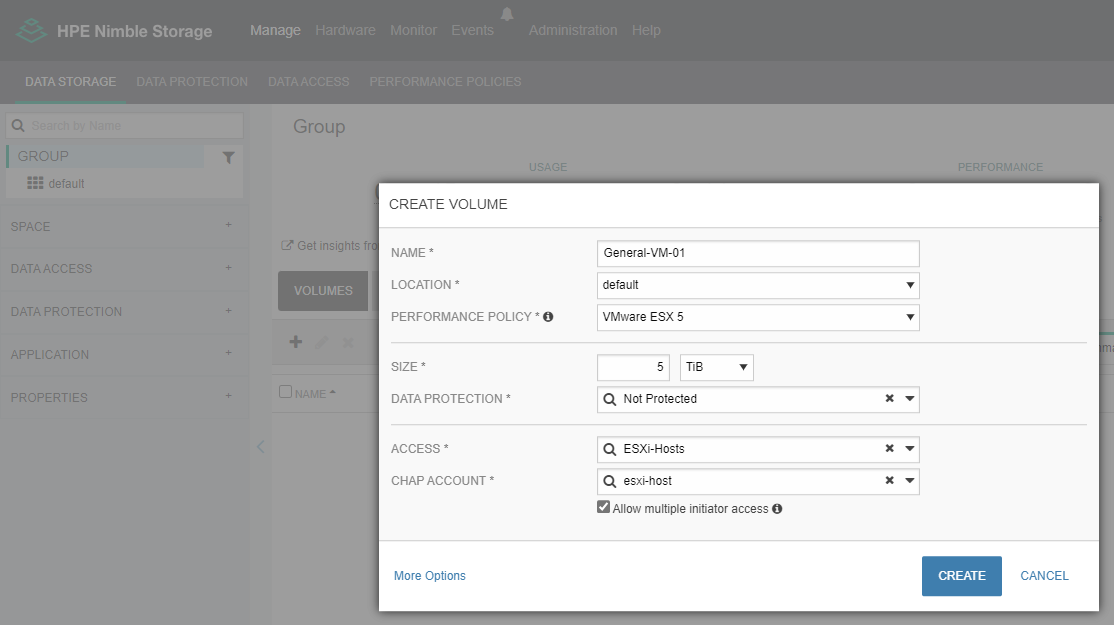
I will be using a HPE Nimble to offer a block of iSCSI storage to my ESXi hosts. First I will create a new initiator group, limited down to my three ESXi hosts and their IQNs.
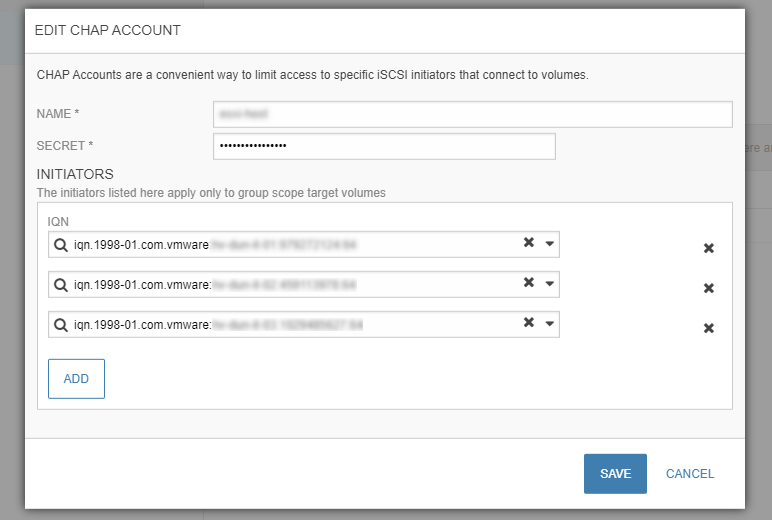
Then I will create a new CHAP account for authentication.
Next, I will create a new volume, using the access policy and CHAP account.
Lastly I will create a new data protection policy, this is a basic 30 days, daily.
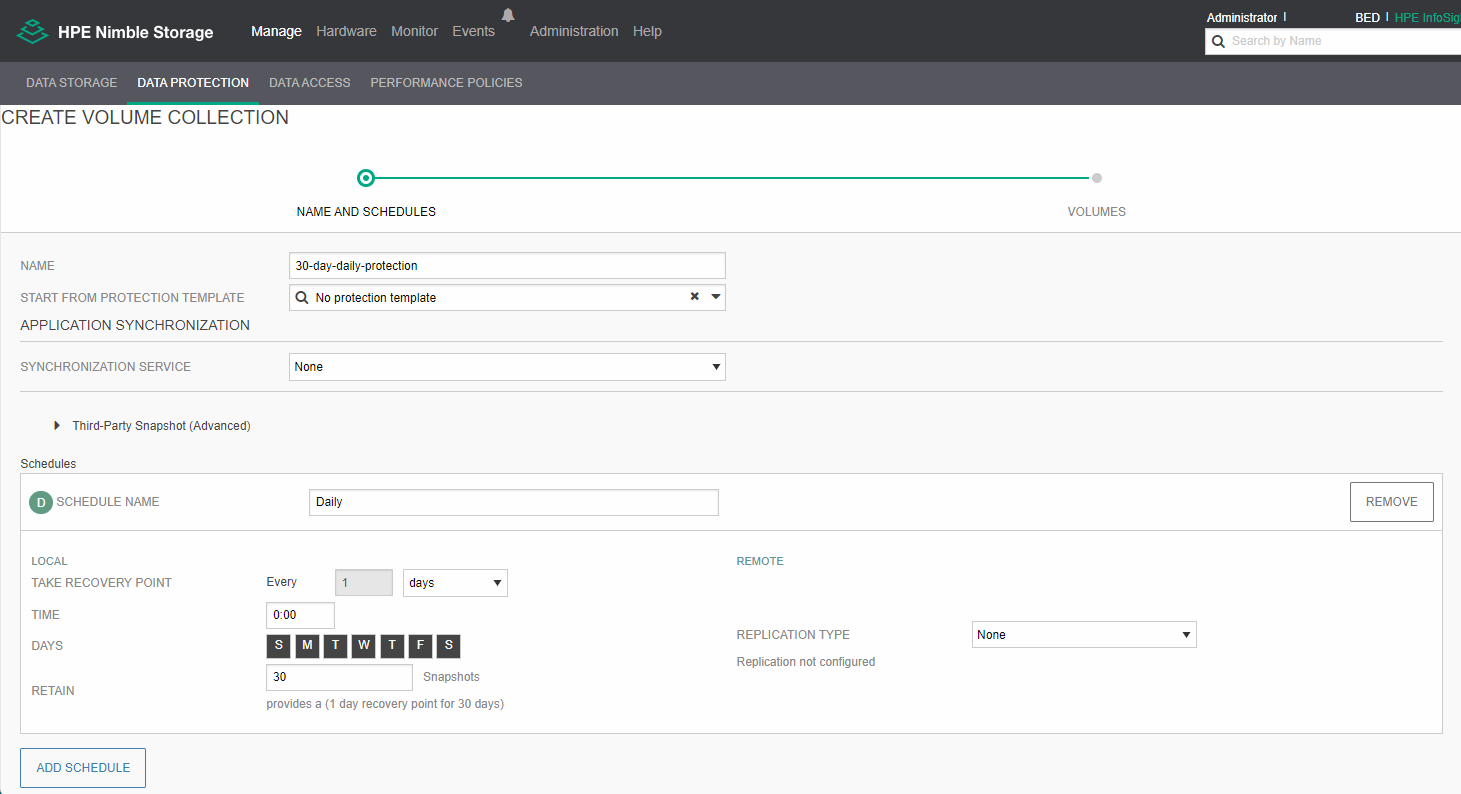
This can then be applied to the newly created volume.

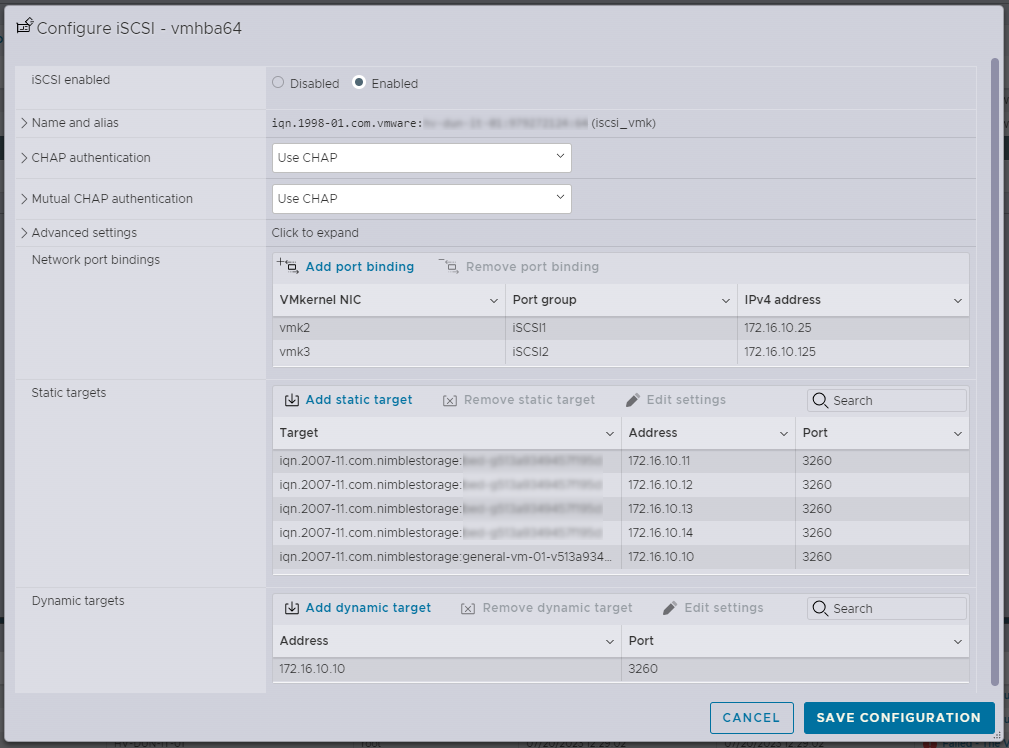
Now we can go back to our ESXi hosts and finish the iSCSI configuration.
- I will enable use of CHAP, providing the username and secret. - expand to view the fields.
- Add the iSCSI VMKs to the Network Port Bindings.
- Enter the discovery IP address into the dynamic targets.
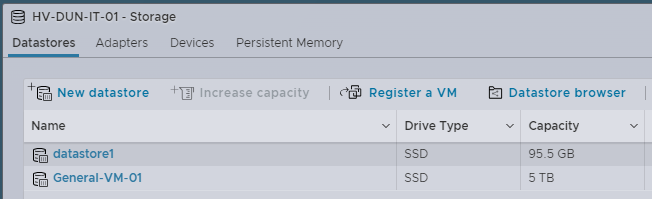
In the “Devices” tab, you should now see the iSCSI block storage that we previously created.
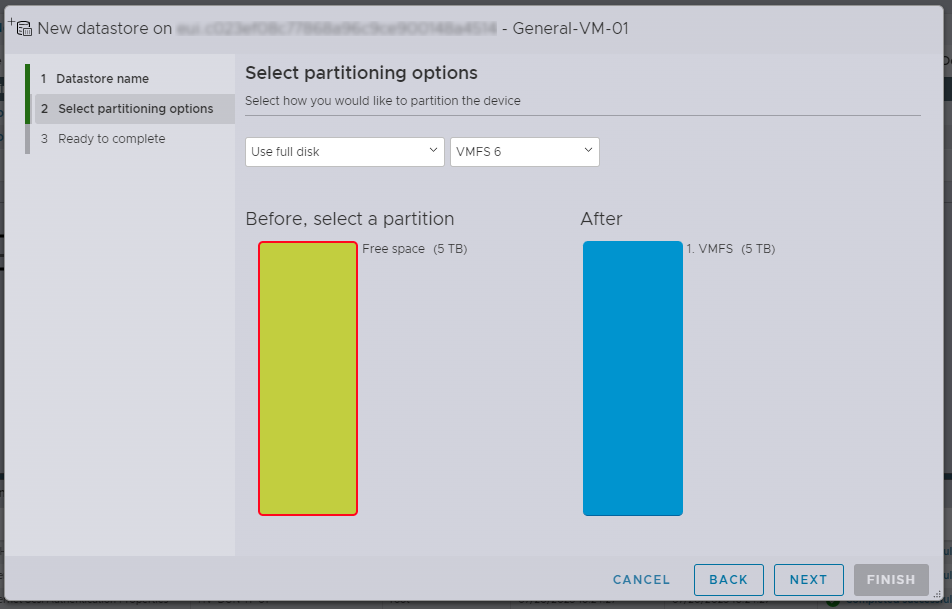
Select the 5 TB block and create a new data store. - Follow the wizard through to completion.
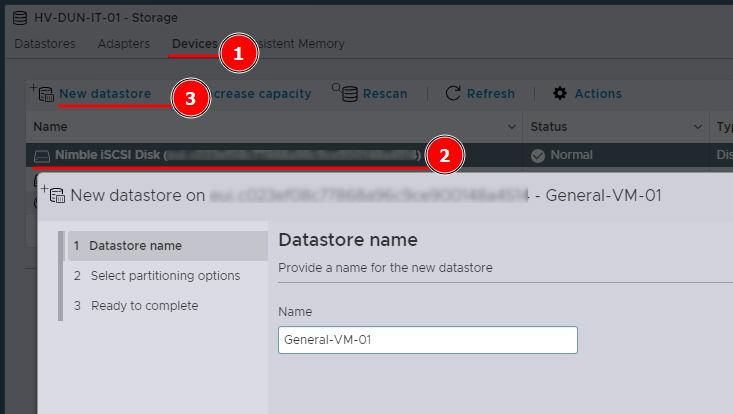
I will be using the full disk in VMFS version 6, which is the latest available to me.
The new data store is available to my ESXi host, which means I can setup the vCenter appliance directly on my centralised storage.
Install vCenter Server Appliance
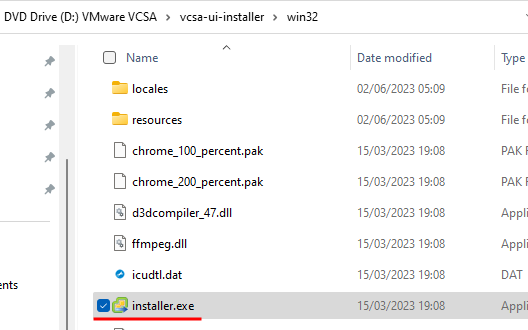
Download the VCSA iso file and mount it.
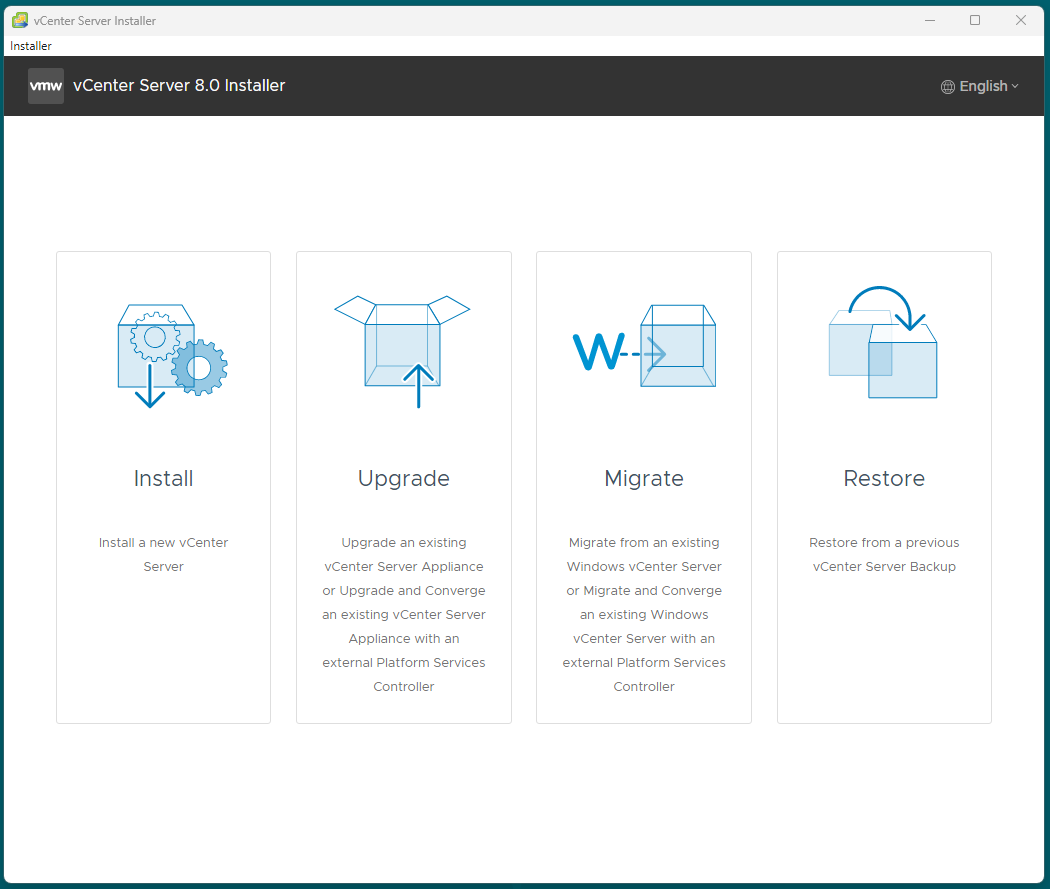
Run the VCSA-UI-Installer, I will be using the Win32 version.
I will be selecting the “Install” option for a new installation, but as the screenshot shows we can also upgrade, migrate and restore using this application.
Progress through the wizard until the 3rd step.
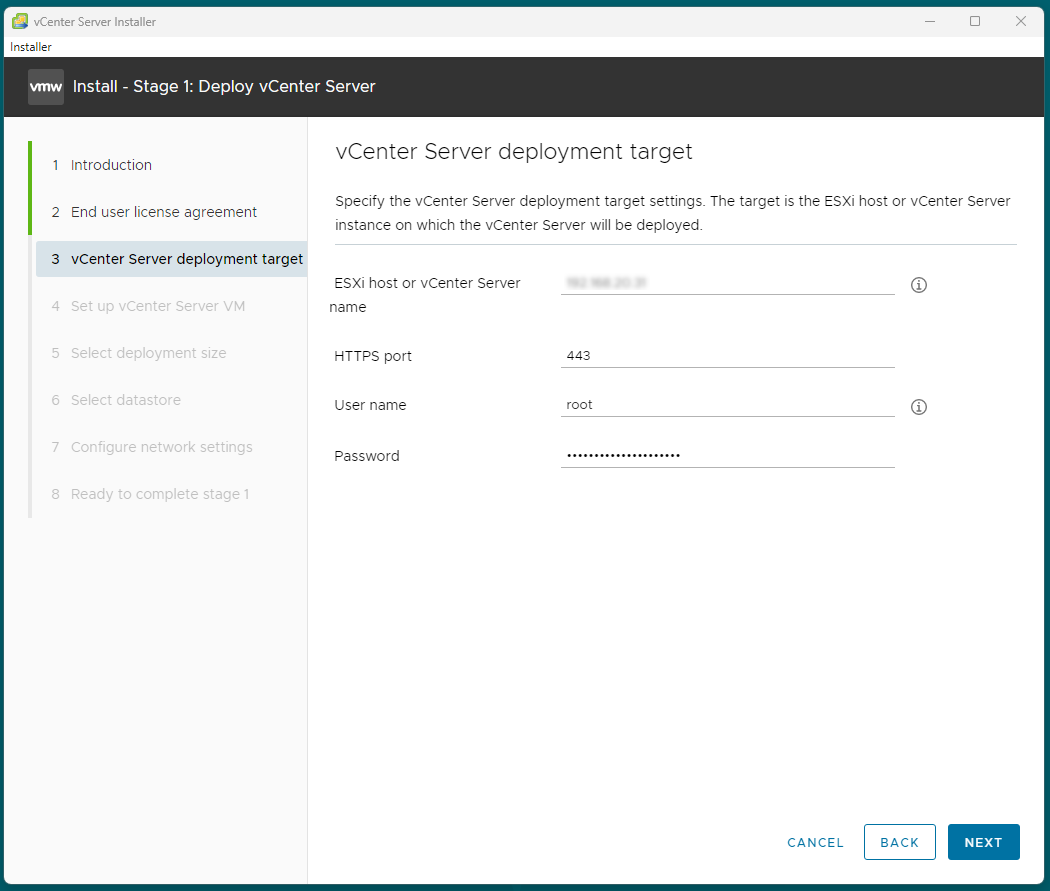
Provide the ESXi host information and root credentials.
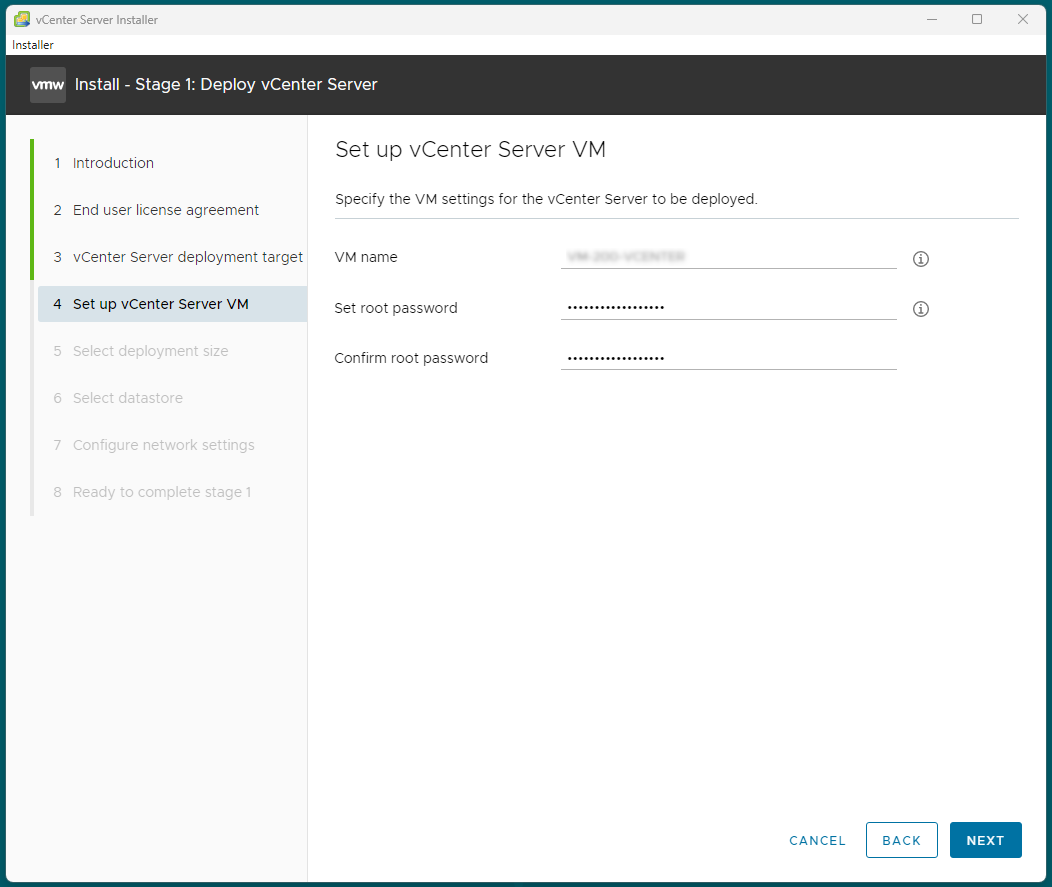
Give the vCenter appliance a name and set the root password.
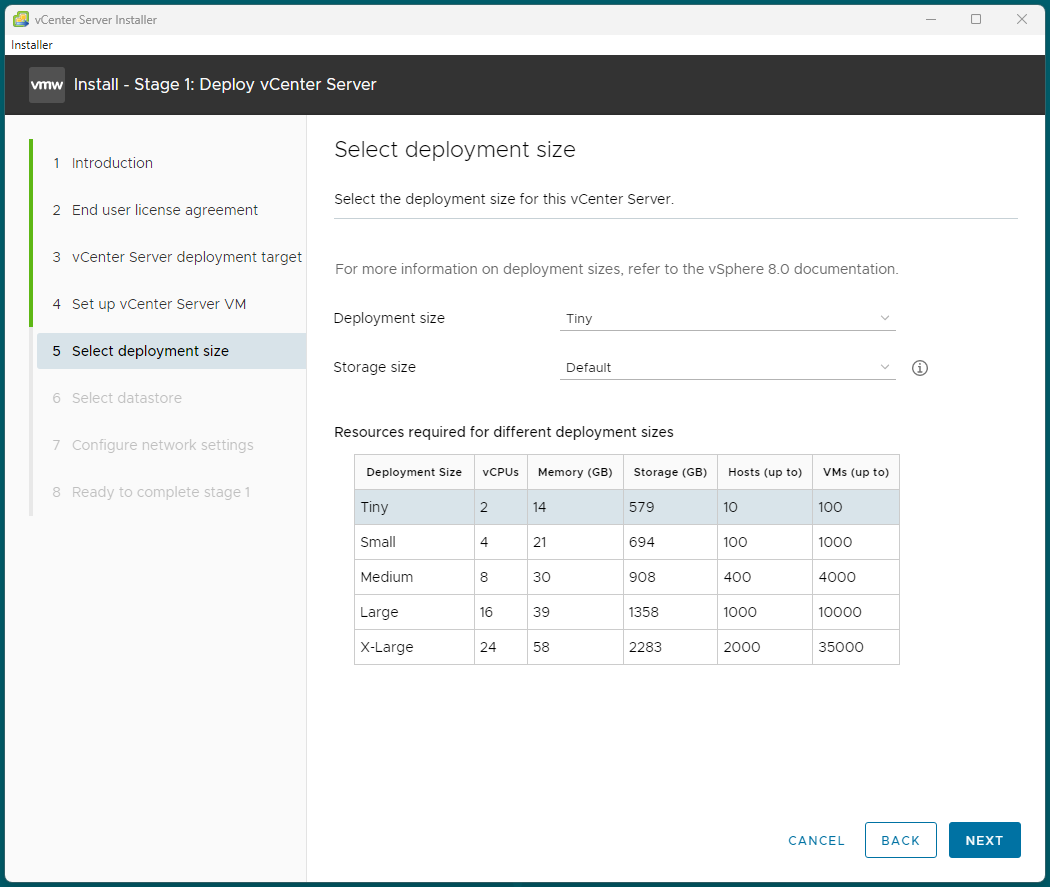
In this setup the “Tiny” deployment will be good enough.
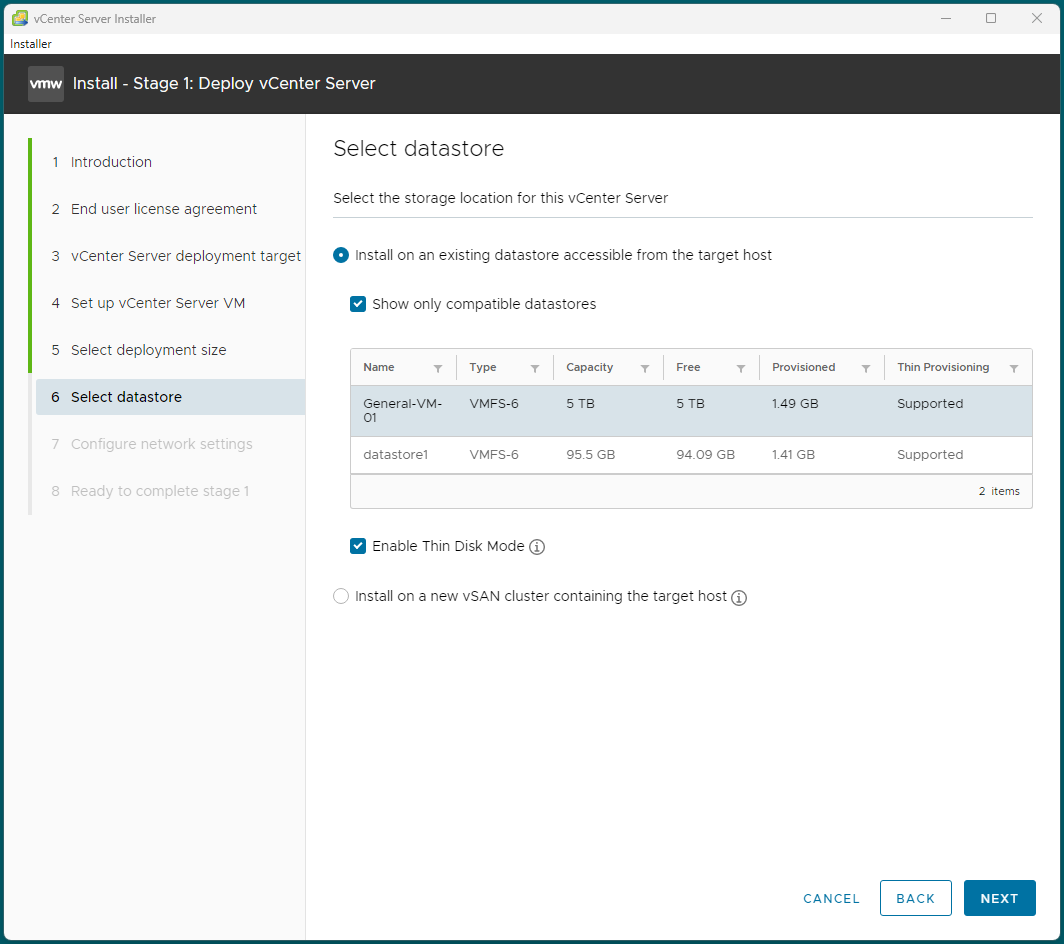
I will now select our iSCSI datastore, which is located on the network and available to all of the ESXi hosts.
I have also enabled Thin Disk mode, as my storage will support it.
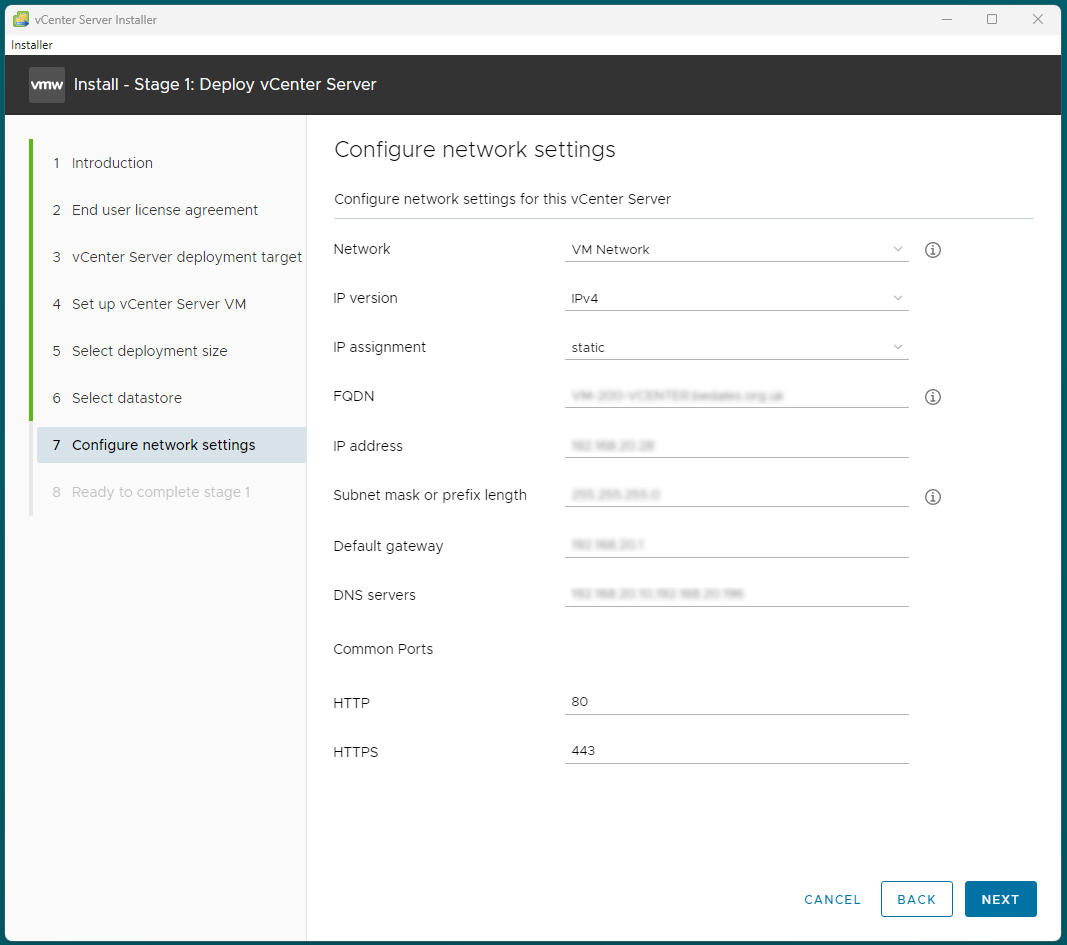
Lastly configure the vCenter network information.
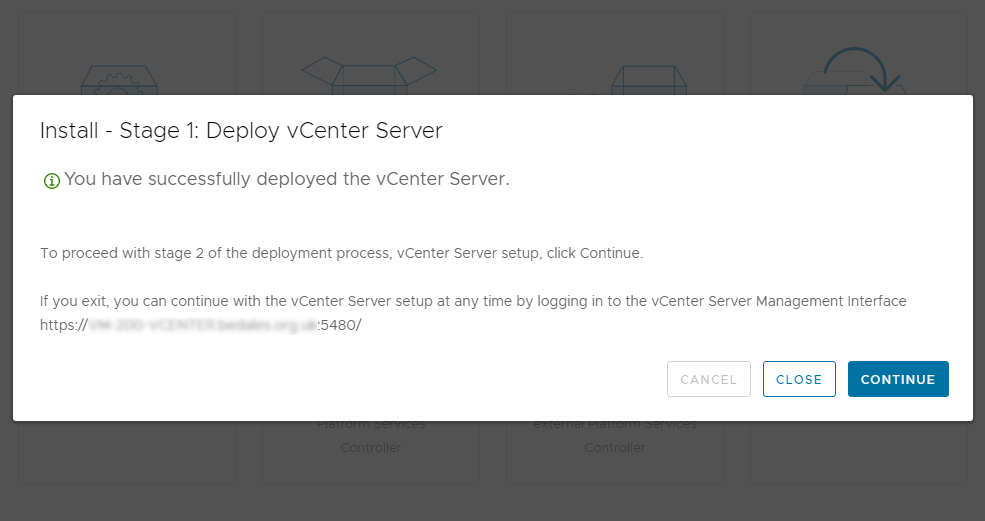
And now sit back and wait for the installation to complete. - This process can take some time, up to 30 minutes roughly depending on your equipment.
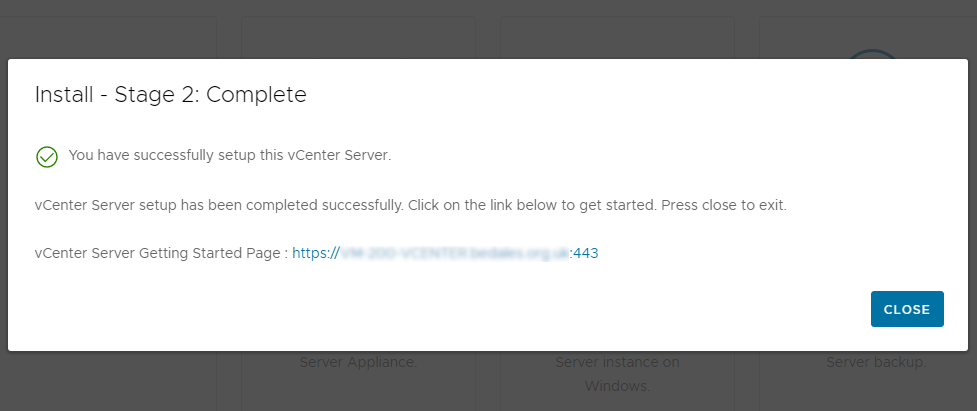
Once the installation has completed we move onto Stage 2.
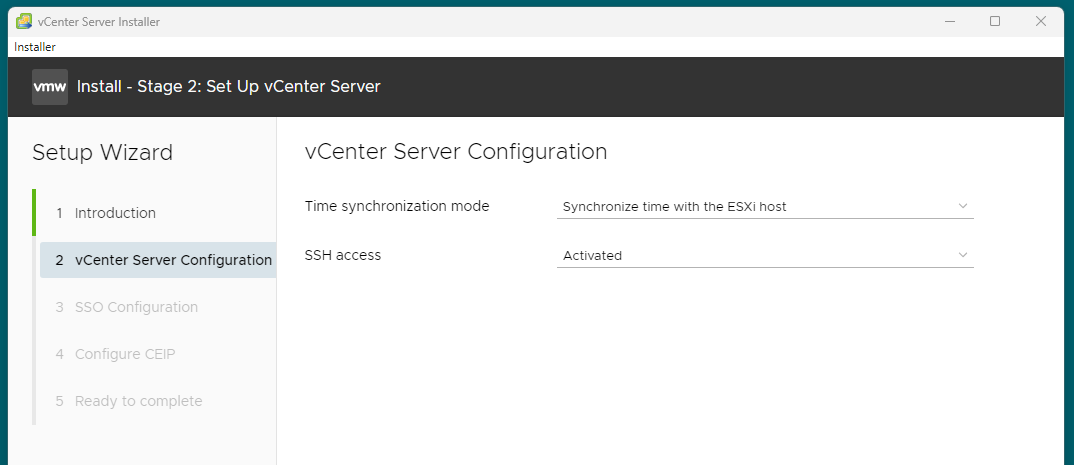
I will sychronise my time and date with the ESXi hosts, as I have already configured NTP on them.
I will also enable SSH, this is required for vCenter HA.
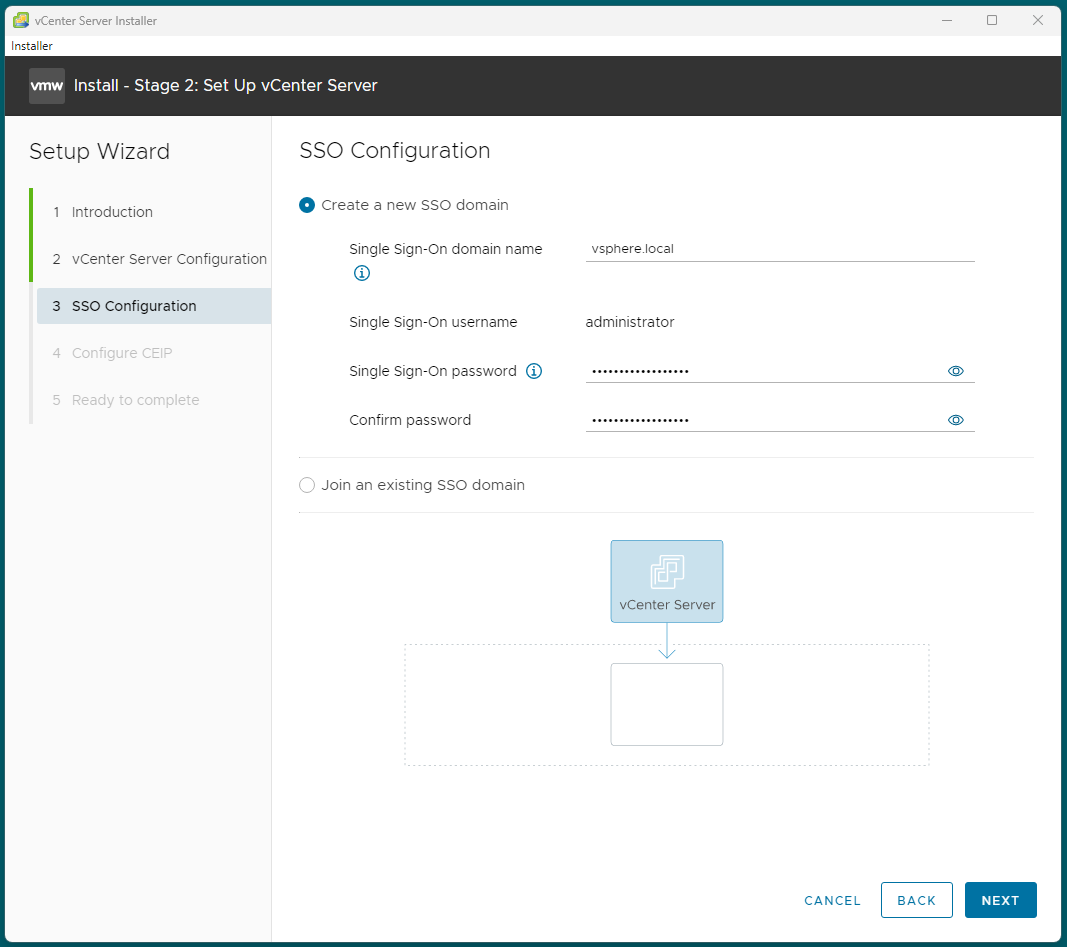
As this is a new installation I will create a new vCenter server SSO domain.
Lastly I will join the CEIP and complete Stage 2.
Now you are able to log into the vSphere Client.
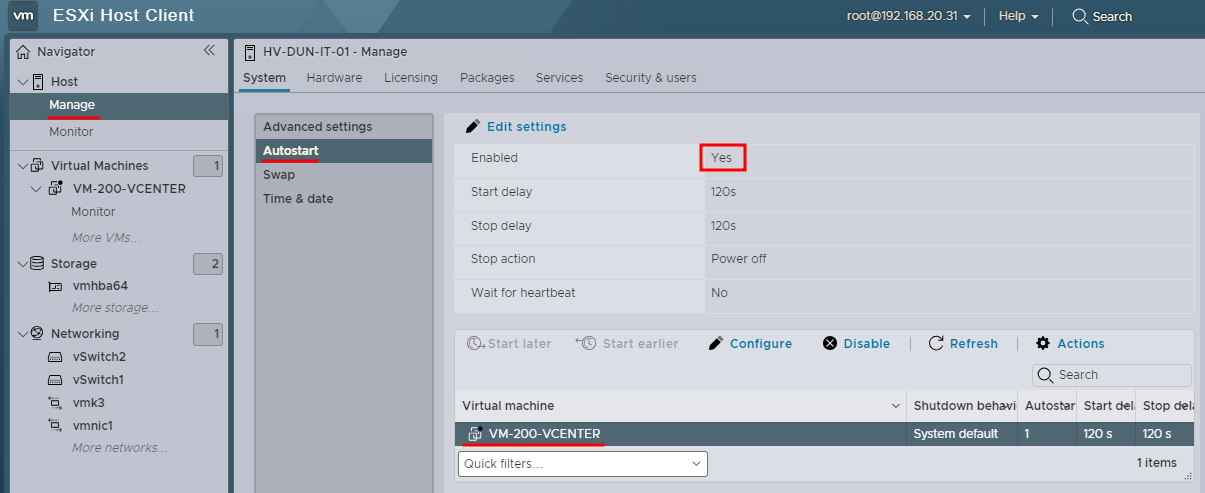
Lastly I enabled ‘autostart’ for the host and the vCenter appliance, as shown in the screenshot.
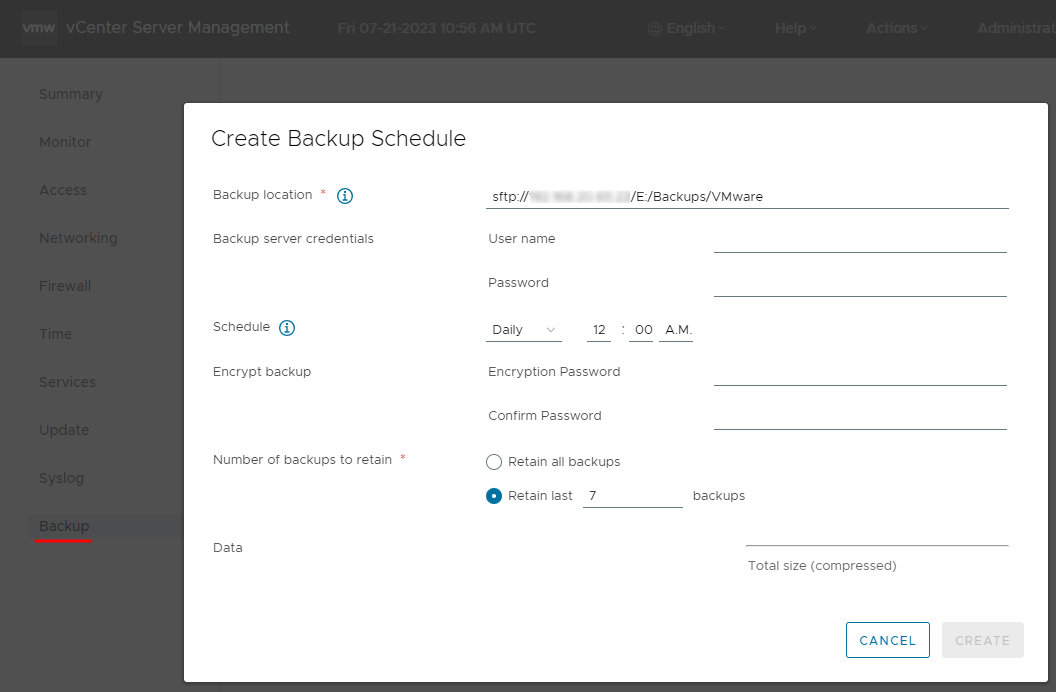
VCSA Scheduled Backup
Visit the web interface for VCSA via https://xxx.xxx.xxx.xxx:5480/ and log in using the root credentials.
Click the “Backup” menu option and configure a new schedule.
Supported protocols include: FTPS, HTTPS, SFTP, FTP, NFS, SMB and HTTP.
How to configure a Windows Server for SFTP - Get started with OpenSSH for Windows
vSphere Configuration
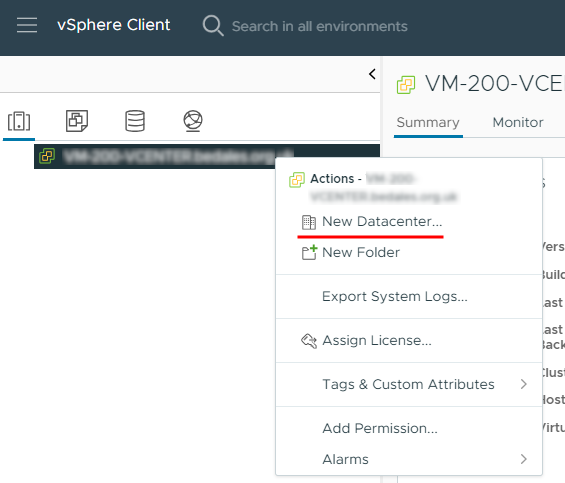
Create a Datacenter and Cluster
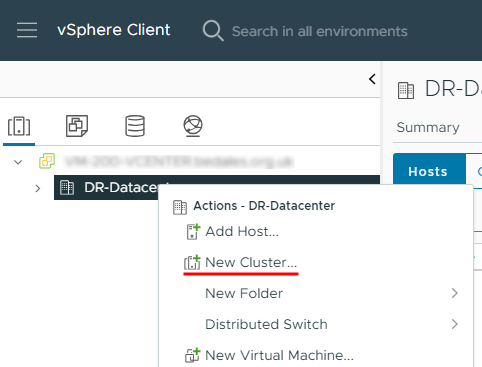
Lets start by creating a new datacenter, right clicking the vCenter Server Appliance (VCSA) select “New Datacenter”.
Then give it a name or stay with the default of “Datacenter”.
Then right click the datacenter and create a “New Cluster”.
Provide a name for this cluster and set whether you want to enable DRS, HA, vSAN.
Please bare in mind that some of these features are enterprise edition license only, such as DRS.
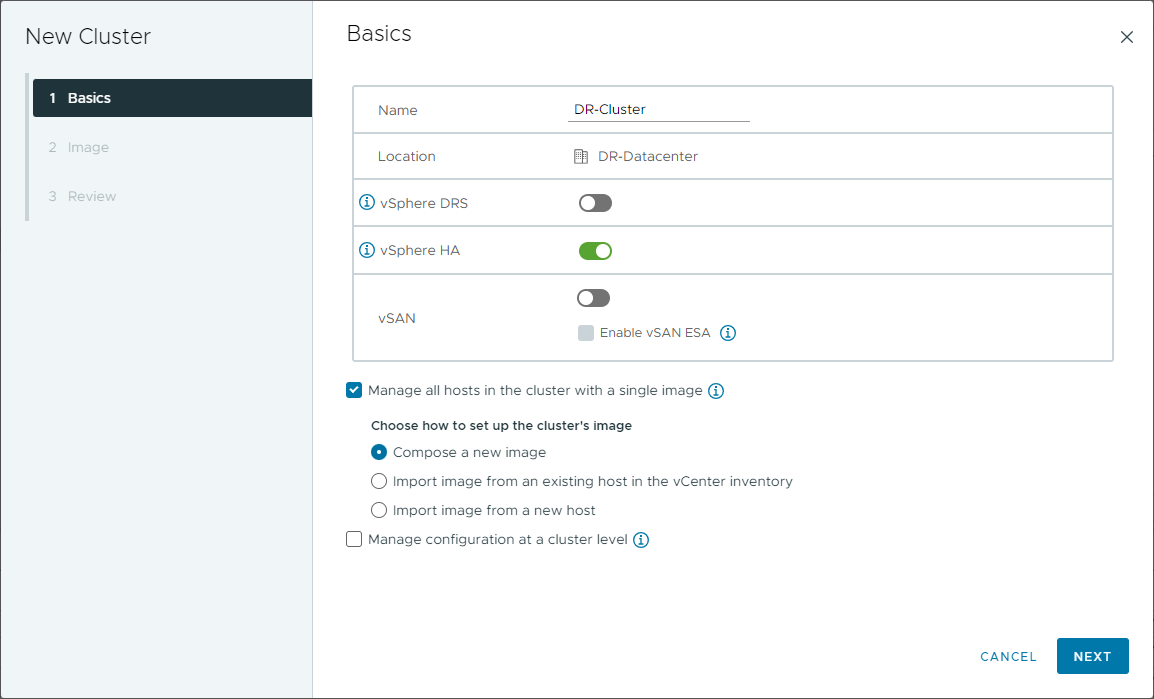
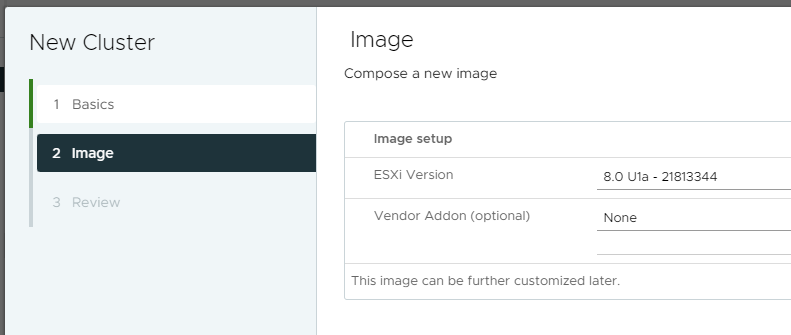
Now set the ESXi version you want to use for your image.
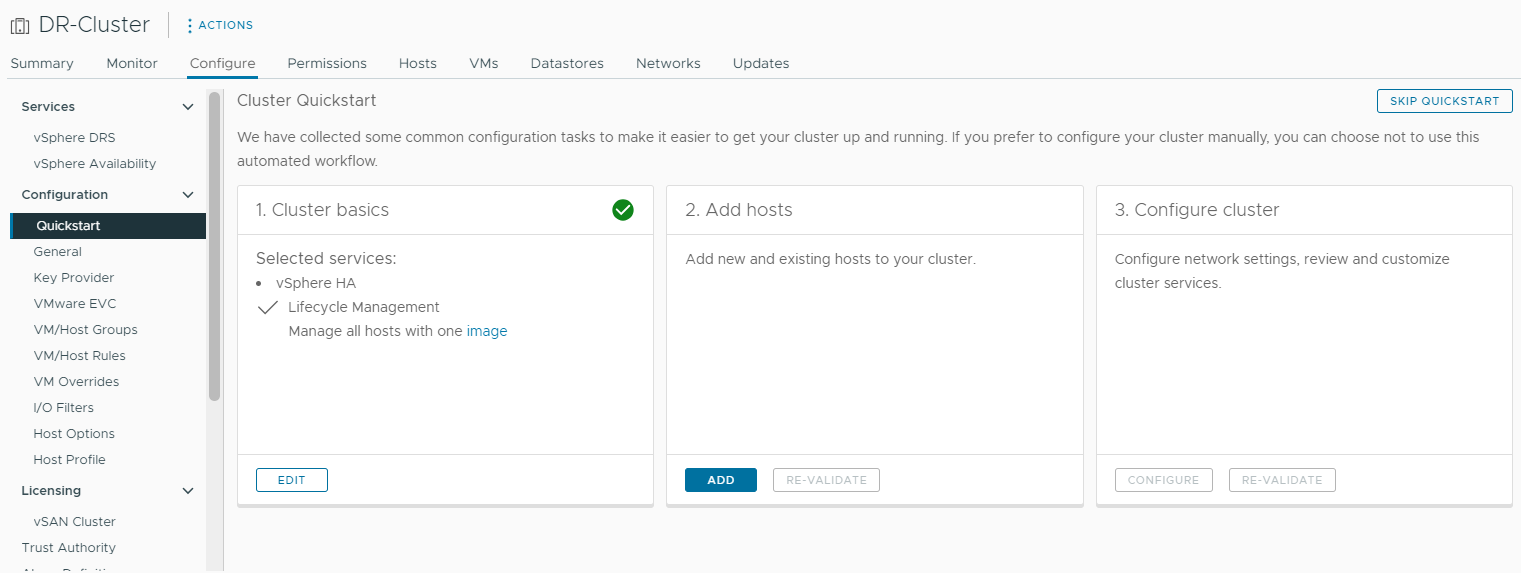
Once the cluster has been created, we can now add hosts to it.
Add other ESXi hosts
Using the Quickstart section, after the cluster has been created, we can move onto step 2 adding hosts.
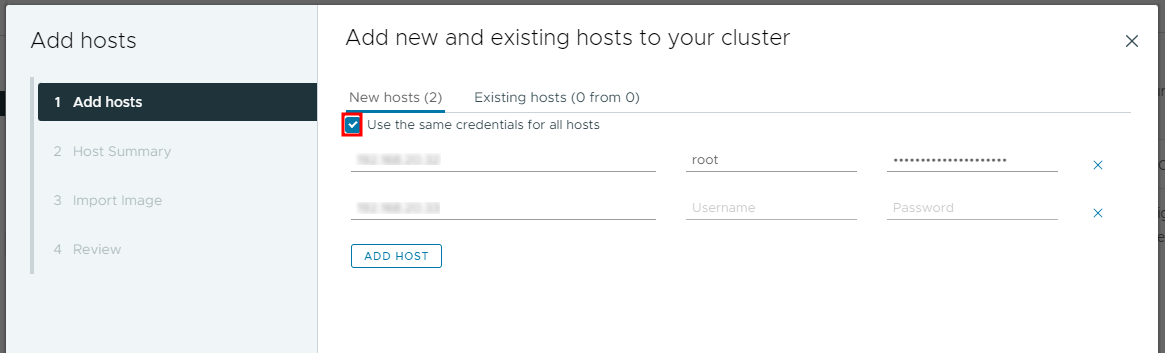
Click the “Add” button to start the wizard.
Populate the fields with your other ESXi hosts, I can use the same credentials for all hosts as I have set them up identical to one another.
As the other hosts are using self-assigned certificates I have to accept them manually.
Edit: I forgot to add my first ESXi host, which was hosting the VCSA. I added this after the fact.
I will not import an image from these hosts.

The final review also mentions about the hosts being placed into maintenance mode before they are moved into the cluster.
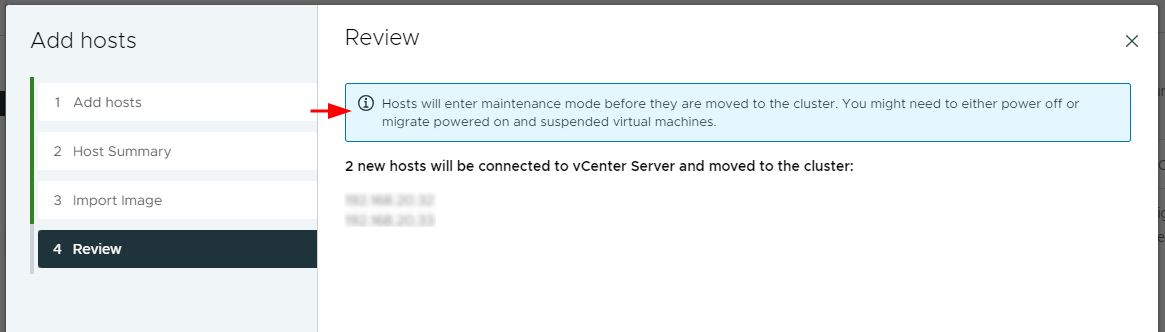
A new VM will be created called “vCLS”, this was introduced in vSphere 7 and is for the vSphere Clustering Service.
With the ESXi hosts in maintenance mode, we can now continue onto Step 3 within the Quickstart, configuring the cluster.
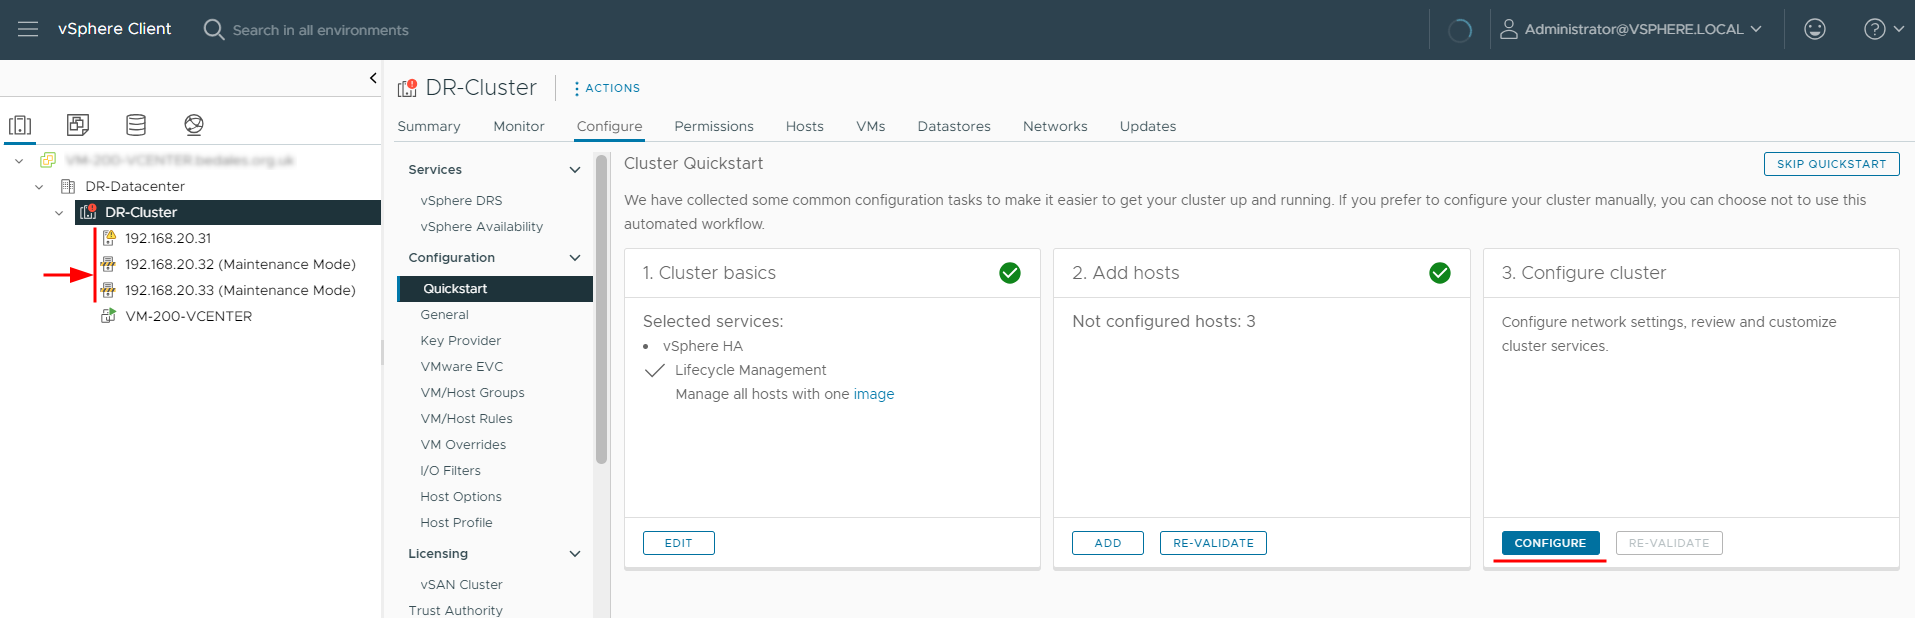
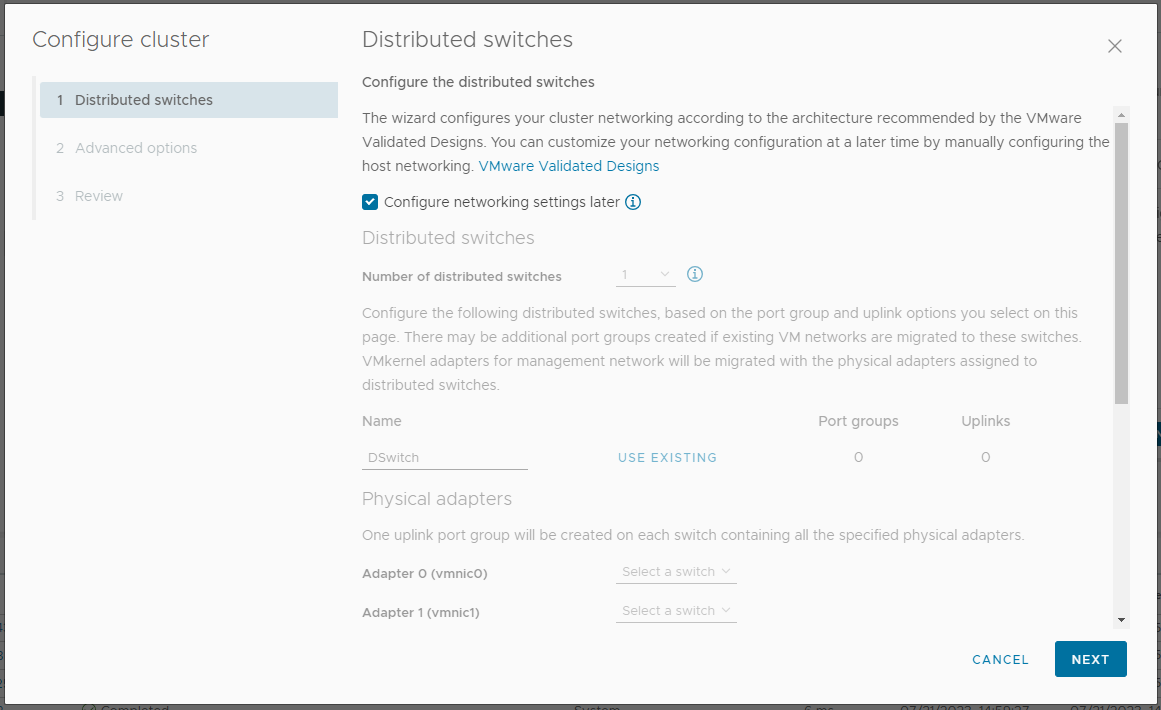
As I do not have a real enterprise license I will not be using distributed switches, therefore I will configure networking later.
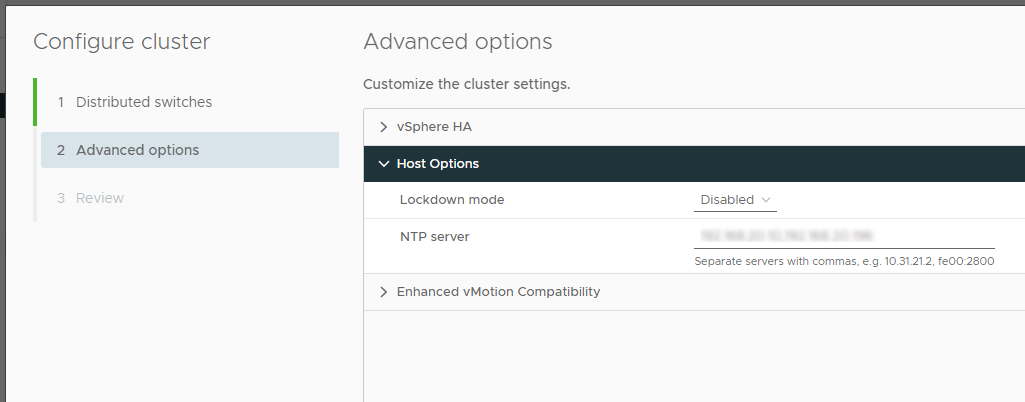
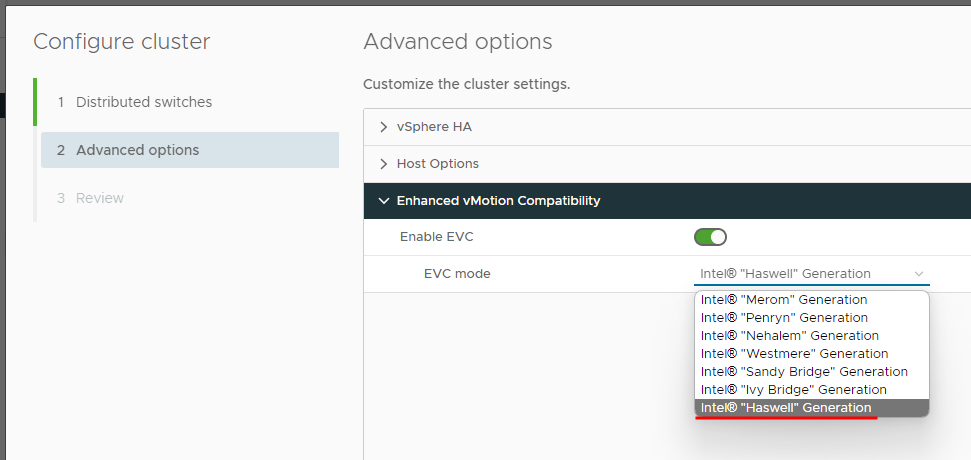
Within the advanced options there are a few options; vSphere HA, Host Options and Enhanced vMotion Compatibility.
In vSphere HA I have enabled Virtual Machine monitoring.
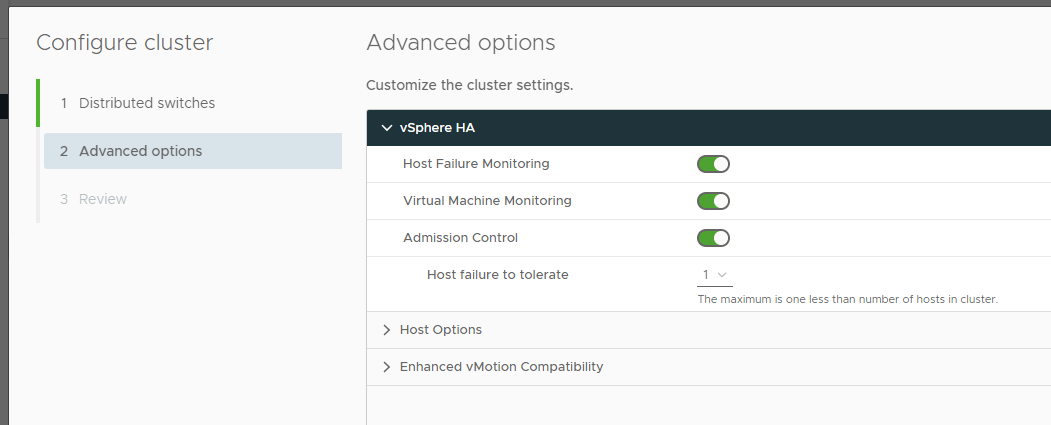
In host options I have provided a list of NTP servers for the cluster to use.
And lastly I have enabled enhanced vMotion compatibility (EVC) for my server’s CPU generation.
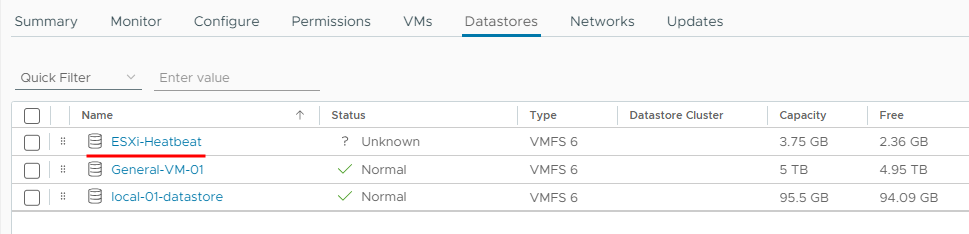
The minimum number of ESXi heartbeat data stores is 2, therefore I needed to create another volume on the Nimble to act as a dummy data store.
Later I will not require this extra data store as I will implement Veeam replicas, with its own data store.
At this point we have a fully working VMware vSphere cluster.
Migrating from another vSphere
There are three ways to migrate, either:
- Both vCenter servers must be in the same SSO domain.
- Standard license feature
Advanced Cross vCenter vMotion
- Introduced with vSphere 7 Update 1c release
- Enterprise Plus license feature
Or lastly the manual approach, which I will be performing due to license restrictions.
The Manual Approach
Add the new storage to the old vSphere
- Configure Storage networking if required
- Configure iSCSI interface
- Attach iSCSI block storage
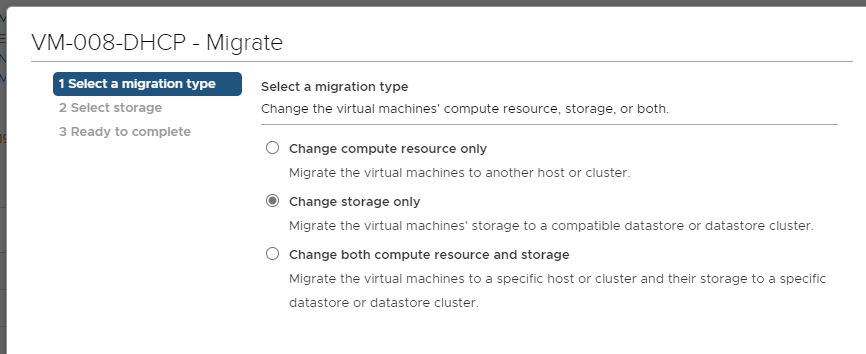
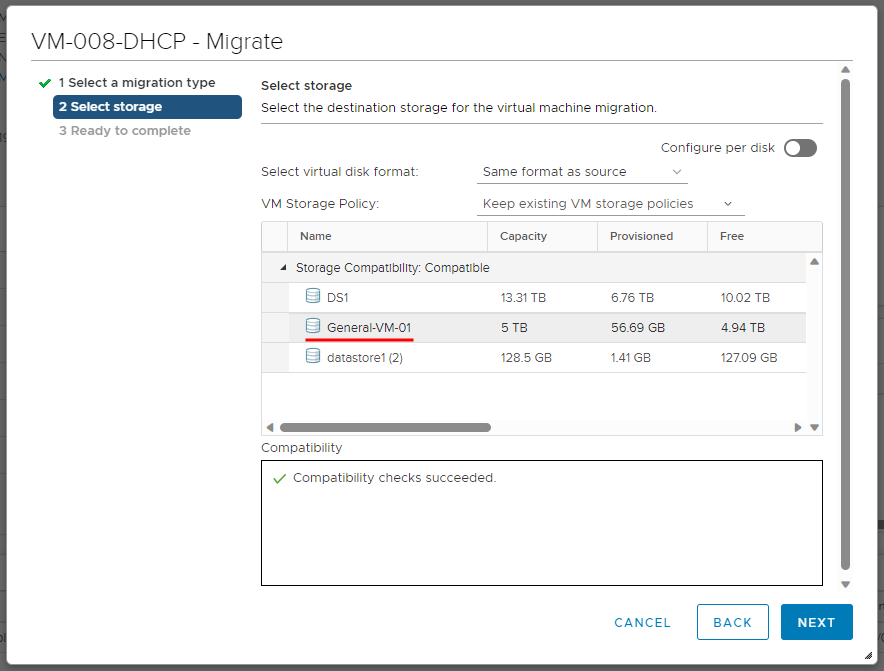
Stop the VMs and Migrate the VM storage per VM
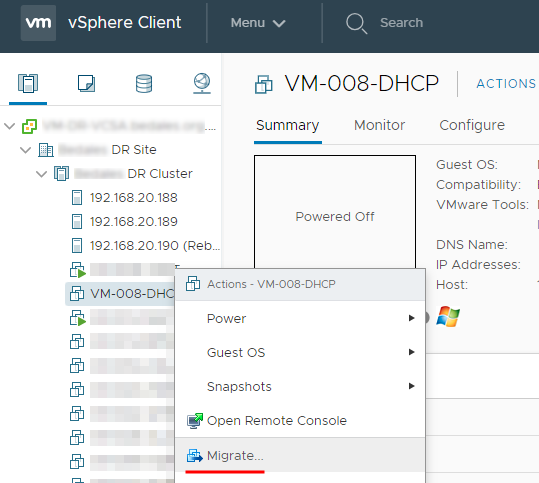
We only need to migrate the storage only.
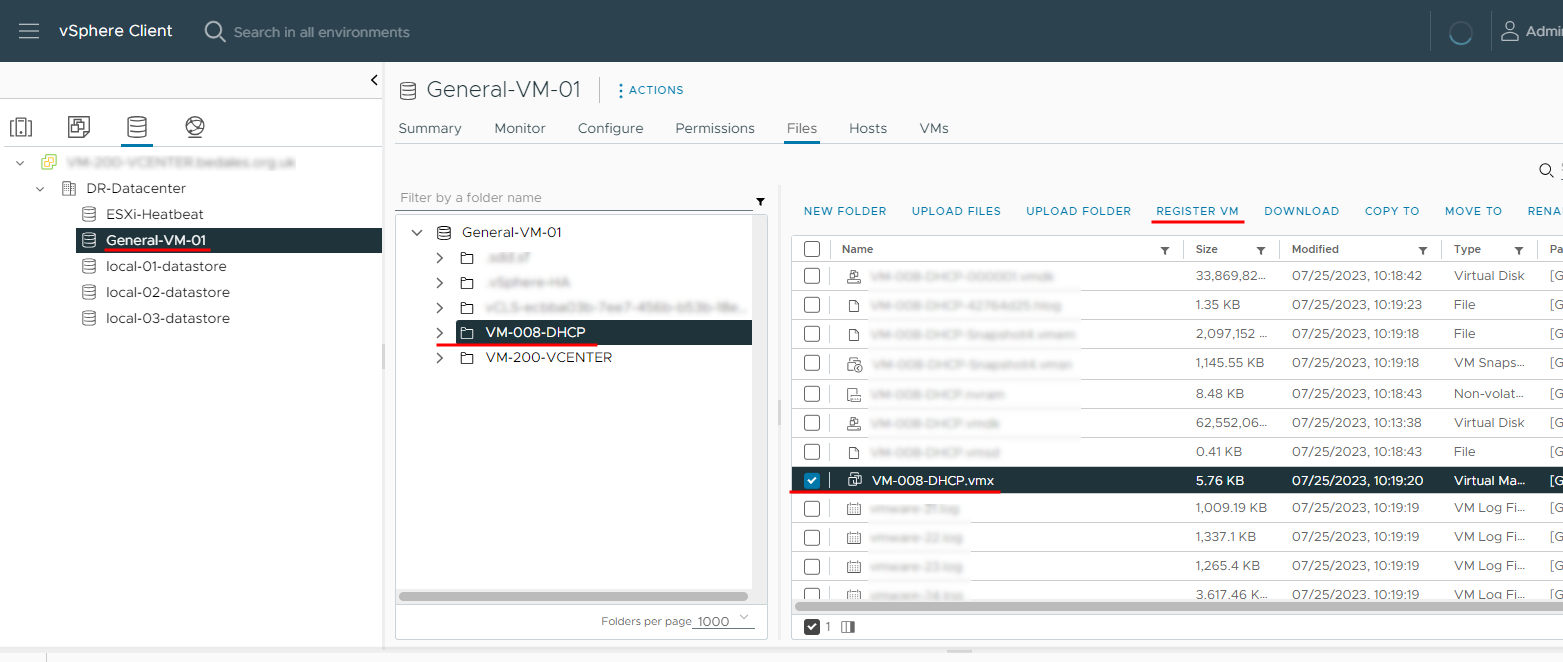
Move the VM files to the new storage
Register the new VM using the migrated storage
Select the new datacenter and keep the existing VM name.
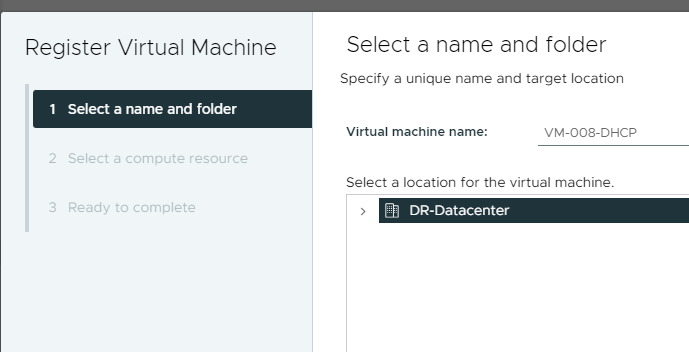
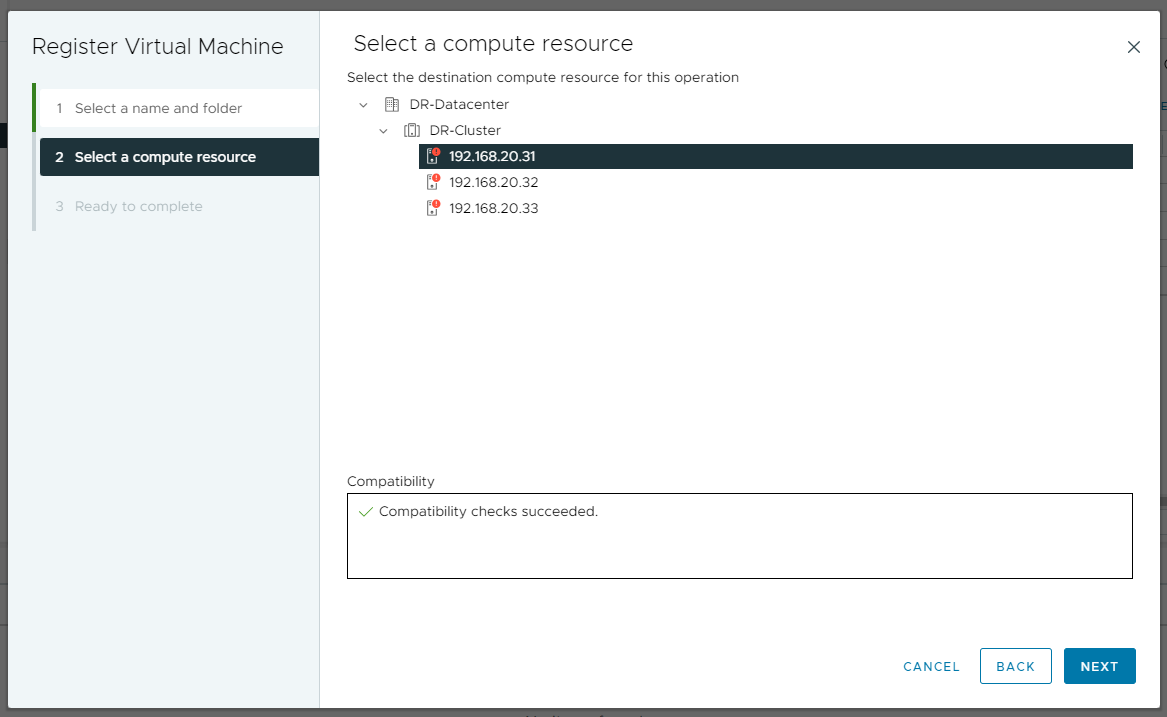
Select an appropriate ESXi host for the new compute resource.
Note: in the screenshot my ESXi hosts are complaining about only running on a single PSU, this is only a temporary measure.
Review the VM, then start and verify everything is working and then consider removing VM from the old vSphere environment.
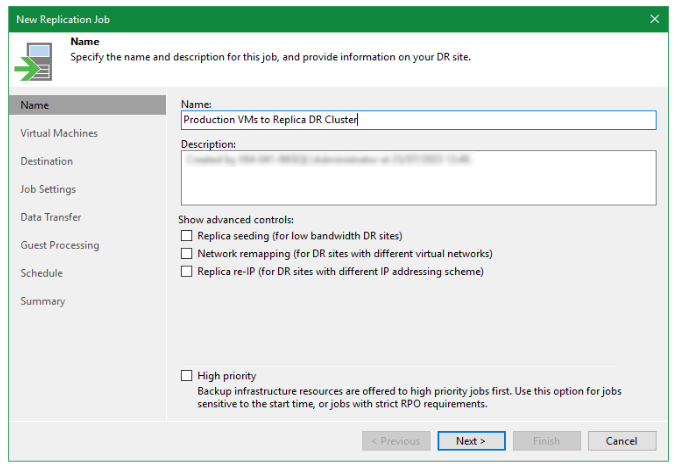
Veeam Replication
As we also run Veeam replication to the DR vSphere cluster, I need to ensure this job has been updated with the new vSphere cluster.
I have already created another block storage and presented it to the vSphere environment.
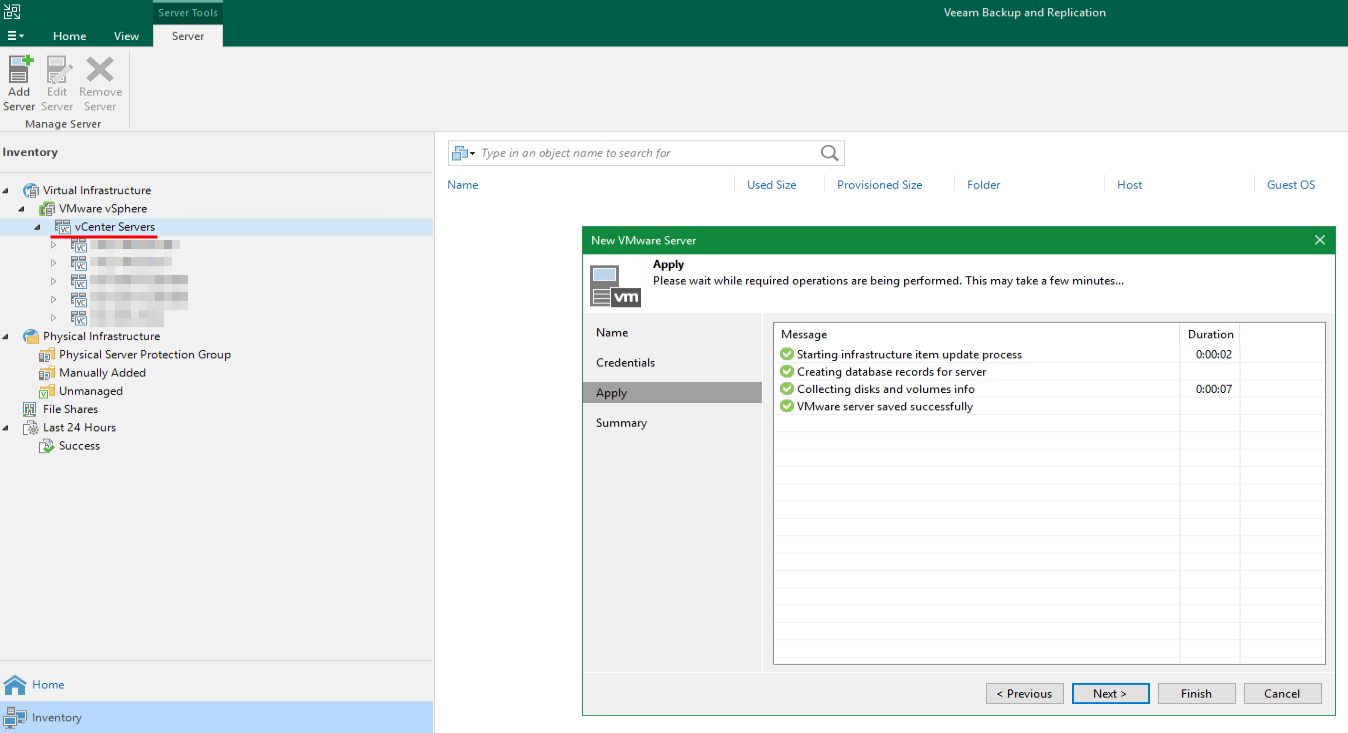
First step is to add the vCenter Server, this can be completed via the “Inventory” tab, under “Virtual Infrastructure” > “VMware vSphere” and “vCenter Servers”. Right click and “Add Server”, progress through the wizard until completion.
Disable the existing job and create a new Replication job.
Add the virtual machines you wish to replicate.
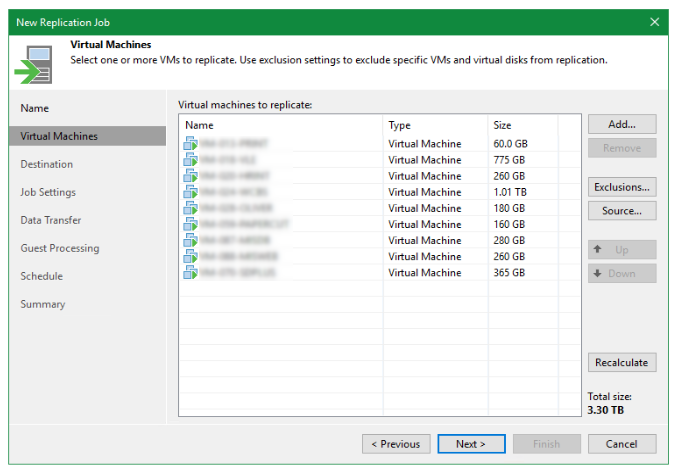
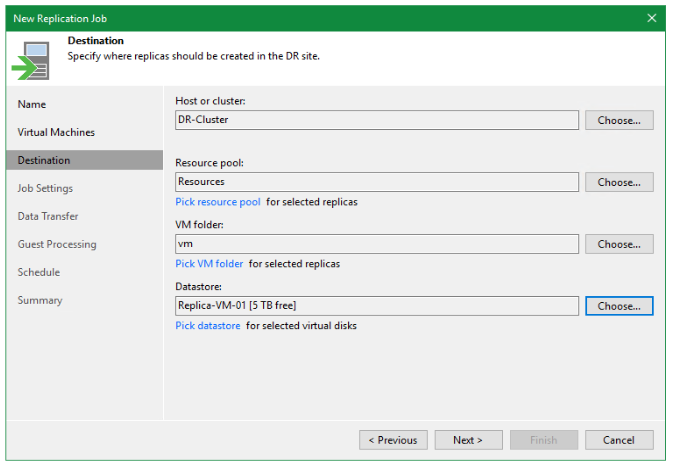
Next select the new vSphere cluster, resource pool, VM folder and datastore.
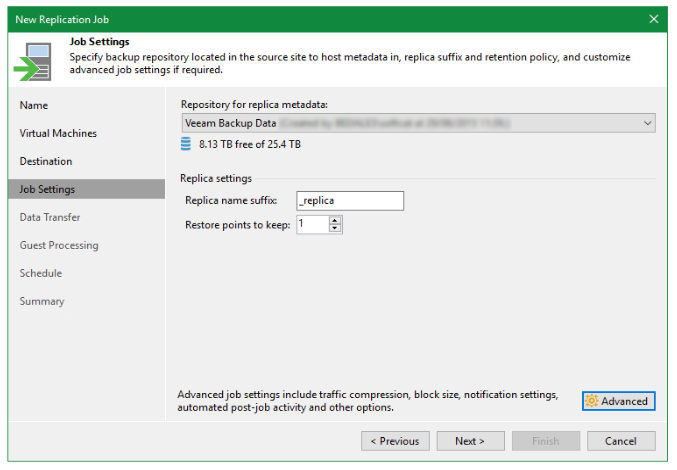
Select the repository replica metadata, and I have changed the restore points down to 1.
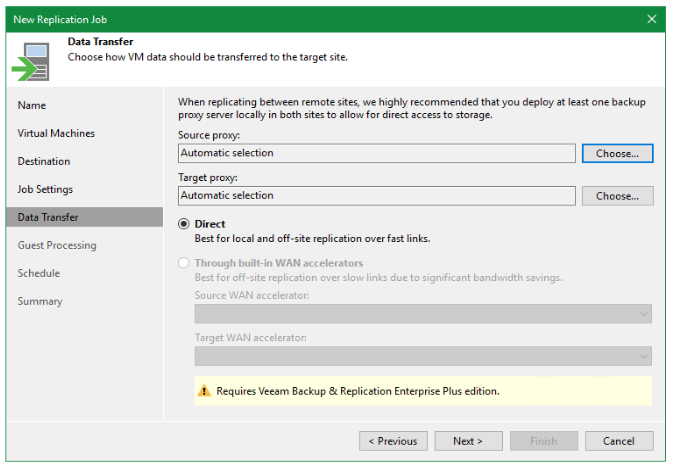
I have selected a direct transfer, using automatic proxy selection for both the source and target.
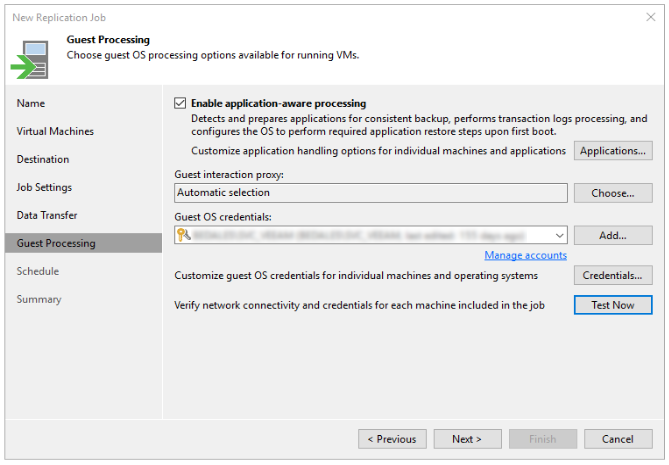
To enable application-aware processing we need to provide valid credentials to access the selected virtual machines.
I followed this up with a “Test Now” to verify the success.
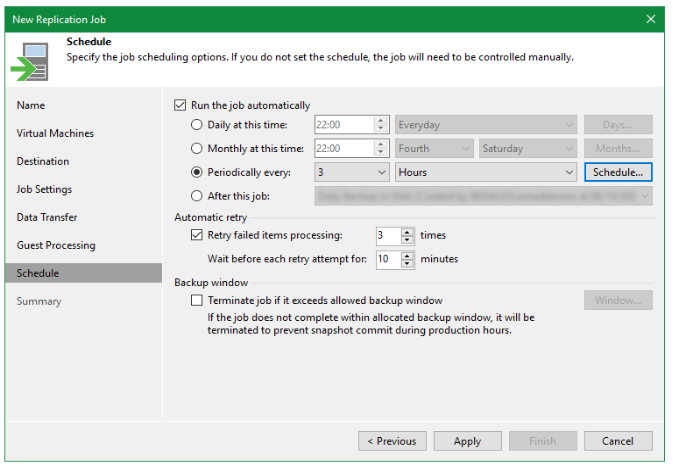
Lastly I configured the schedule, which will occur every 3 hours, Monday-Friday and retry upon failure.
Everything that I set out to achieve was completed, and therefore is the end of this article. I hope this helps someone, somehow.