Veeam Backup, Office 365 and ONE
16 Jan 2022
In this article I discover Veeam Backup & Replication Community Edition, Veeam Microsoft Office 365 and Veeam ONE, what they can offer including licensed features. This article provides a full walk through of how they can be installed on top of Proxmox VE using Microsoft Server 2022.
Contents
- Introduction to Veeam Backup and Replication Community Edition
- Installation
- Getting started with Veeam Backup and Replication
- Backup Repositories
- Adding Storage and Tape Infrastructure
- Protection Group
- Virtual Infrastructure
- Managed Servers
- Backup and Restore
- NAS Backup and Restore
- Restoring Active Directory Objects
- Microsoft Exchange and SharePoint
- Microsoft SQL and Oracle
- History
- Throttling Traffic and Rules
- Configuration Backup Settings
- IO Control
- Enable Email Notifications
- DataLabs - Virtual Lab
- Staged Restore
- Storage Snapshots
- Veeam Backup Enterprise Manager
- Microsoft Office 365
- Veeam ONE
Introduction to Veeam Backup and Replication Community Edition
Veeam Backup & Replication Community Edition, hence forth known as Veeam provides a free option for up to 10 workloads or 500 GB of unstructured NAS data, this provides administrators with an industry-leading backup solution for virtual, physical and cloud infrastructure.
Veeam allows administrators to leverage granular item-level recovery, the ability to create replicated workloads and verify backups are free of malware before restoration, secure restore does require a CLI compatible antivirus be installed, some examples include:
Veeam Training Resources
Veeam provide Free On-Demand Training and the Veeam helpcenter is an excellent resource for any exploration and troubleshooting.
System Requirements
Further information can be found on the release notes.
Hardware
- CPU: x86-64 processor (minimum 4 cores recommended).
- Memory: 4 GB RAM plus 500 MB RAM for each concurrent job.
- Disk Space:
- 5 GB for product installation
- 4.5 GB for Microsoft .NET Framework 4.7.2 installation.
- 10 GB per 100 VM for guest file system catalog folder (persistent data).
- Additional free disk space for Instant VM Recovery (IVMR)
- Cache folder (non-persistent data, at least 100 GB recommended).
- Network: 1 Gbps or faster for on-site backup and replication, and 1 Mbps or faster for off-site backup and replication. High latency and reasonably unstable WAN links are supported.
OS
Only 64-bit versions of the following operating systems are supported:
- Microsoft Windows Server 2012, 2012 R2, 2016, 2019
- Microsoft Windows Server 2008 R2 SP1
Visit the Microsoft Evaluation Center to download 180 day trial versions of MS Server.
Software
- Microsoft SQL Server 2008 to 2019 (2016 SP1 Express is included)
- Microsoft .NET Framework 4.7.2 (included in the setup)
- Windows Installer 4.5 (included in the setup)
- Microsoft Windows PowerShell 5.1 (included in the setup)
- Firefox, Google Chrome, Microsoft Edge, or Microsoft Internet Explorer 11.0 or later
Installation
Create the Virtual Machine
First download the evaluation copy of Microsoft Server 2022 and upload it to the Proxmox ISO Images repository

Now we can start the Virtual Machine (VM) creation wizard and follow through the steps.
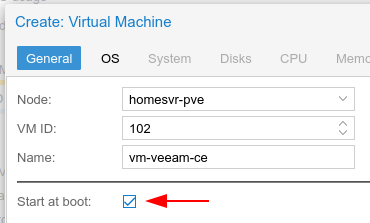
Provide a name for the new VM, I will be calling mine VM-VEEAM-CE and enable Start at boot, which is available when ‘Advanced’ is checked.
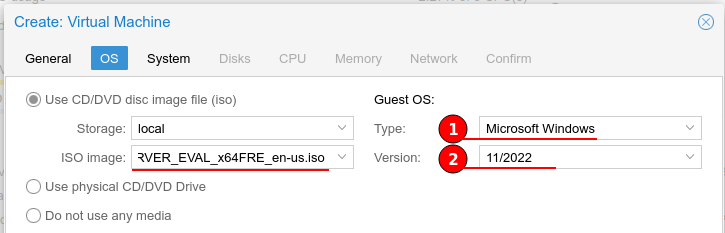
Next supply the downloaded Microsoft Server 2022 ISO image that we uploaded and change the Guest OS type to Windows version 11/2022.
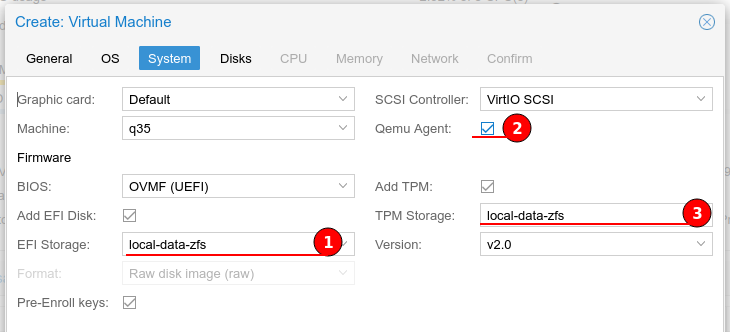
Proxmox will provide some default values and suggestions, on the system tab I will enable Qemu Agent, which I will installed after the OS installation has completed.
I have also set a EFI and TPM storage location.
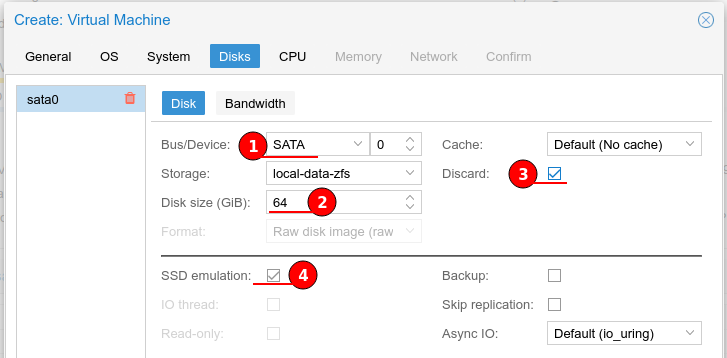
Under Disks I will be setting SATA, increasing the disk of the OS disk to 64 GB, enabling Discard and SSD emulation.
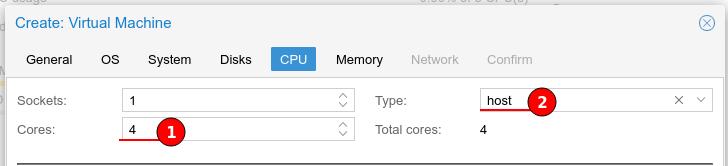
As per the system requirements I will increase the CPU cores to 4 and change the type to use the host, this will provide Windows with the real host CPU information.
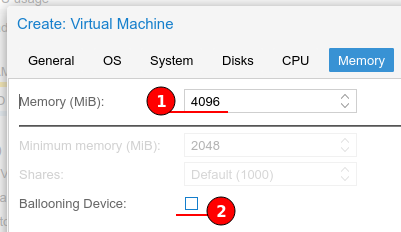
Again as per system requirements I will give the VM 4 GB of RAM and disable ballooning until the Virt drivers are installed as this will dramatically reduce performance if we enable it beforehand.
The network tab can be left on default values.

Server 2019 Installation
Open the console then start the VM, press any key to start the installation process.
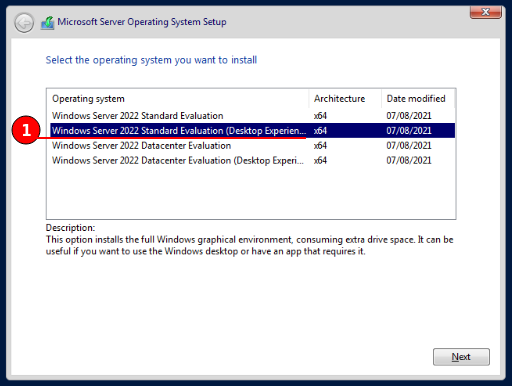
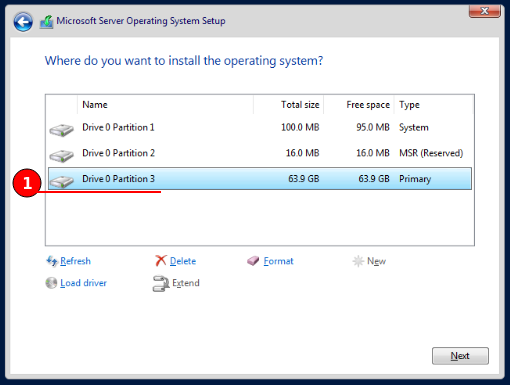
Step through the OS installation wizard, I will be installing the Windows Server 2022 Standard Evaluation (Desktop Experience).
In the below screenshot, the 64 GB hard disk has been formatted and the Primary disk is selected for installation.
Windows does not natively support VirtIO therefore there will be issues with networking, block storage, QXL graphics, and memory ballooning. You can download the Latest VirtIO Drivers ISO from the link provided. Use the Load driver button to add all the required drivers.
Either way make sure to download the VirtIO drivers ISO and upload it to the Proxmox ISO images.
Server 2019 has been installed.
Now swap the CD/DVD image to the downloaded VirtIO drivers ISO file.
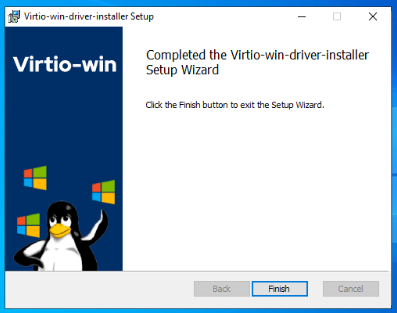
If you did not add the VirtIO drivers during installation you can navigate to the mounted ISO file and install via the Virtio-win-driver-installer Setup.
We’ll also need to install the Virtio-win-guest-tools, which can be found on the mounted ISO.
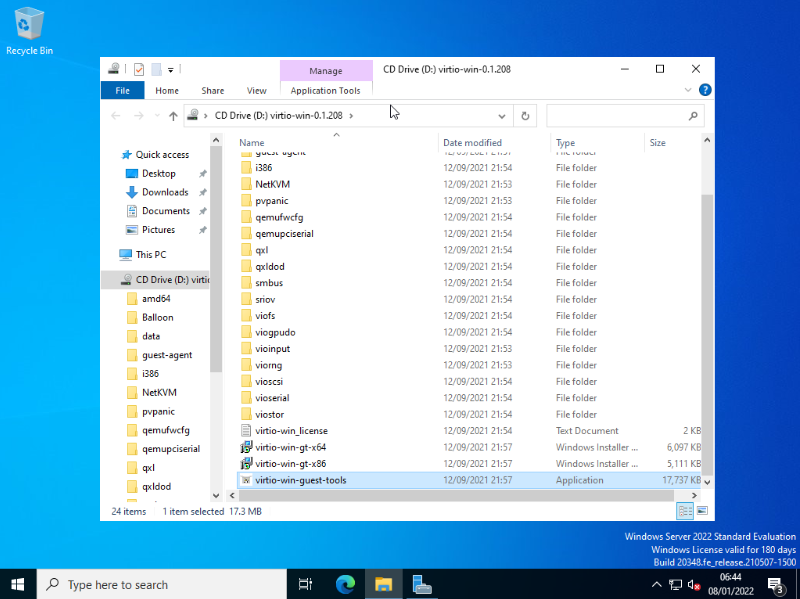
I have kept with the default values for the VirtIO-win installation.
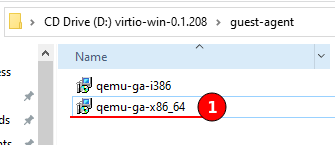
Now install the “guest-agent”, this will enable the Qemu Agent.
This is also a good point in time to make sure that the Server has all available updates and security patches. We can also change the host name of the server and set a static IP address if
If you haven’t already downloaded the ISO you can grab it from Veeam’s website.
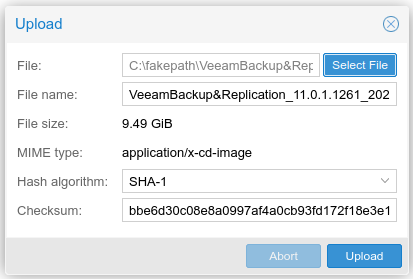
Now restart the Virtual machine and mount our Veeam Community Edition ISO on the CD/DVD, or download and mount the ISO from within Microsoft Server.
Veeam Installation
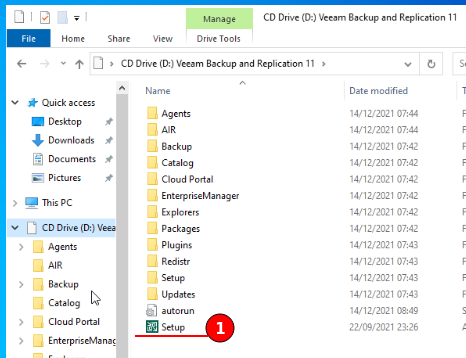
With the Veeam Backup and Replication ISO mounted, run the Setup file and step through the installation wizard.
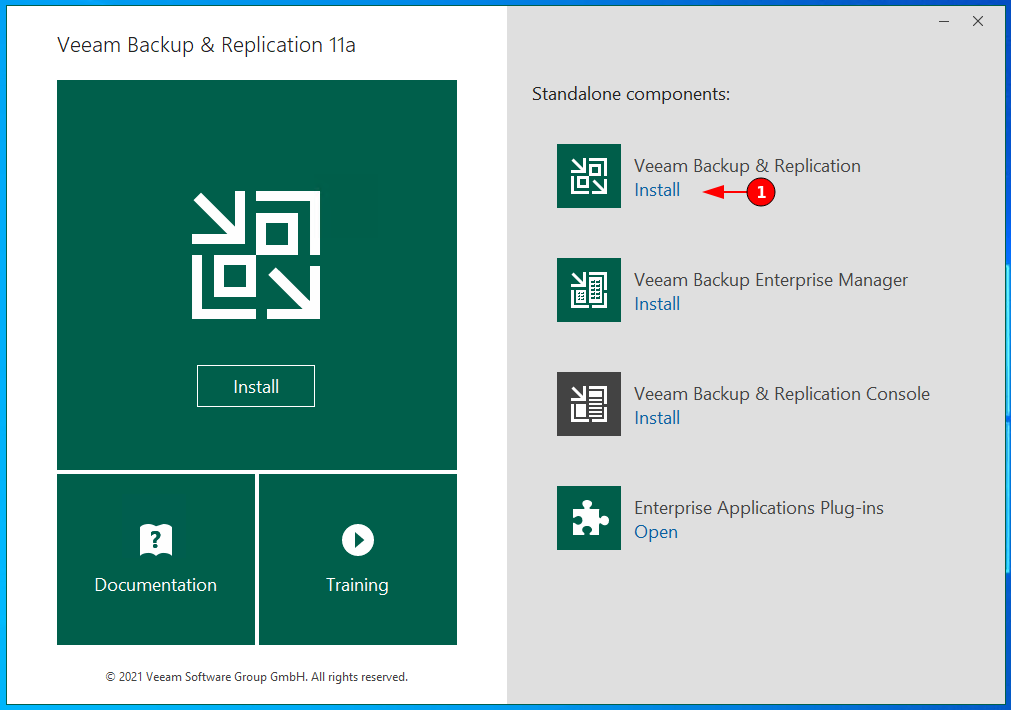
Proceed with the Veeam Backup & Replication by clicking the Install button.
“OK” the installation of Microsoft Visual C++ 2015-2019 Redistributable.
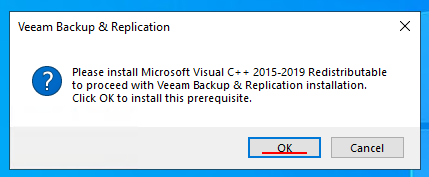
Give it a moment to install the required packages.
Then agree to the terms of the license agreement and 3rd party components license agreements and continue.
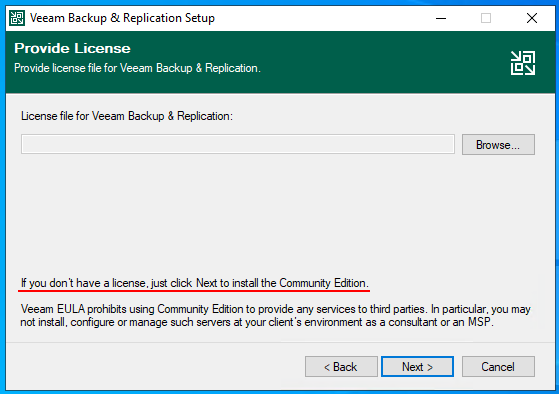
A license can be provided during installation but we are using the Community Edition therefore we can continue.
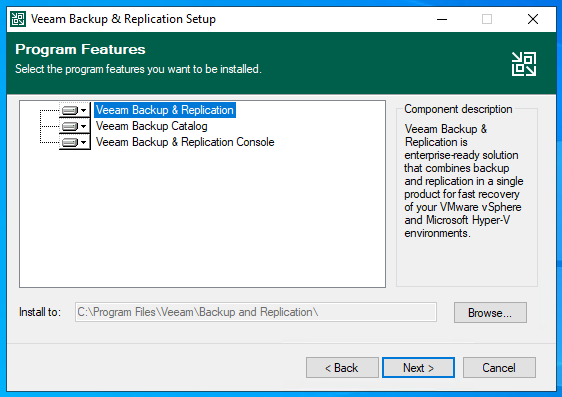
The default program features of Backup & Replication, Catalog and Console are perfectly fine and we’ll be continuing with these.
- Backup & Replication - The Veeam server.
- Backup Catalog - Consolidates index files from file system indexing, that can be shared with Veeam Enterprise Manager.
- Backup & Replication Console - Windows based console used to configure Veeam.
The installation path will contain the Veeam log files, which can grow quite large and its recommended that the media type is fast, such as a SSD.
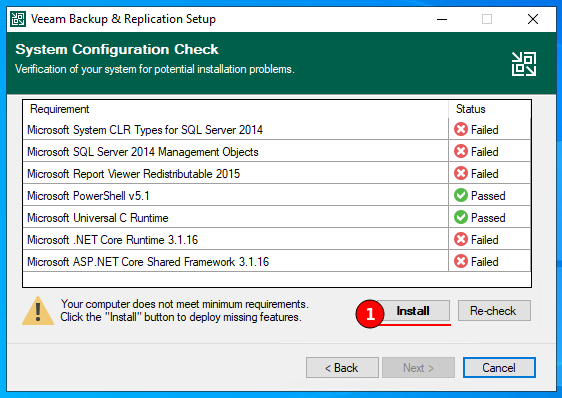
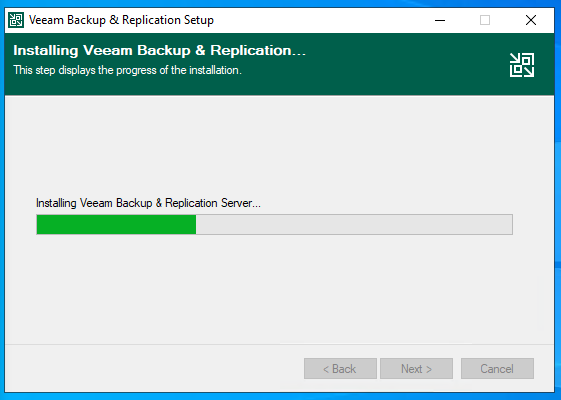
A system configuration check will run and any failed requirements can be enabled using the Install button.
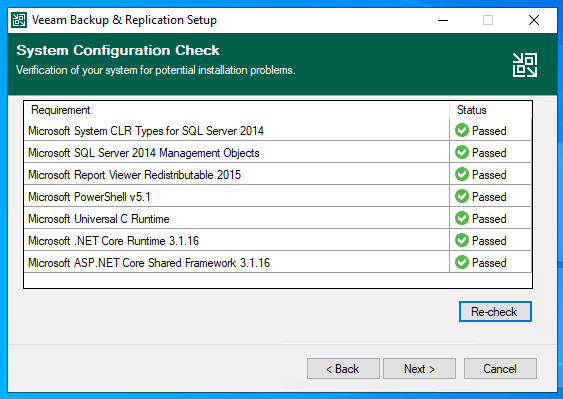
After the install process our configuration check should return all passed.
If you have any failed elements, then troubleshoot and re-check once installed.
Finally the default configuration parameters, If you want to specify different default settings, check the box and you will have prompts for custom settings over the next few steps.
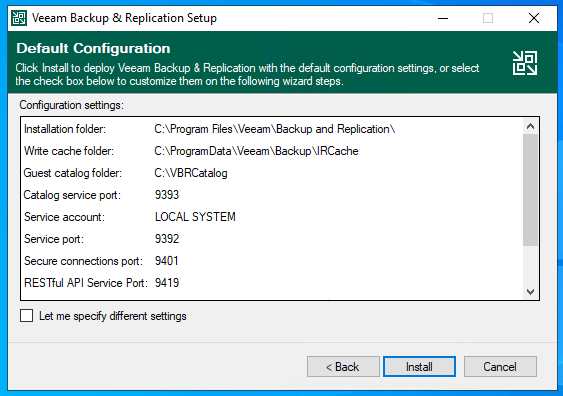
Default Configuration Settings:
- Installation folder: C:\Program Files\Veeam\Backup and Replication\
- Write cache folder: C:\ProgramData\Veeam\Backup\IRCache
- Guest catalog folder: C:\VBRCatalog
- Catalog Service Port: 9393
- Service Account: LOCAL SYSTEM
- Service Port: 9392
- Secure connections port: 9401
- RESTful API Service Port: 9419
- SQL Server: {ServerHostname}\VEEAMSQL2016
- Database name: VeeamBackup
- Check for updates: Once the product is installed and periodically
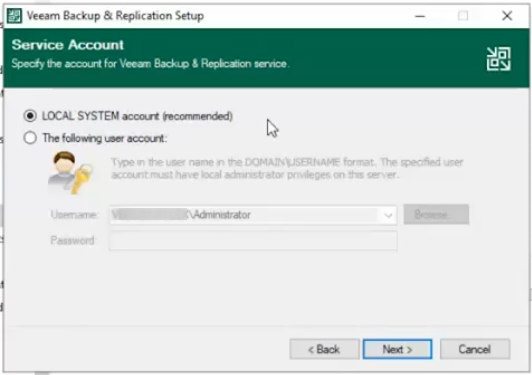
Service account is recommended to leave as the LOCAL SYSTEM.
Veeam does not require deployment within an Active Directory domain, its recommended that Veeam is deployed away from the production domain, either in a workgroup or in a management domain.
SQL Server Instance is used to host the Veeam Backup & Replication database, its a Microsoft SQL instance and can be installed locally, on another server or other technologies.
If MS SQL is not installed, Veeam will download Microsoft SQL Express and consideration needs to be given as there are limitations of MS SQL Express.
- 10 GB max database size
- First 4 cores of the first CPU socket
- 1 GB max memory usable
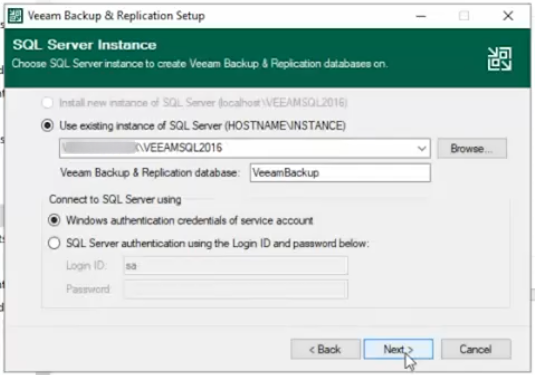
In this demonstration I will be keeping the default values and proceeding with the installation.
Once installation has completed you can unmount the ISO
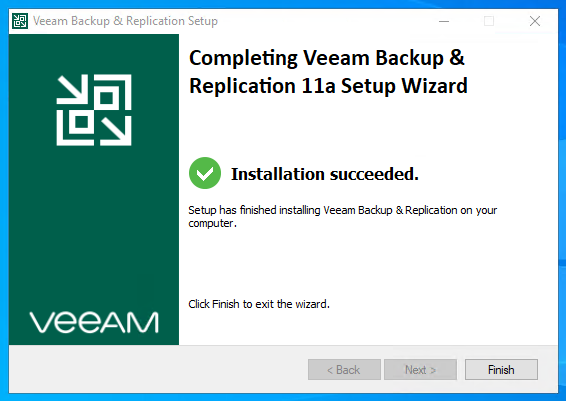
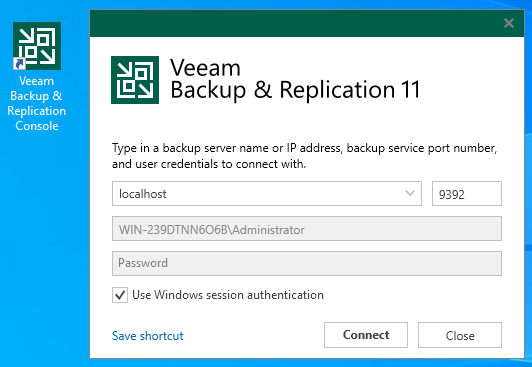
Because we installed the console in our demonstration we can open it using the desktop shortcut provided.
Getting started with Veeam Backup and Replication
There are two types of backup with Veeam CE, the first is an ad-hoc backup operation called VeeamZIP and the other is a scheduled backup job.
Use of a Veeam Agent may be required for physical machines, depending on the operating system. To protect physical machines and centrally manage and deploy agents a protection group will be required. If you wish to backup VMware or Hyper-V environments then they will need to be added to Veeam.
Lastly you need to decide where you want to store your backups. By default, during installation of Community Edition, Veeam creates a backup repository on the backup server itself. Veeam supports Directly Attached Storage (DAS) and Network Attached Storage (NAS).
From a security aspect, consider using a backup repository that is immutable, this means a solution that prevents data deletion or modification from the storage. This is achievable within Community Edition by using the Hardened Linux Repository.
How Veeam Creates Backups
On the first run of a job Veeam will create a full backup (VBK), then each subsequent run will be an incremental backup (VIB).
Veeam utilises Change Block Tracking (CBT) to perform incremental backups, this scans for changed blocks since the last backup session.
Veeam has two different full backups, the first is an active full backup. This backup retrieves the full data from source, compresses and de-duplicates it and stores is as full backup. The second method is called Synthetic full, which uses the existing backup chain (full + incremental) and consolidates the data into a new full backup.
Other terms are required to understand how Veeam performs backups these are:
Forever Forward Incremental
This method produces a backup chain that consists of the first full backup file and then a set of incremental backup files.
Forward Incremental
This method will require administrators to create an active full or synthetic full periodically. This gives the backup chain potential to contain multiple full backup files. This is the key differentiator between the forever forward incremental and forward incremental methods.
Reverse Incremental Backup (slower)
This backup chain consists of the last full backup file and a set of reverse incremental backup files preceding it. As a result, the most recent restore point in the backup chain is always a full backup and gets updated after every successful backup job session.
Backup Repositories
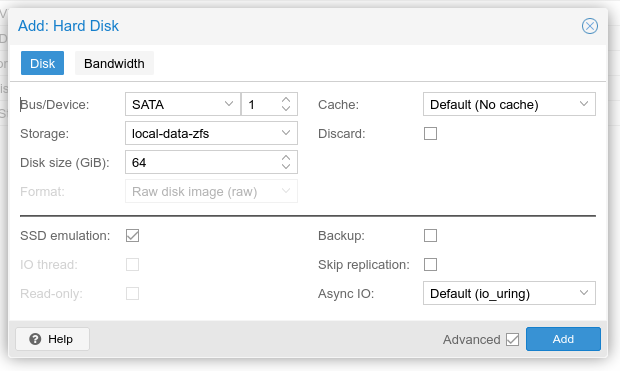
A repository is where our data lives. For this demonstration I will be adding an additional Hard Disk.
The screenshot below shows a small extra disk, by adding this additional disk, the Veeam CE VM will need to be restarted.
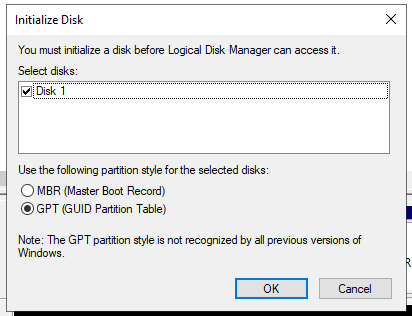
Now go to Computer Management in Microsoft Server and initialise the new disk
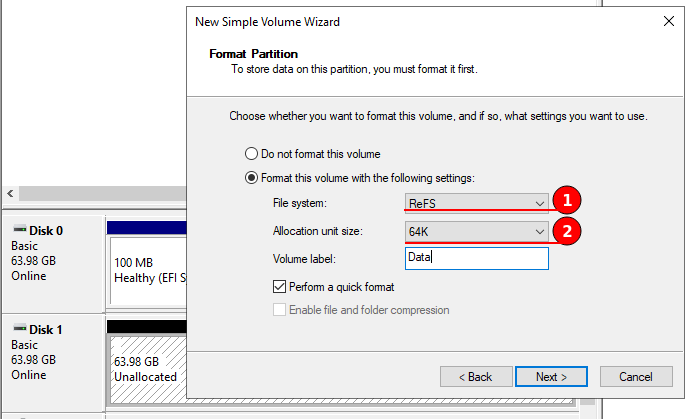
Then format and create a simple volume, I have labelled my disk “Data” and am using the ReFS file system with 64K allocation unit size, this is recommended by Veeam for Fast Cloning.
Now we have a small space in which we can experiment with Veeam and schedule backup jobs.
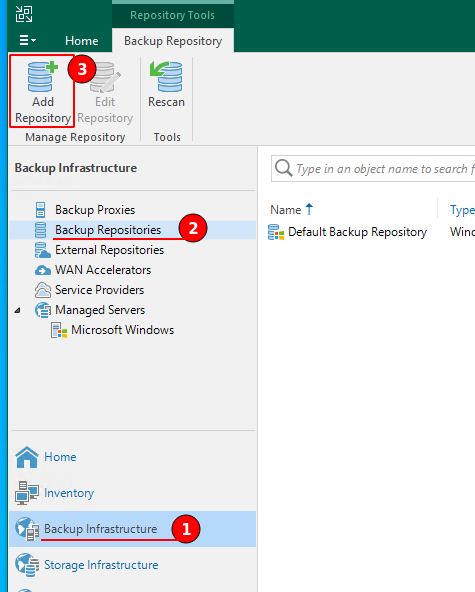
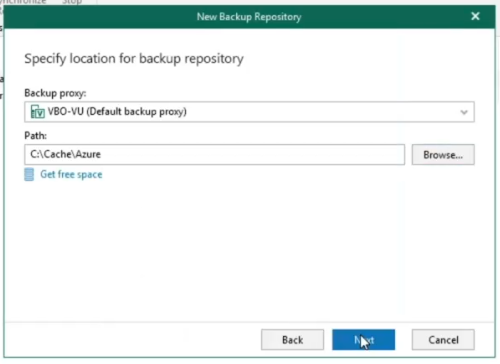
To add this disk as a Veeam Backup Repository, first navigate to Backup Infrastructure > Backup Repositories and select Add Repository.
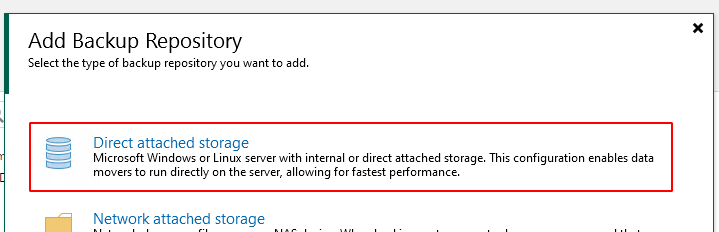
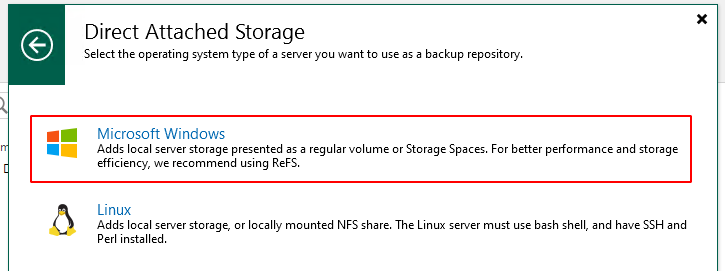
As this additional disk is a directly attached disk, select the option “Direct attached storage” then “Microsoft Windows”.
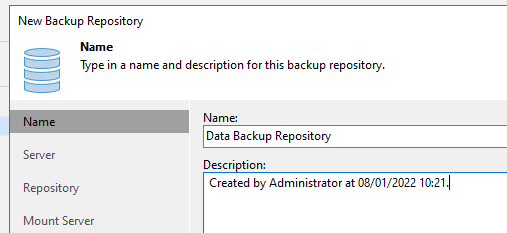
Now step through the New Backup Repository wizard, start by providing a name for the backup repository.
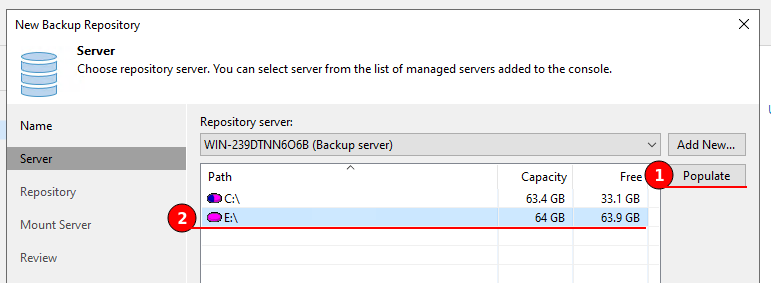
Select the “Populate” button to scan the local server for the available volumes. Then select the newly created volume.
Continuing with the wizard will show the next window where we can click the “Populate” button again to fill the capacity and free space fields.
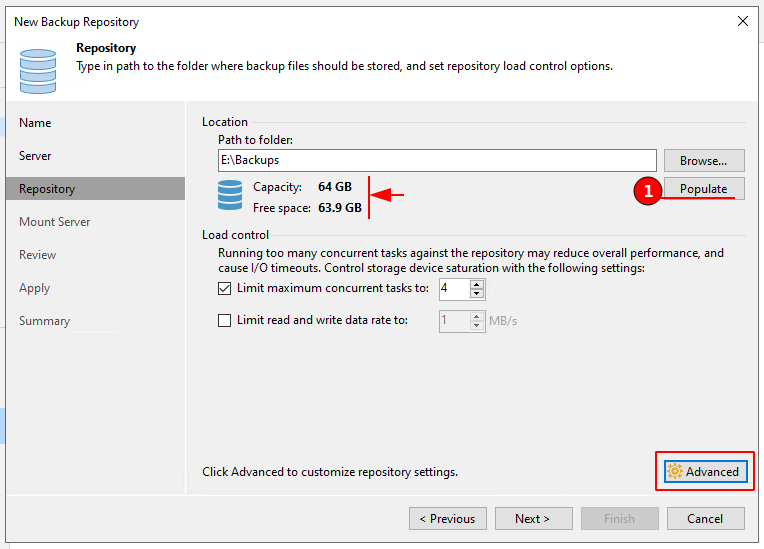
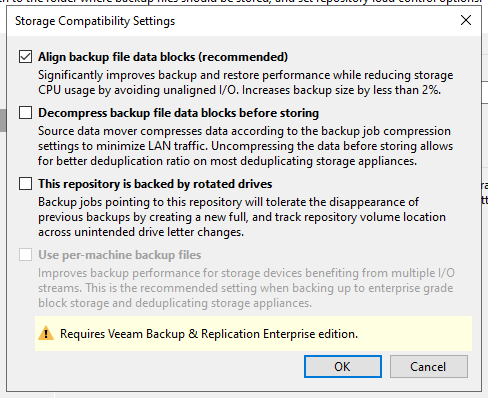
Its also worth clicking the “Advanced” button to view other storage options available to us such as:
- Align backup file data blocks (recommended)
- Decompress backup file data blocks before storing
- This repository is backed by rotated drives
- Use per-machine backup files (Enterprise edition required)
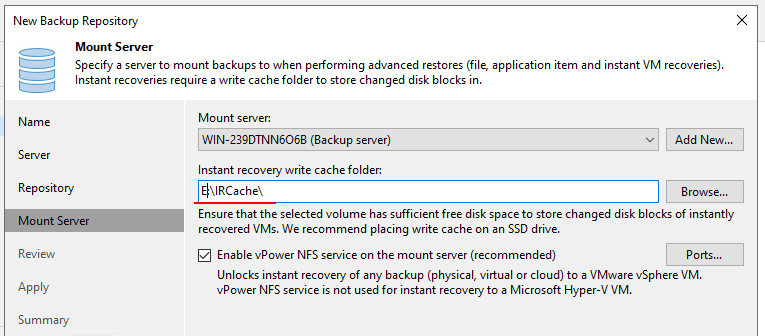
Finally the mount server options, this is where backups will be mounted too when performing restores.
Its recommended that the folder has sufficient free disk space and is placed onto an SSD drive.
The default value is C:\ProgramData\Veeam\Backup\IRCache\
I have placed this onto my Data disk.
Then we can review and apply.
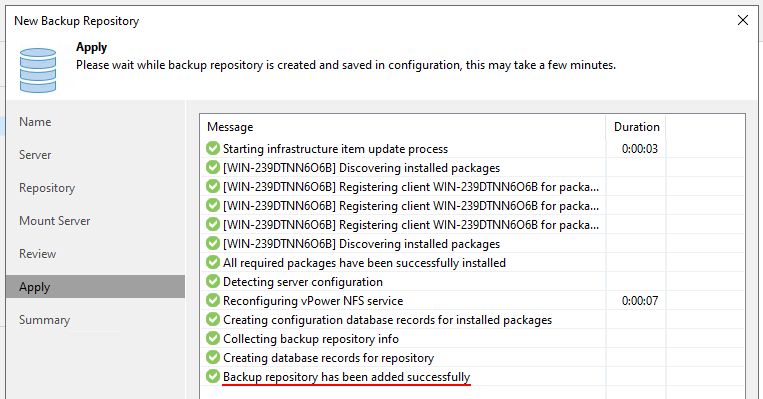
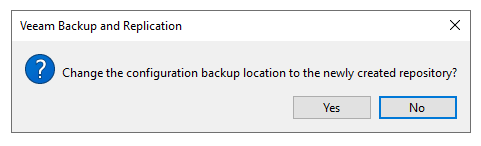
Once complete, Veeam CE will offer to change the configuration backup location to the newly created repository. In this demonstration I will accept using “Yes”, this will move the configuration off the main OS drive C.
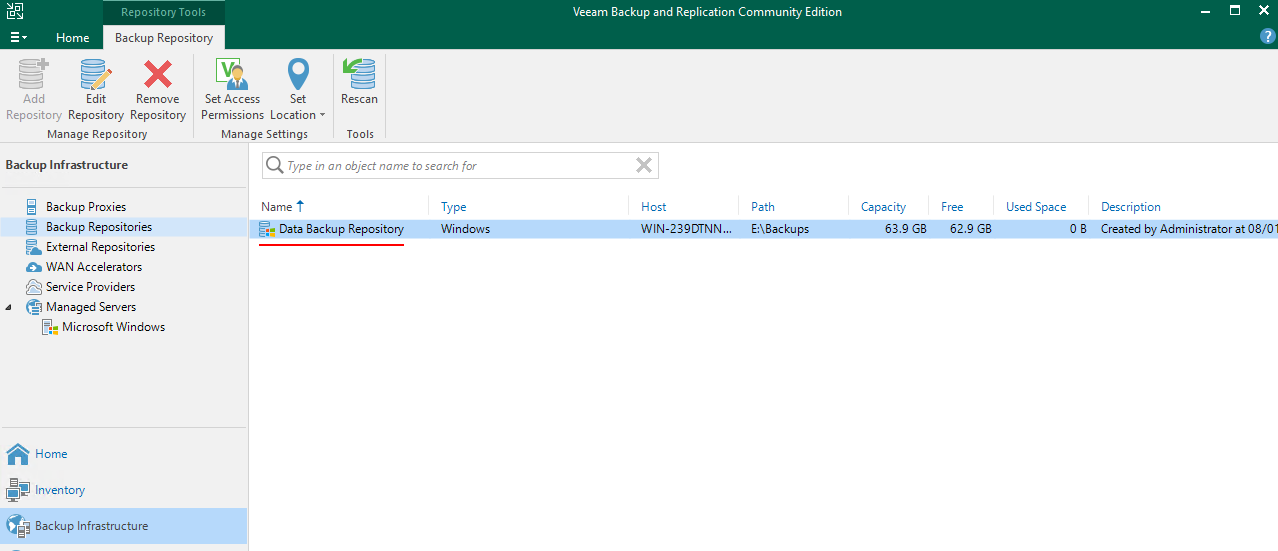
The default repository can now be removed if you so wish, this can be achieved by selecting it and clicking the “Remove Repository” button.
Backup Proxies
Proxies are extremely important in a Veeam backup solution. The proxy processes jobs and delivers backup traffic.
Basic backup proxy tasks include the following:
- Retrieving VM data from the production storage
- Compressing
- Deduplicating
- Encrypting
- Sending it to the backup repository (for example, if you run a backup job) or another backup proxy (for example, if you run a replication job)
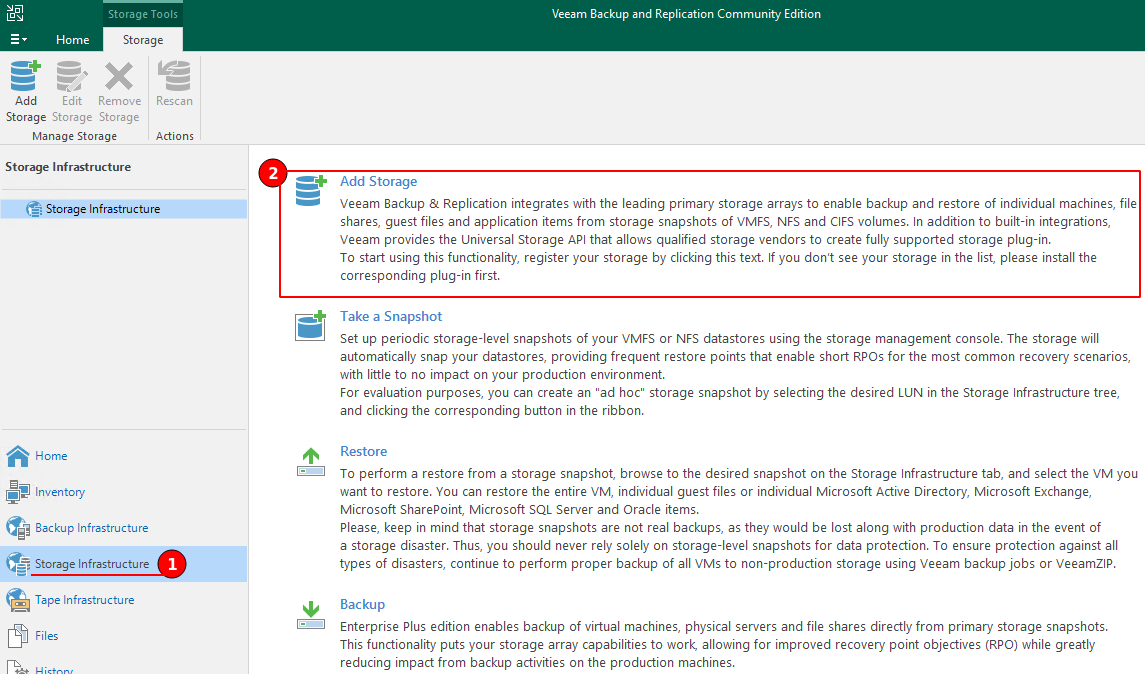
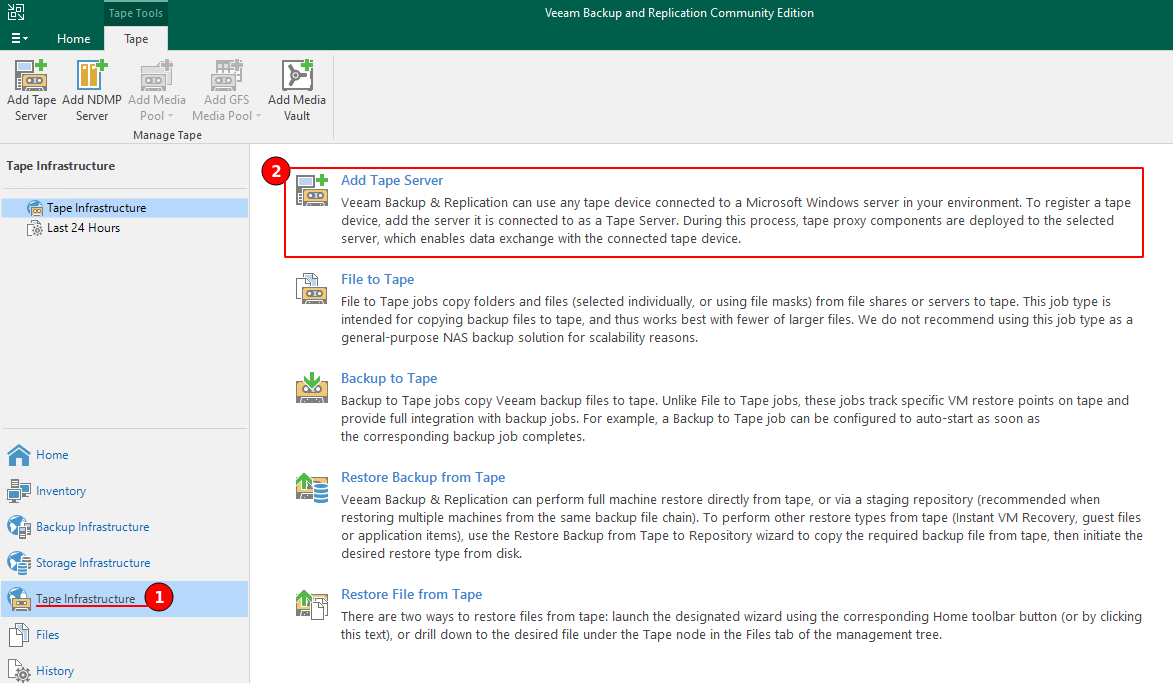
Adding Storage and Tape Infrastructure
Sadly I do not have a SAN storage array or tape library to explore these options within Veeam, but to add Storage Infrastructure navigate to Storage Infrastructure and select Add Storage, following the configuration wizard.
To add a Tape library navigate to Tape Infrastructure and select Add Tape Server, following the configuration wizard.
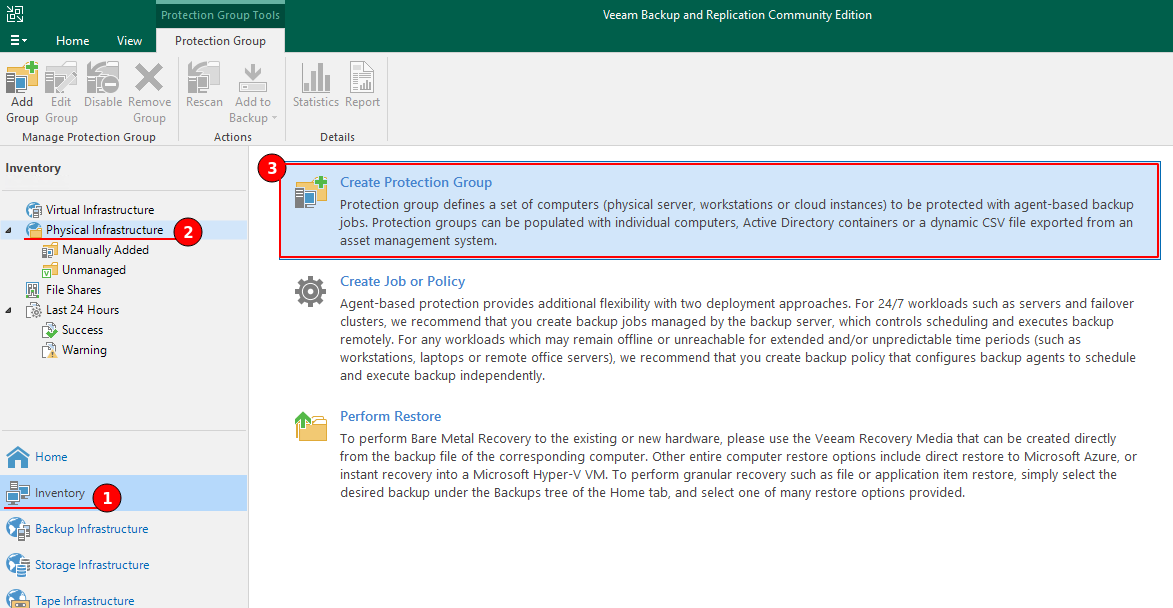
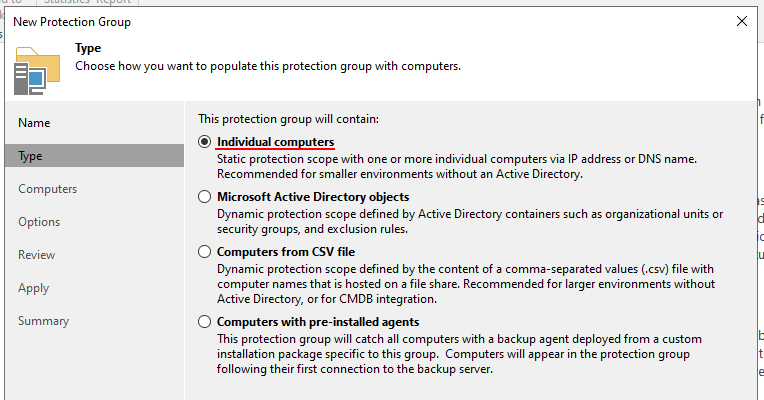
Protection Group
Protection groups are used to define a set of computers that are to be protected using the Veeam agent.
Protection groups can be populated with individual computers, Active Directory (AD) containers or dynamic CSV files from asset management systems.
To start creating a new protection group navigate to Inventory > Physical Infrastructure and select Create Protection Group.
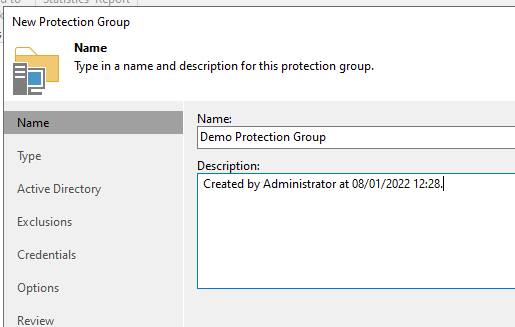
Provide a name for the protection group and then proceed.
Next set the type that fulfils your requirements, in this demonstration I will be using Individual computers as I do not have a lab Active Directory.
In production, chances are that you will want to use Microsoft Active Directory objects to utilise organisational units, security groups and exclusion rules.
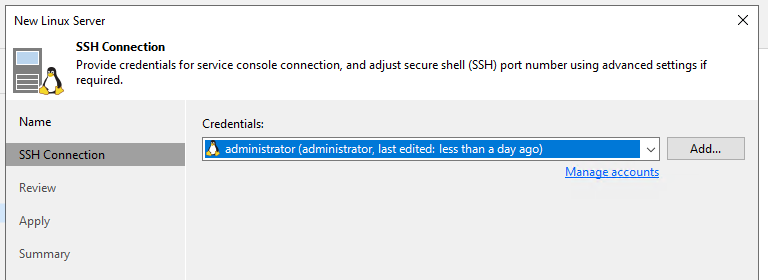
Now computer accounts can be added, using the “Add…” button, providing a host name or IP address and adding credentials
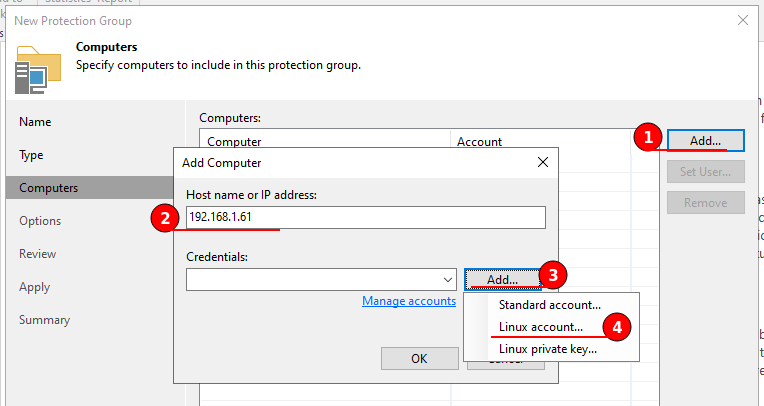
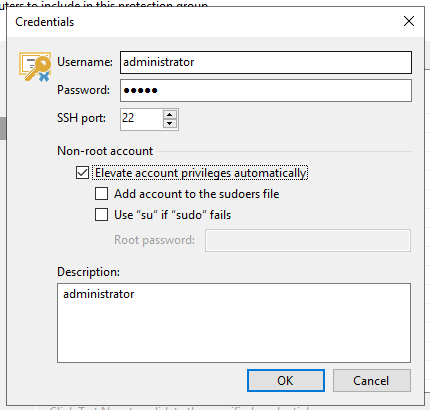
I am adding a Linux machine, therefore I will add a Linux account, a pop out window will appear where I can configure the username and password and elevate as Veeam does require root privileges.
Its worth noting that SSH is required on the Linux host.
Once complete return to the previous window and select “Test Now”.
The test should return a “Success” result, if it fails troubleshoot and retry, ensure SSH access is enabled for the provided user credentials.
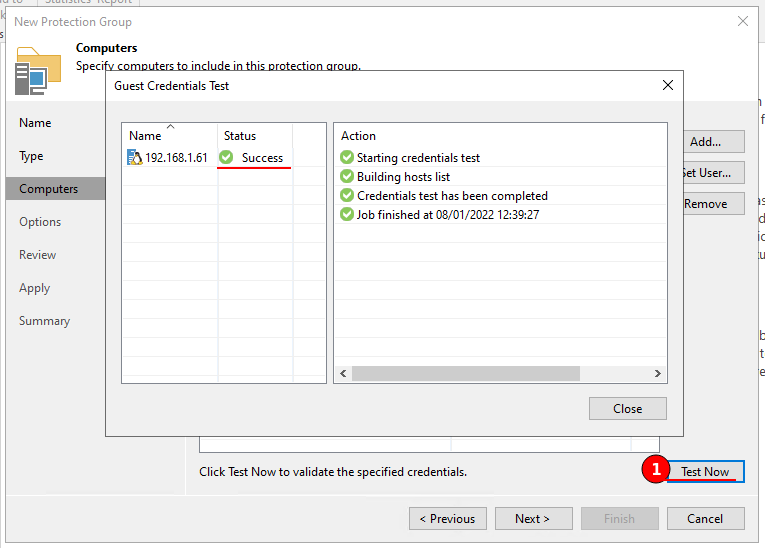
Continue once you have finishing adding all of the computers you want, in this demonstration I only have a single machine.
Next is the options window, this is where we can configure machine discovery and agent deployment.
The default options are to scan daily at 21:00 and to automatically install and update agents.
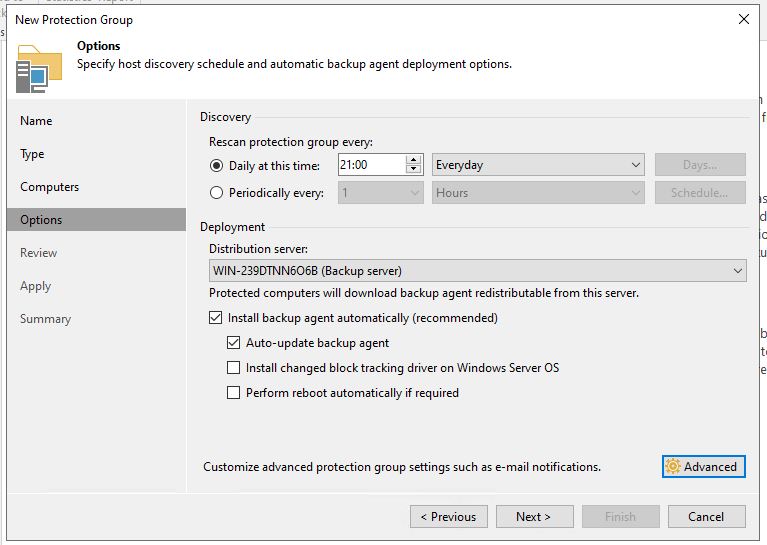
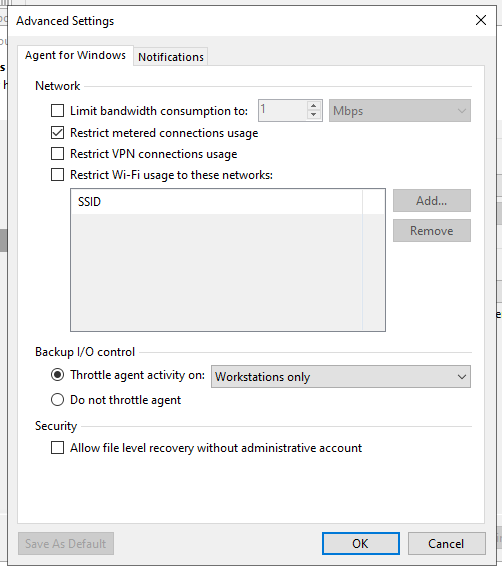
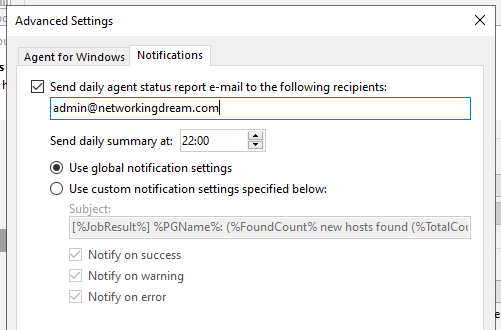
Within the “Advanced” button we have additional options for Windows agent network restrictions and email notifications
I have enabled the sending of daily agent status reports, which I will finalise later. For now accept the warning message regarding email notifications not being configured.
The review panel give you a break down of any actions or components required.
I also added a Microsoft Server 2022 test VM to this group, while creating the protection group the clients will be discovered and agents installed if selected and possible.
Continue for installation and to complete the creation of the protection group. The newly created protection group “Demo Protection Group” is now located on the left navigation pane.
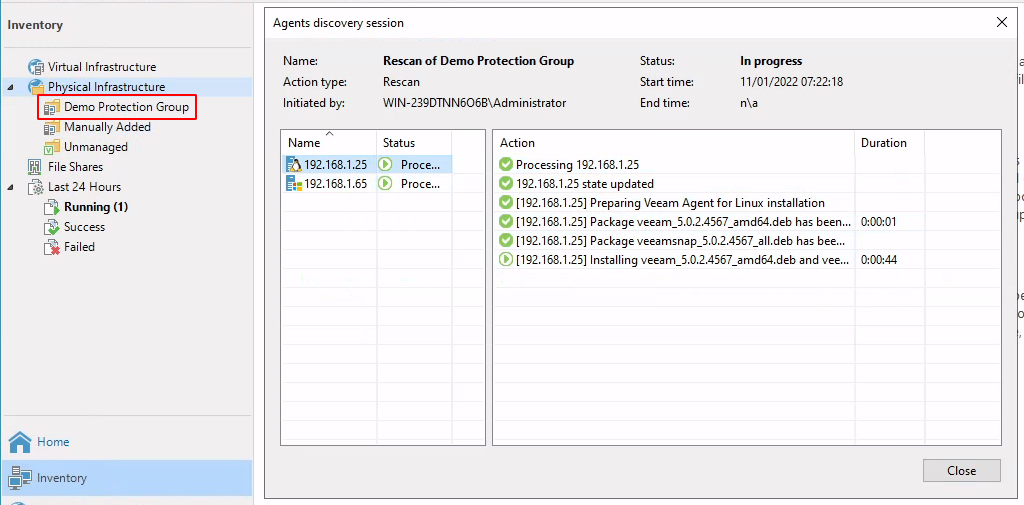
Select the protection group to review all the added clients, their IP Address, Last Seen, Status and OS information.

The installed Veeam clients on both Windows and Ubuntu.

Virtual Infrastructure
Navigating to Inventory > Virtual Infrastructure is where we add our VMware vSphere or Microsoft Hyper-V environments to Veeam CE.
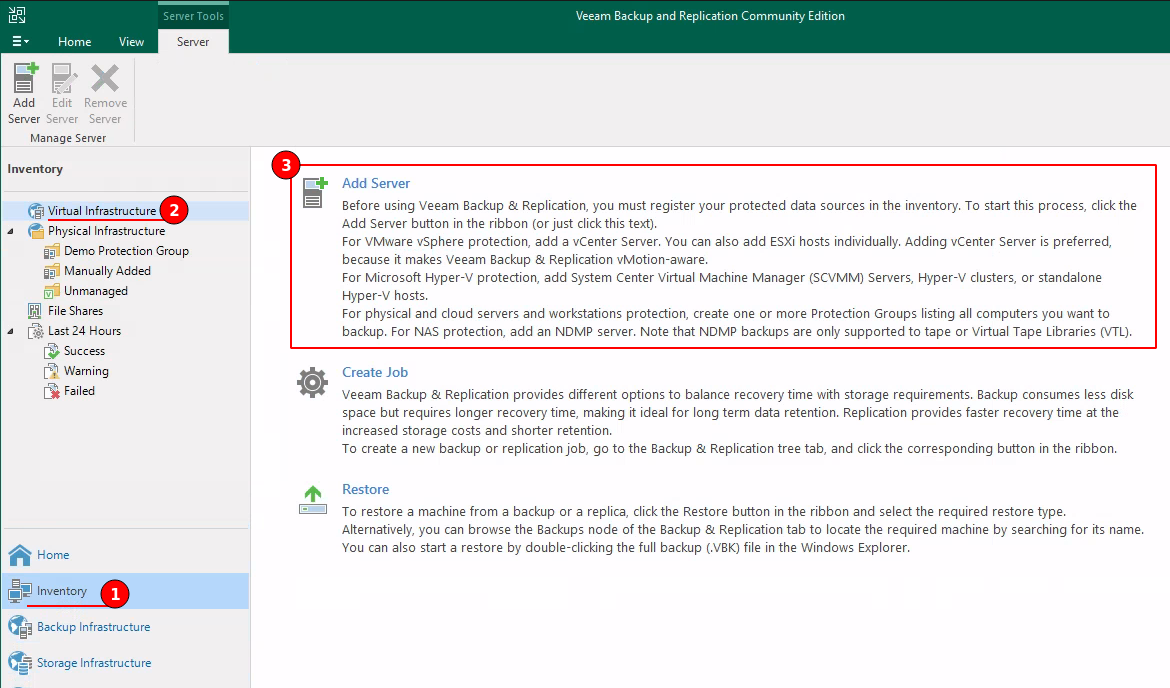
I do not have a VMware vSphere or Microsoft Hyper-V environment to add, but the process of adding is similar to other wizards.
Launch the wizard by clicking “Add Server” and step through each stage to authenticate your environments.
For VMware vSphere protection, add a vCenter server. You can also add ESXi hosts individually.
For Microsoft Hyper-V protection, add System Center Virtual Machine Manager (SCVMM) Servers, Hyper-V clusters or standalone Hyper-V hosts.
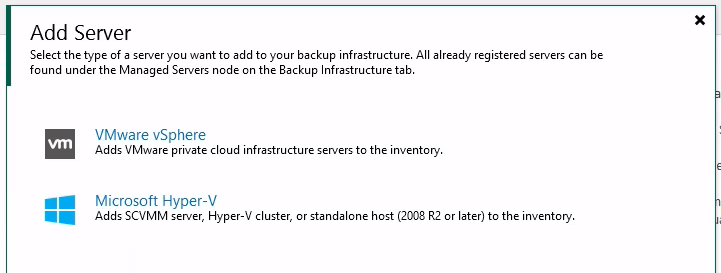
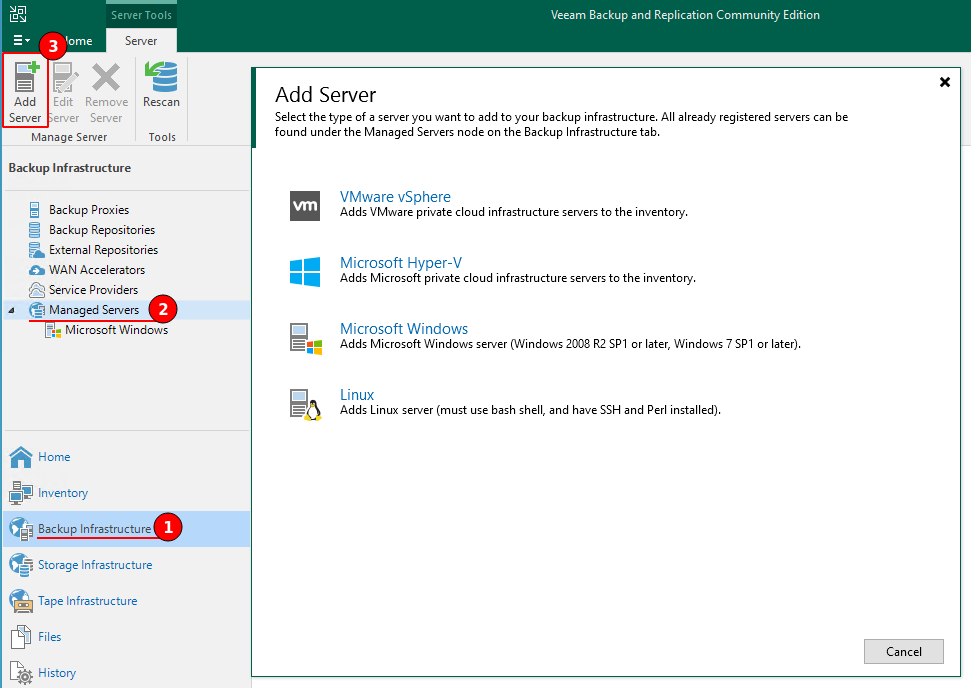
Managed Servers
Used to establish connections with relevant servers such as VMware Vcenter, Microsoft Hyper-V clusters or standalone Windows or Linux machines.
Navigate to Backup Infrastructure > Managed Servers > Add Server
The pop out window will then present us with options for our hyper-visors and servers.
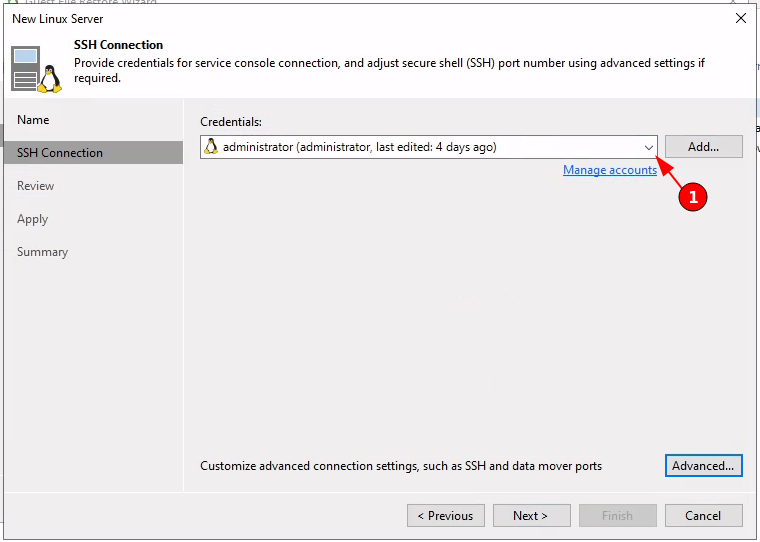
In this demonstration I will be adding a Linux server. Ensure that the Linux server already has SSH and Perl installed.
Provide a host name or IP address for the Linux server.
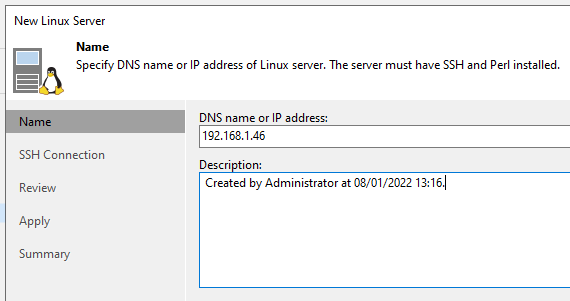
Next add the Linux server credentials to enable Veeam to login using SSH.
This process is the same as when we created credentials for the Protection Group.
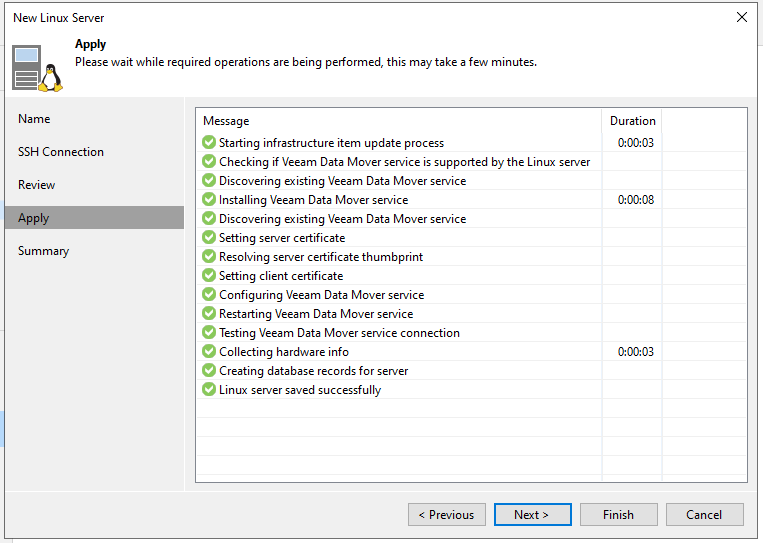
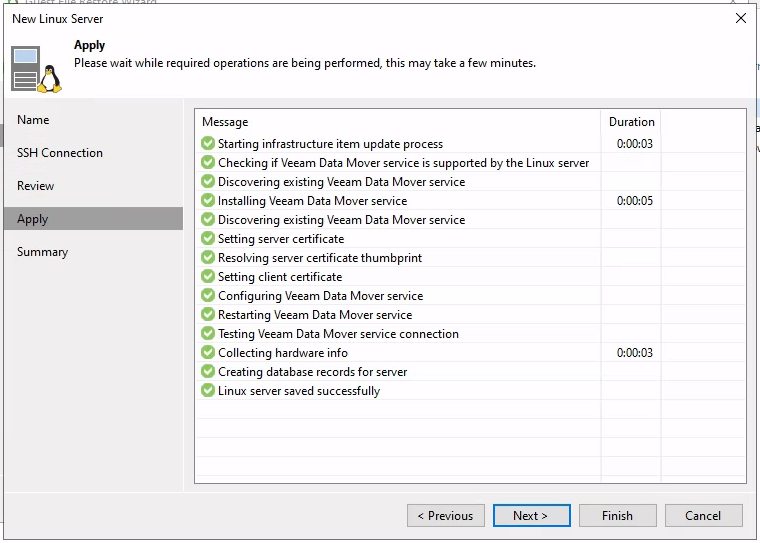
When you proceed the connection will be tested and any required components installed.
Backup and Restore
Backup Jobs
In this demonstration I will be creating a backup schedule for a Linux Server.
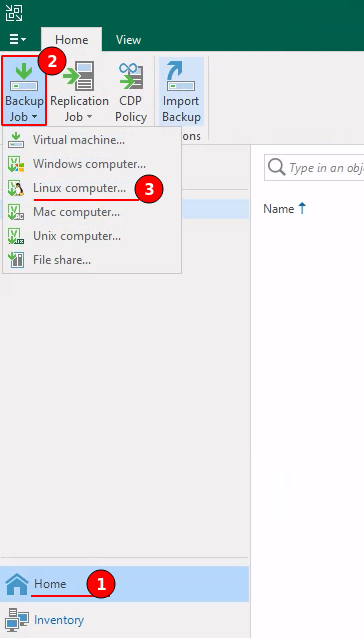
Start the Backup Job wizard by navigating to Backup Job > Linux Computer, this will open a “New Agent Backup Job” wizard window.
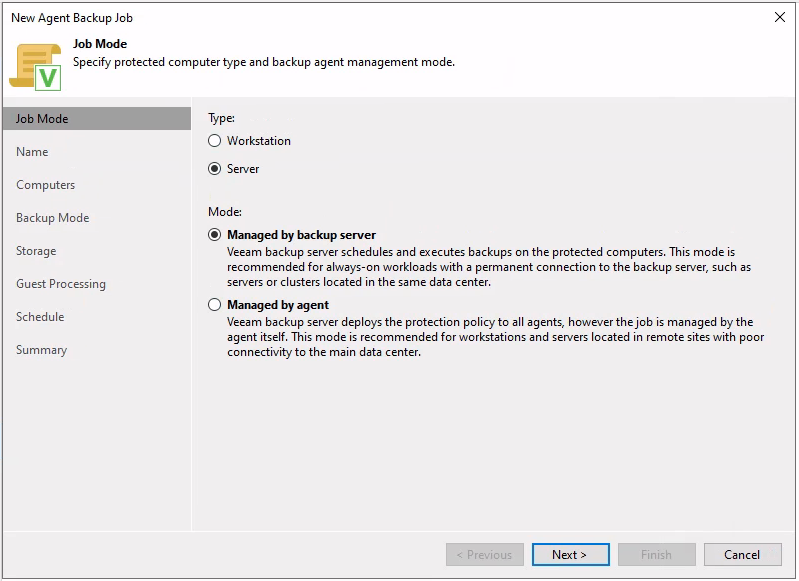
First select the type of of computer we are backing up, in this demonstration it is a Server.
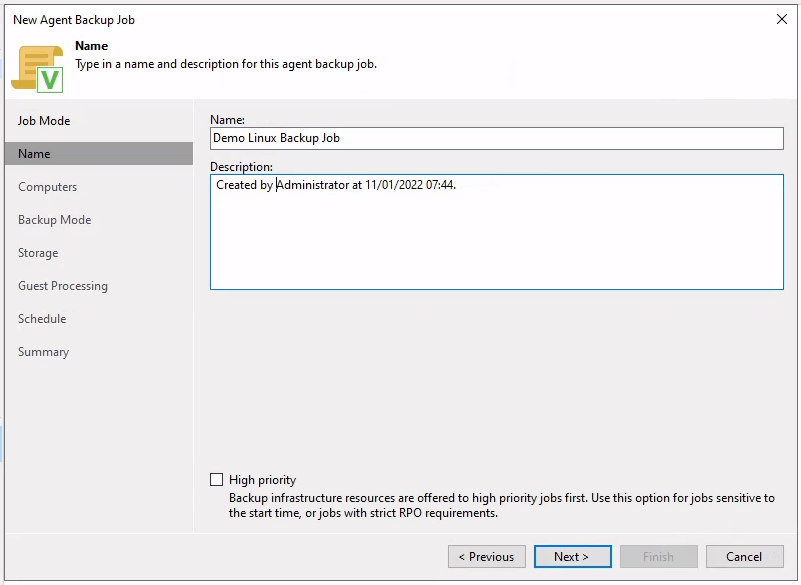
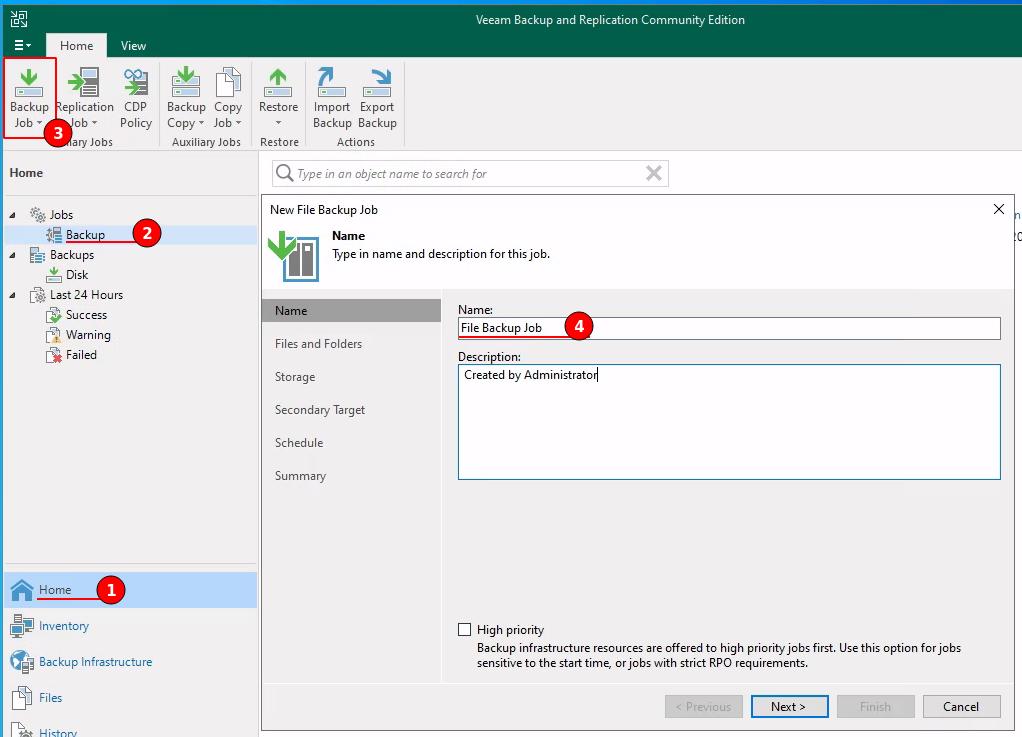
Provide a name and description for the backup job, here “High Priority” can be configured, which ensures backup resources are offered to high priority jobs before standard jobs.
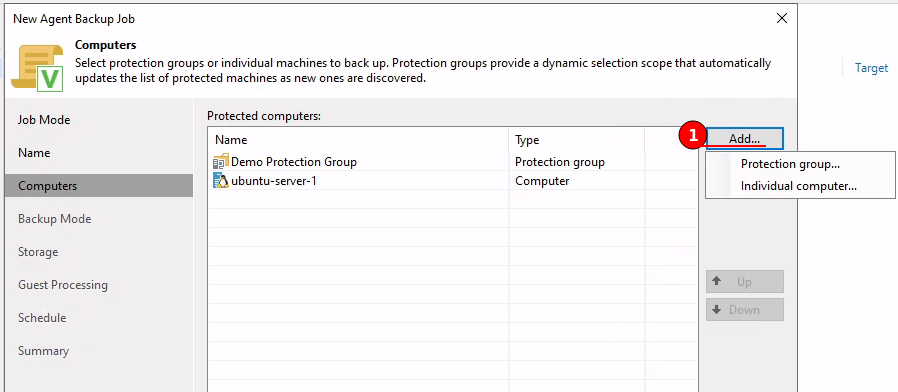
Now add the computers that are to be included within this Backup Job. In the figure below I have added the whole “Demo Protection Group” and a specific computer for demonstration purposes.
The order dictates the order of processing, use the “Up” and “Down” buttons to change the order of the protected computer.
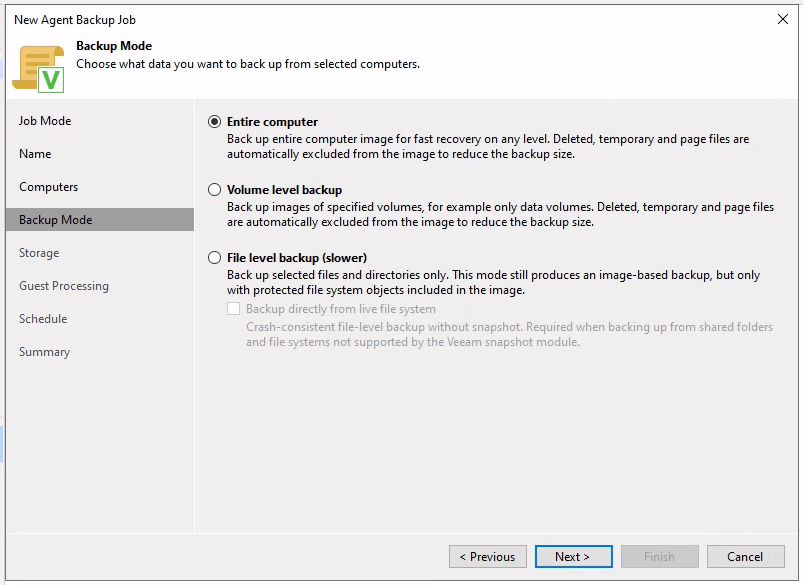
The next step is to configure what backup mode. The entire computer can be backed up or specific volumes and even file level backup, including the option to backup directly from a live file system.
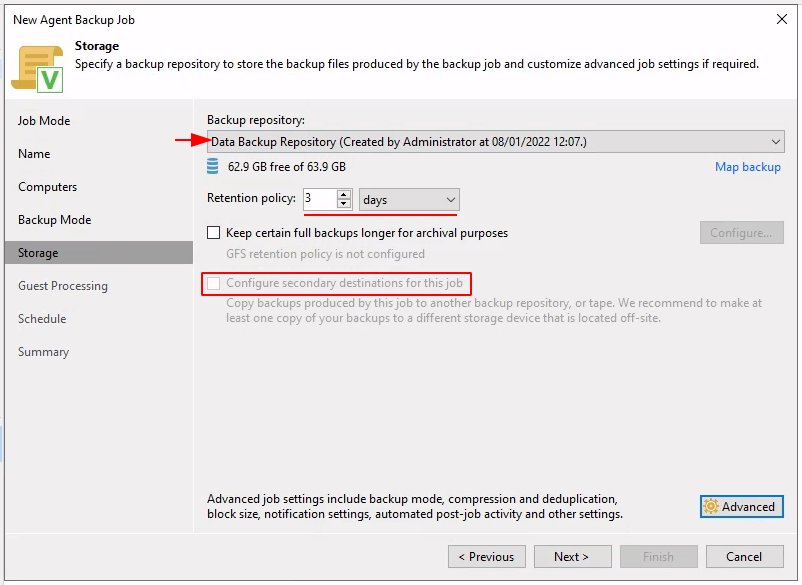
A backup repository must be selected, the only option available in this demonstration is the additional storage configured earlier.
We can modify the retention policy, this means that 3 days of backups will be kept.
We also have an option to configure a secondary destination such as another backup repository or tape. Veeam recommends keeping at least one copy to a different device, off-site.
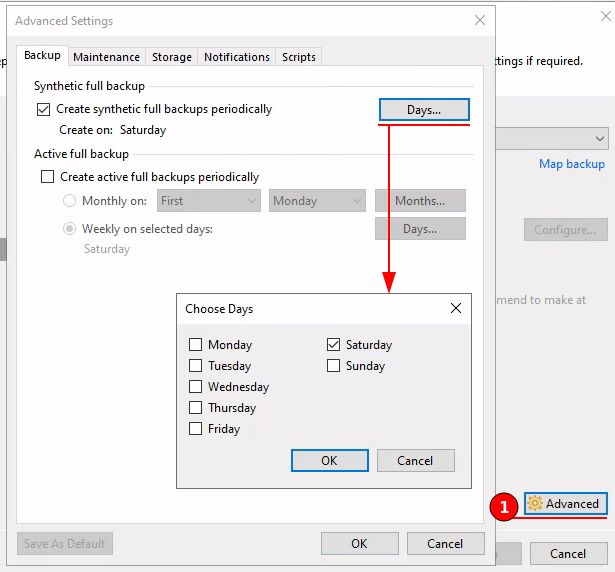
Additional options are available within the “Advanced” button, these include the creation of Synthetic full backups and scheduling active full backups.
Forever Forward Incremental are created by unchecking “Create synthetic full backups periodically” and “Create active full backups periodically”.
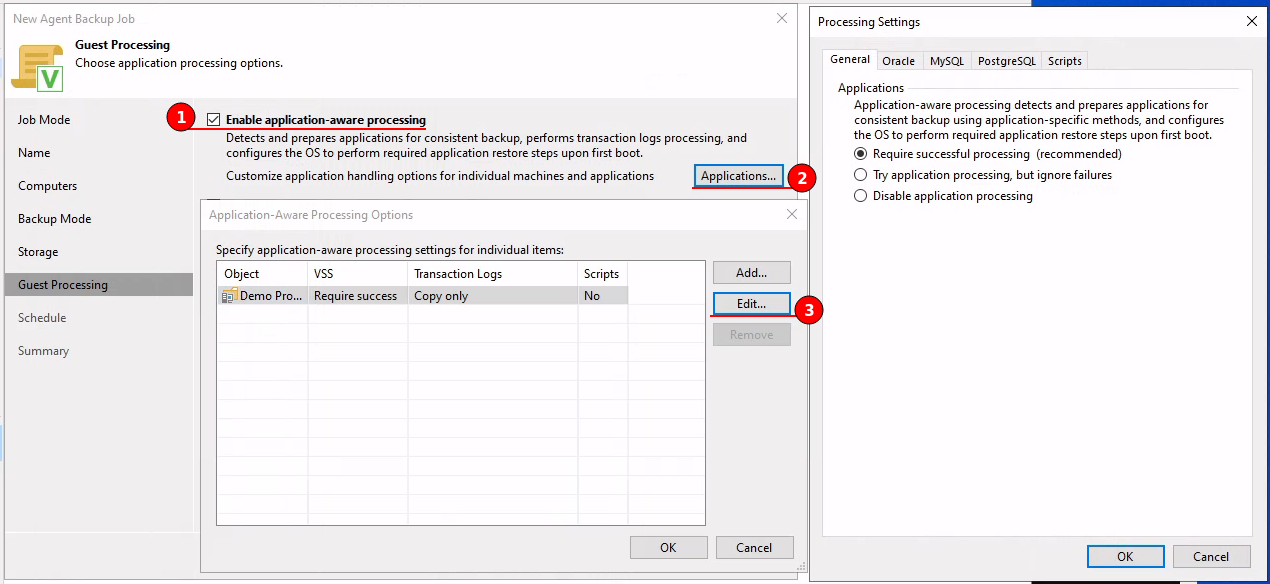
Next is guest processing, where Application-aware processing and Guest file system indexing can be enabled and configured.
Enable application-aware processing to utilise Microsoft Volume Shadow Service (VSS) to ensures that there are no unfinished database transactions or incomplete application files when Veeam triggers the VM snapshot and starts copying VM data.
Application-aware processing should be enabled on services such as Microsoft Active Directory, Microsoft SQL Server, Microsoft SharePoint, Microsoft Exchange or Oracle. Oracle, MySQL and PostgreSQL can all be configured and handled differently via the Processing Settings.
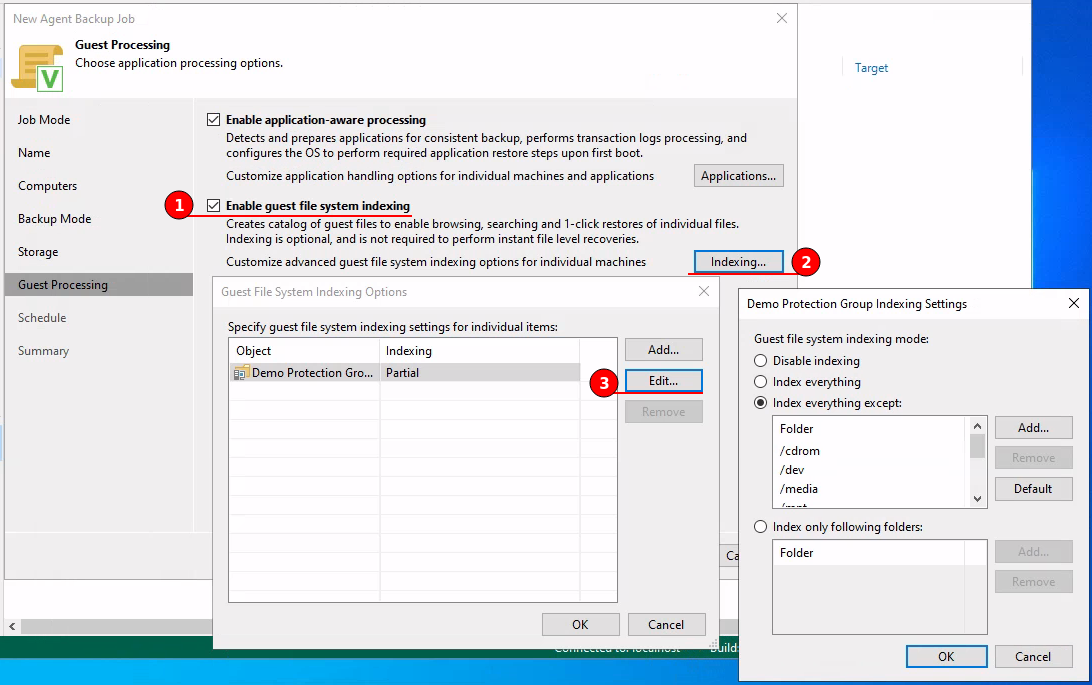
Guest file system indexing creates an index of files and folders on the VM guest OS during the backup. This allows the administrator to search for files inside the VM backups and perform 1-click restores in Veeam Backup Enterprise Manager.
Indexing can be configured to index everything, index everything except and index only the follow folders.
To utilise Guest File System Indexing on Linux machines the following utilities need to be installed:
- openssh
- mlocate
- gzip
- tar
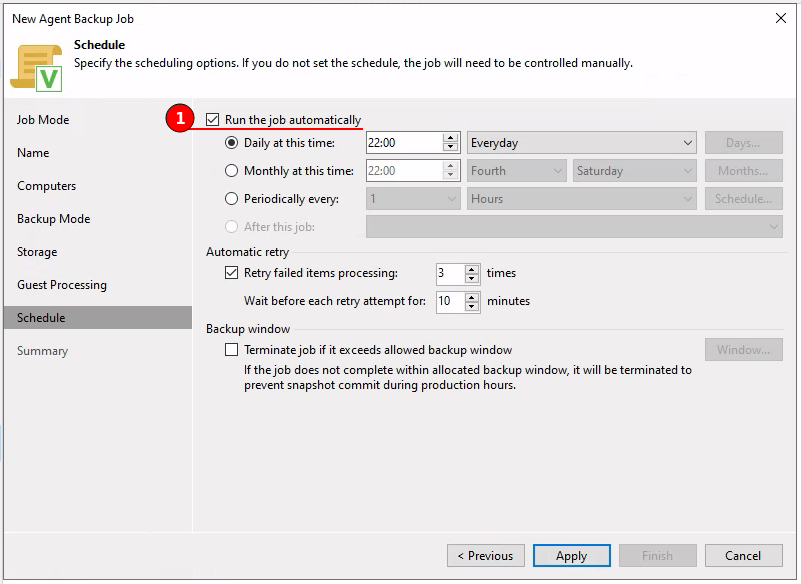
The final window is creating the schedule in which this job will be executed. By default jobs are configured to run automatically everyday at 22:00 with 3 failure retries.
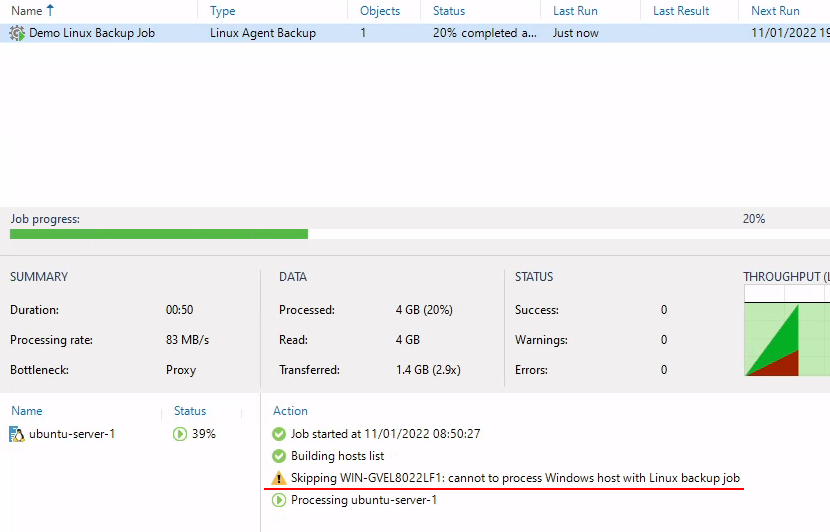
Once the wizard has been completed the job can be scheduled to run immediately. When performing a Linux backup job with Windows servers included in the protection group, the servers are skipped and a warning is recorded as shown in the figure below
In the summary panel, the Bottleneck indicator can be useful to see where the slow ups are being generated.
Restoring
Veeam is able to restore an unlimited number of VMs using Multi-VM instant recovery. Any changes to the VM are stored in the Re-Do log and this is merged back into production unlike the changes are discarded.
When restoring an entire VM, the ability to restore only changed blocks using change block tracking (CBT) improves recovery times drastically over the conventional restore as only changed data is overwritten.
Veeam offers restoring of VM virtual disks and VM files, such as VM Configurations. Although consideration needs to be given to powering off the VM when attaching a virtual disk over no powering off when extracting VM files.
Restore Linux Guest Files
When restoring Linux guest files a helper Linux machine is required, this is used to mount the backup to for the file-level recovery. In this demonstration I have create a fresh VM with Ubuntu server installed, I also ensured that openssh-server and perl were installed.
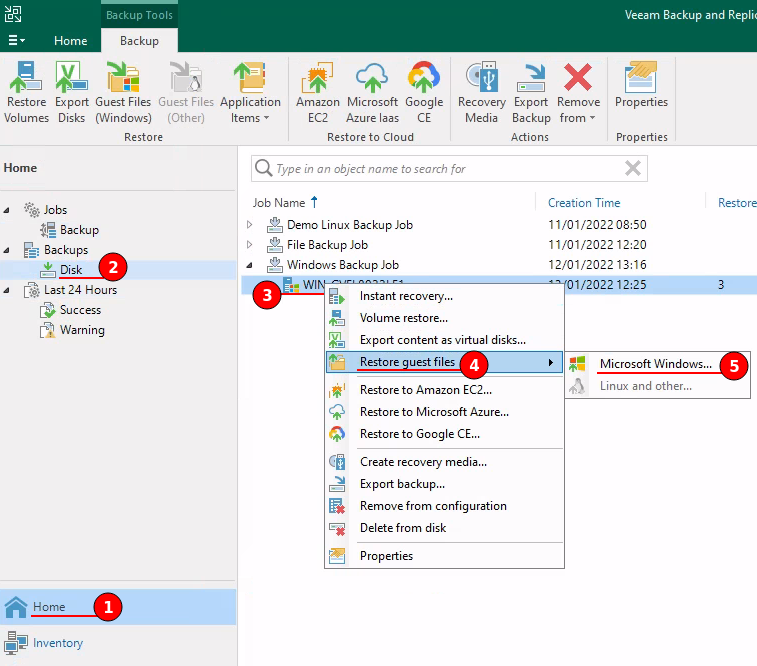
To start a Linux guest file restore, first navigate to Home > Backups > Disk and right click the server, then select Restore guest files > Linux and other…
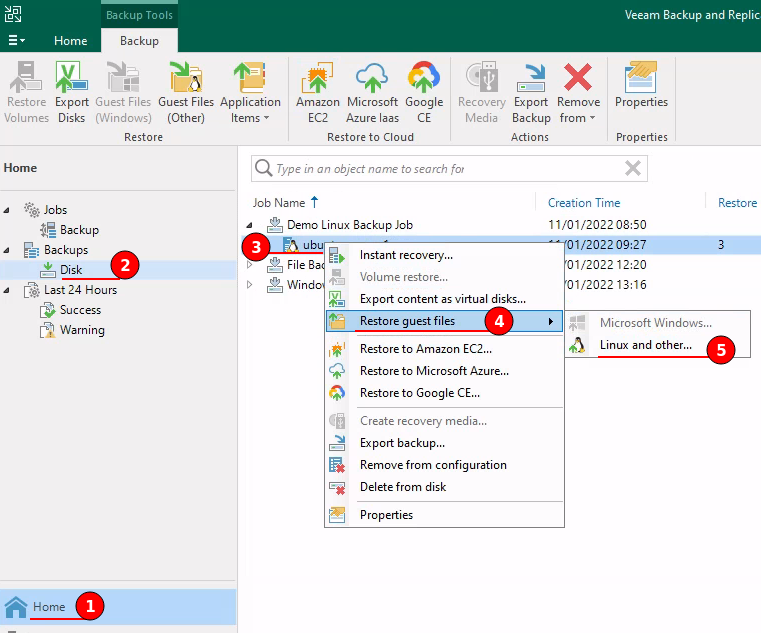
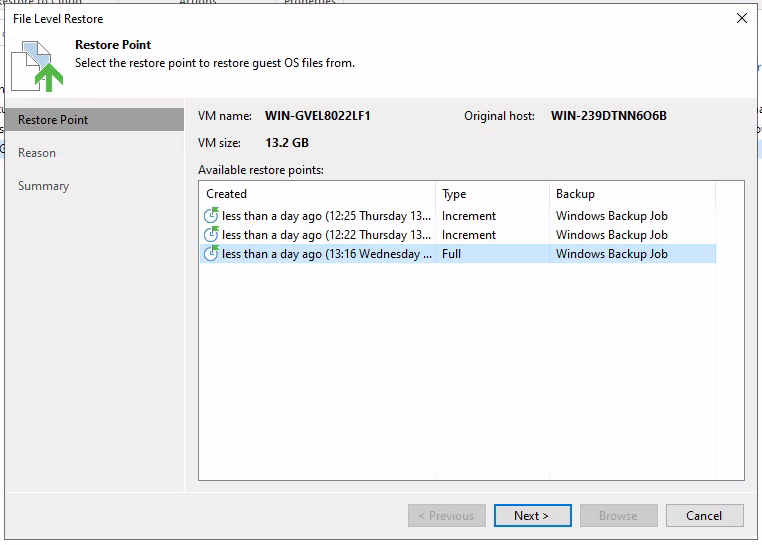
The administrator will then select which restore point to restore from.

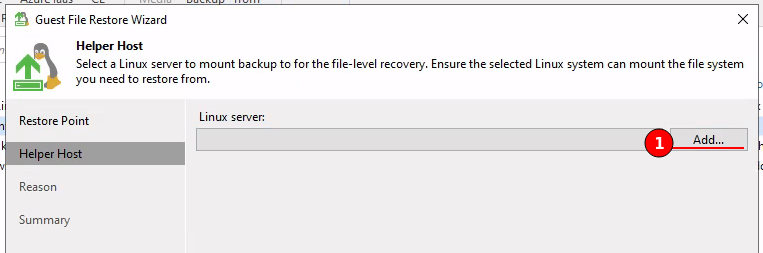
Next Veeam will ask for a Linux server to act as a helper when mounting the backup file. In this demonstration I selected “Add…” as I did not have a pre-configured Linux server.
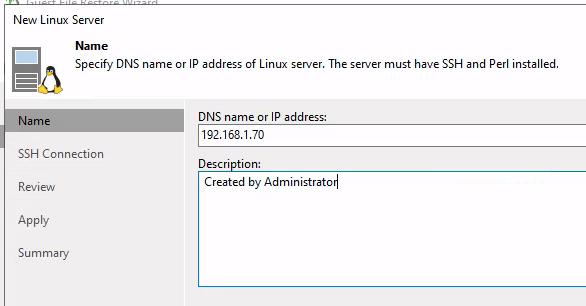
I populated the DNS name or IP address of the new Ubuntu VM.
Add credentials to allow Veeam to SSH to this server.
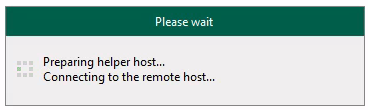
The below figure shows the “Apply” stage of the restore, once complete you can select “Finish”, then a Connecting to the remote host prompt will appear briefly while Veeam connects to the helper Linux server.
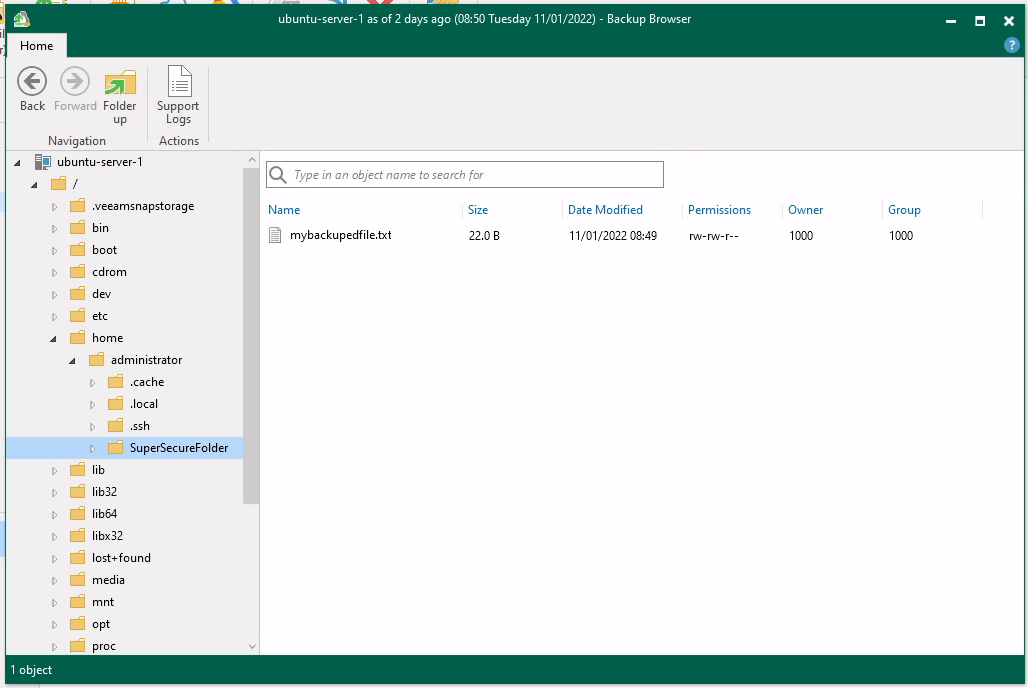
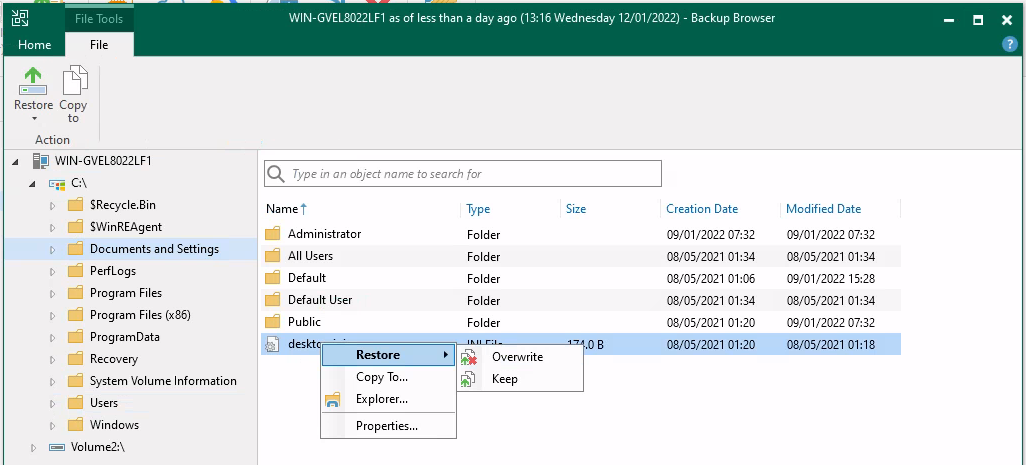
Lastly the restore explorer will appear, on the left is the directory tree and in the right pane the files and folders. The administrator can choose to right click a file or folder can restore to their preferred location or restore in place.
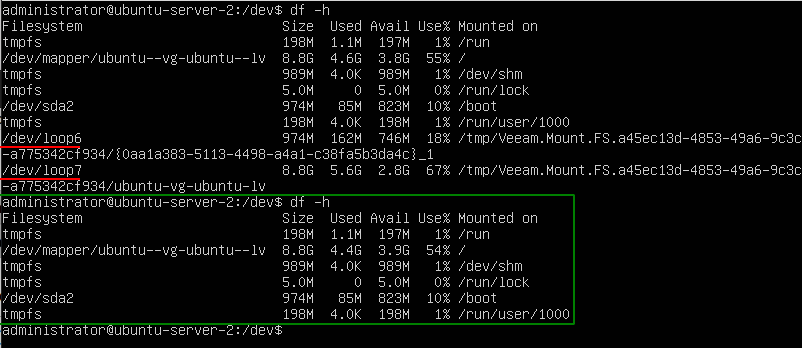
The below figure shows the helper Linux server while restoring, from the red lines we can see that two additional drives were mounted. Once restore completed the drives were removed as shown in the green square.
Restore Windows Guest Files
Restoring guest files from a Windows based machine is a similar process but does not require an additional machine as Veeam can mount and explorer from within itself.
Start by navigating to Home > Backups > Disk and right click the server, then select Restore guest files > Microsoft Windows…
Select the restore point you wish to recover from.
Veeam will then open a Explorer window with the backed up drive mounted. The administrator can then navigate the directory tree and choose to restore files and folders either copying to a different location or restoring directly back to the server.
NAS Backup and Restore
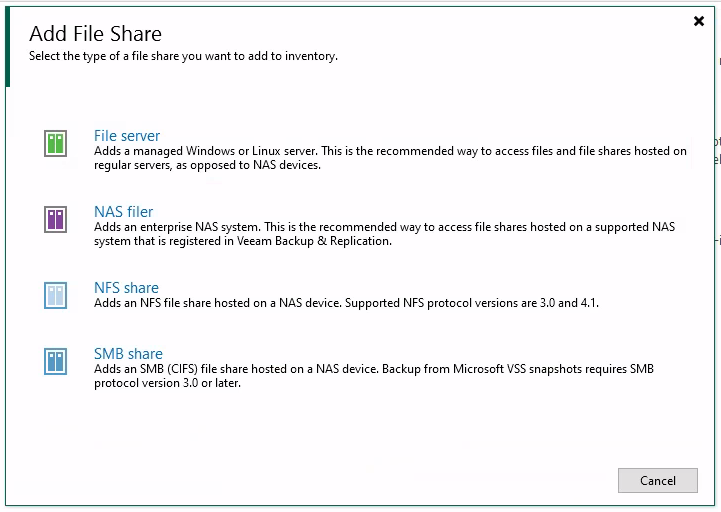
Veeam has the ability to protect file shares including File Servers, Network Attached Storage (NAS), NFS and SMB/CIFS shares.
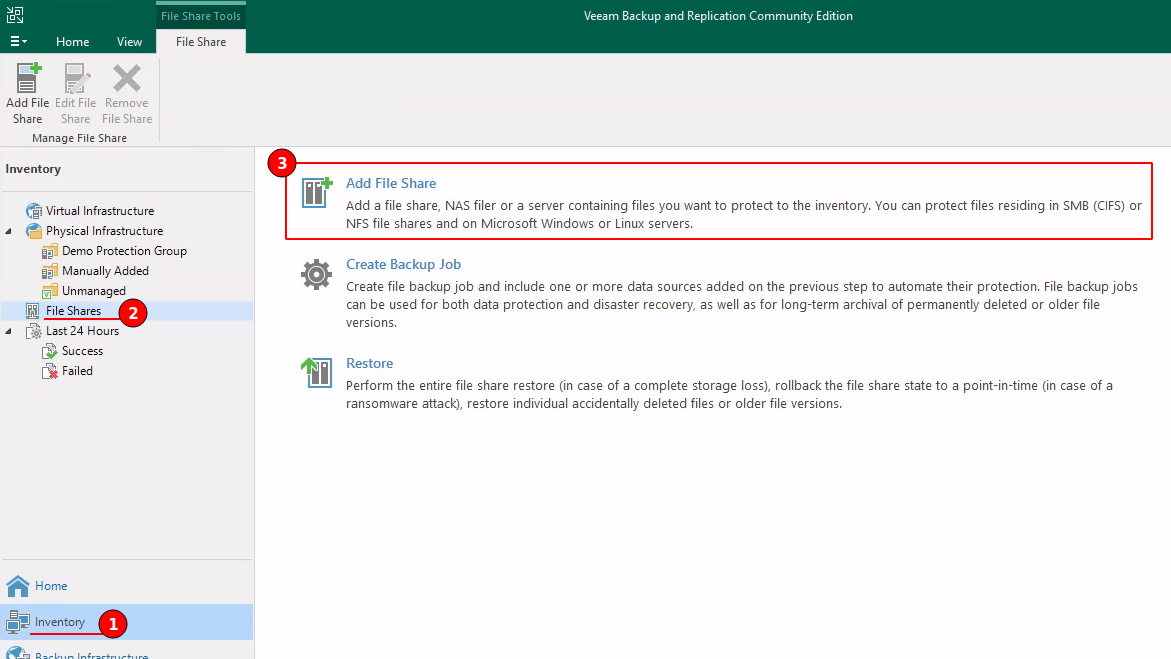
To start protecting first navigate to Inventory > File Shares > Add File Share.
The wizard will appear and the first selection is the type of file share that will be added. In this demonstration I will be creating a SMB share.
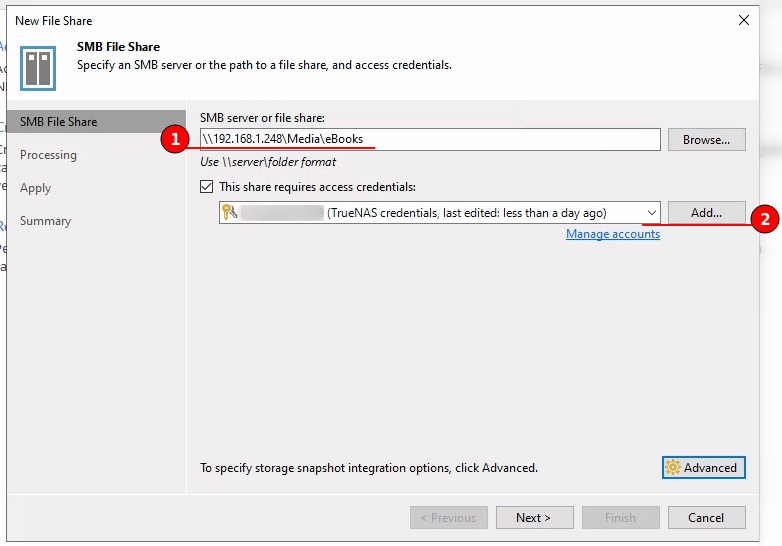
Next there will be a prompt for the SMB server or file share, with a browse button. There is also a section to add credentials for the file share.
In the figure below I have added a small eBook share from TrueNAS.
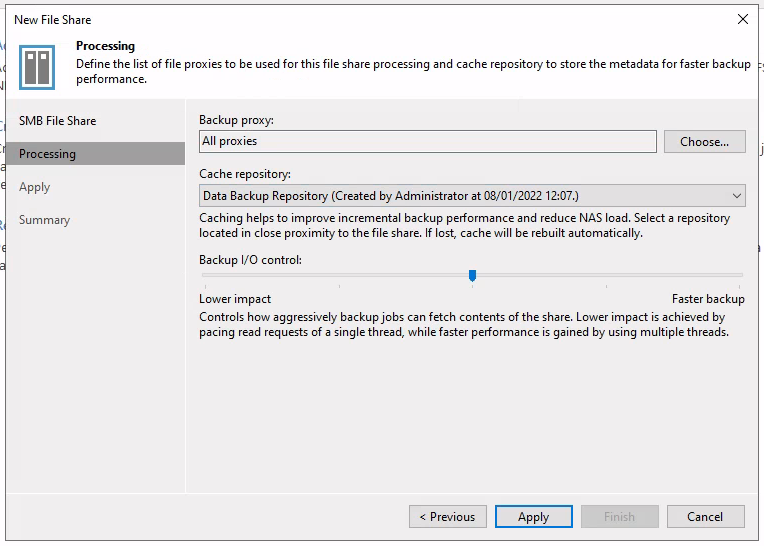
Proceeding will give an opportunity to tell Veeam which backup proxy to use, where to back up the data to and a slider for input/output control.
In this demonstration I have selected to use all available proxies and backup to our small additional hard disk repository that was added earlier.
Continue through to completion.
Once the file share has been added, a backup job can be created. To start the “New File Backup Job” wizard navigate to Home > Backup > Backup Job and select File Share.
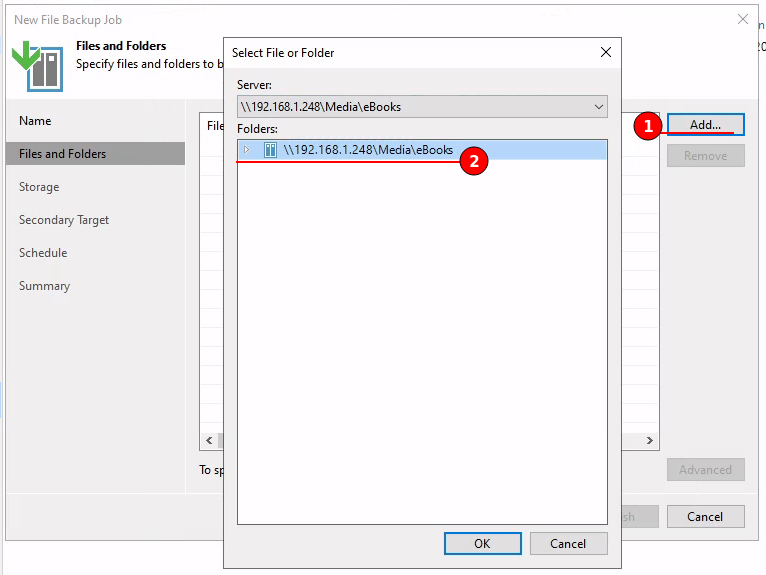
In the next window a selection of files and folder can be made, in this demonstration I will be backing up the while File Share. By selecting “Add…”, choosing the server and selecting the root directory.
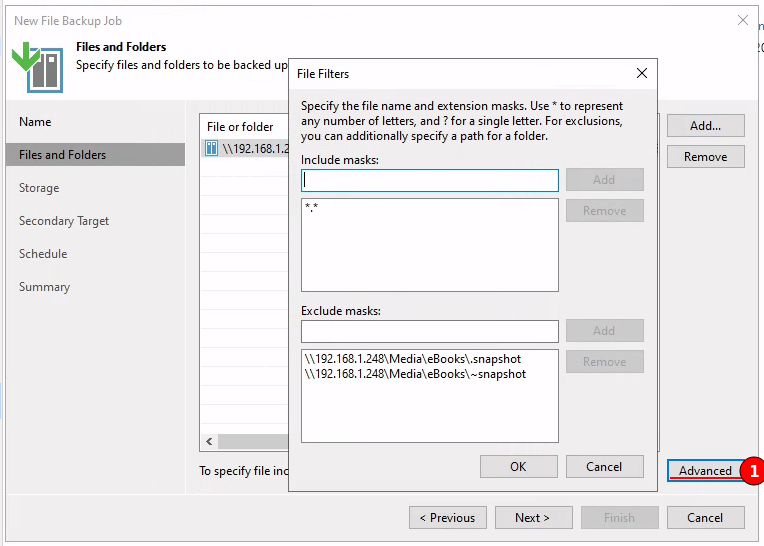
After adding the File Share the administrator can highlight the selected Share and click Advanced, this will provide options to create include and exclude masks, this means that specific files and folders can be included into the backup job or excluded from the rest of the File Share.
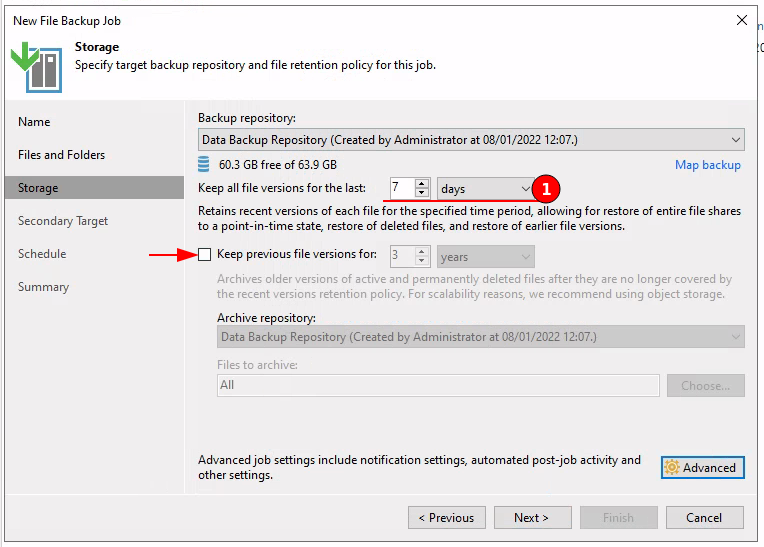
After selecting the Files and Folders, the next window is the available storage options. In this demonstration I have chosen to backup to the repository that was added earlier in this article.
I have also changed the file version history to keep 7 days.
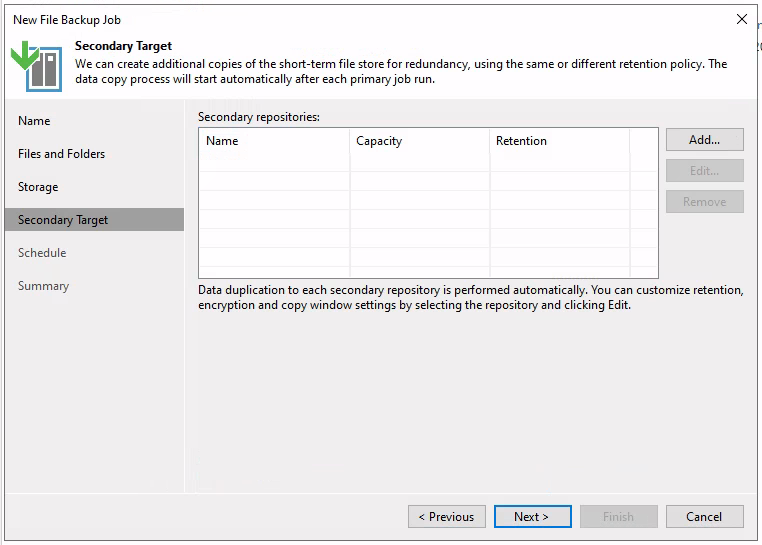
When protecting File Shares, there are options to add a Secondary Target, which creates additional copies of the file store.
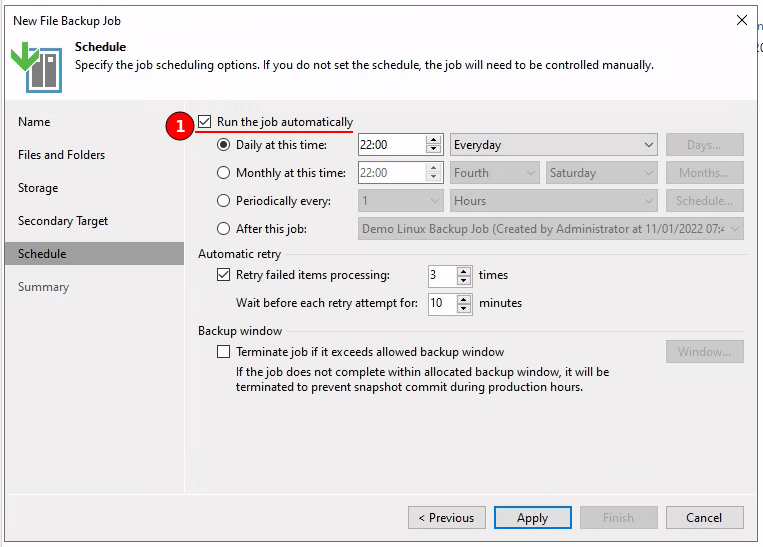
Lastly create a schedule to best fit the File Share requirements and business needs. In this demonstration I have chosen to automatically run the backup job daily at 22:00, with the default retry option.
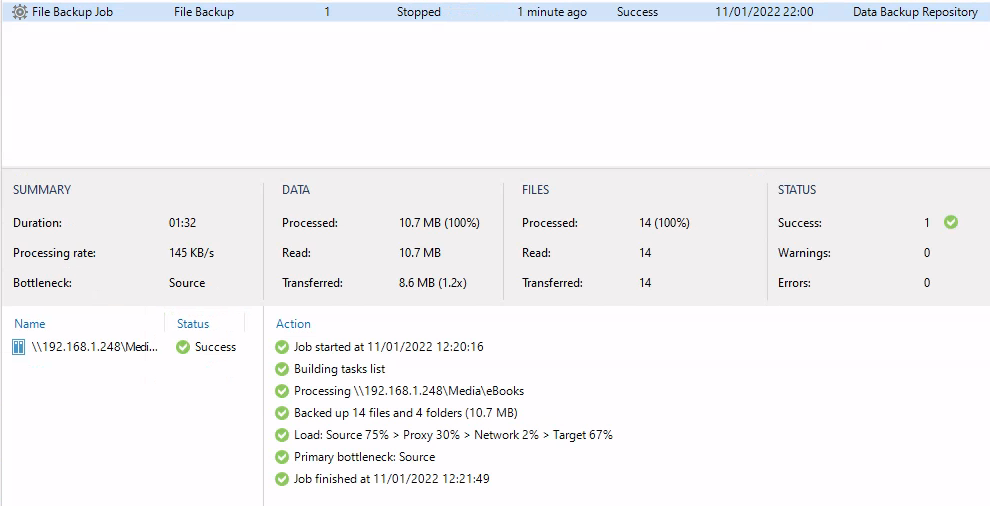
Running the File Share backup job, success can be seen in the figure below.
Restoring Active Directory Objects
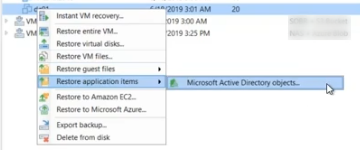
Active Directory can be backed up and restored using Veeam, first navigate to Home > Backup > Disk and select a Domain Controller (DC). The right click context menu offers the option Restore application items and within Microsoft Active Directory objects.
Then select the required restore point. The AD database is then mounted and accessed directly.
Using the explorer the administrator can view the Active Directory tree structure and view objects contains within.
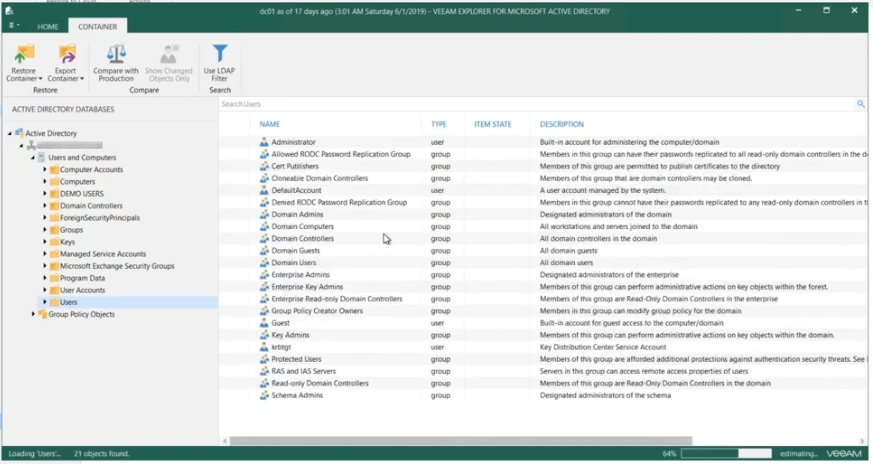
Objects can be restored, exported and compared.
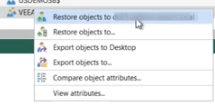
Enabling the “Compare with Production” option, the administrator can see all items that have changed, as shown in the figure below the “VEEAMSE” group has changed from production.
Microsoft Exchange and SharePoint
Veeam has to the ability to protect Microsoft Exchange including mailboxes, messages, folders, tasks, contacts and more.
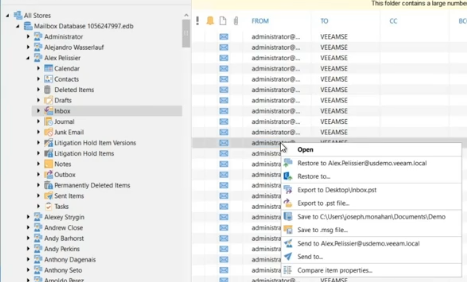
To start a recovery, first navigate to Home > Backup > Disk and Select the Exchange backup. Under the right click context menu there are options for Restore application items > Microsoft Exchange mailbox items.
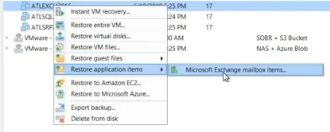
This will open the familiar wizard, where a restore point will need to be selected.
Once the restore point has been loaded the explorer will open and the administrator can browse the Mailbox database as shown in the figure below, as shown there are many options to restore items including the ability to exported into .PST file, but the 64-bit version of Outlook will need to be installed on the Veeam server to perform this action.
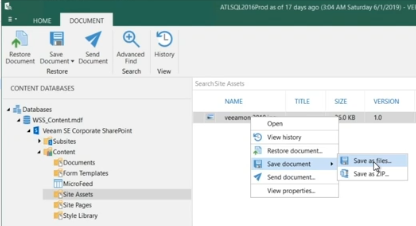
Protecting SharePoint using Veeam allows the administrator to recover library documents, images webpages and entire sites. Recovering Microsoft SharePoint is similar to recovering Microsoft Exchange. Veeam can mount the database without the need of running additional servers, saving resources.
The figure below shows the SharePoint explorer window, after choosing a restore point. Administrators can Restore, Export and even Send via email the restored content.
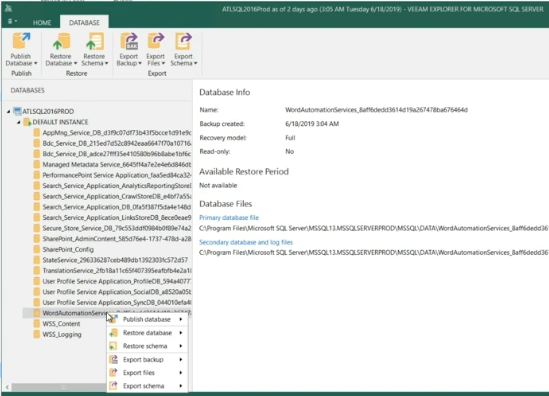
Microsoft SQL and Oracle
Further to the Microsoft Exchange and SharePoint, Microsoft SQL and Oracle can be protected and recovered using a similar process.
To start a recovery, first navigate to Home > Backup > Disk and Select the Exchange backup. Under the right click context menu there are options for Restore application items > Microsoft SQL Server databases.
Veeam allows administrators to Publish, Restore and Export SQL database items and schemas. Files can be exported as the native .bak file extension for easy import.
History
Located in the bottom left navigation panel, either as a large icon or a small icon at the bottom right of the panel.
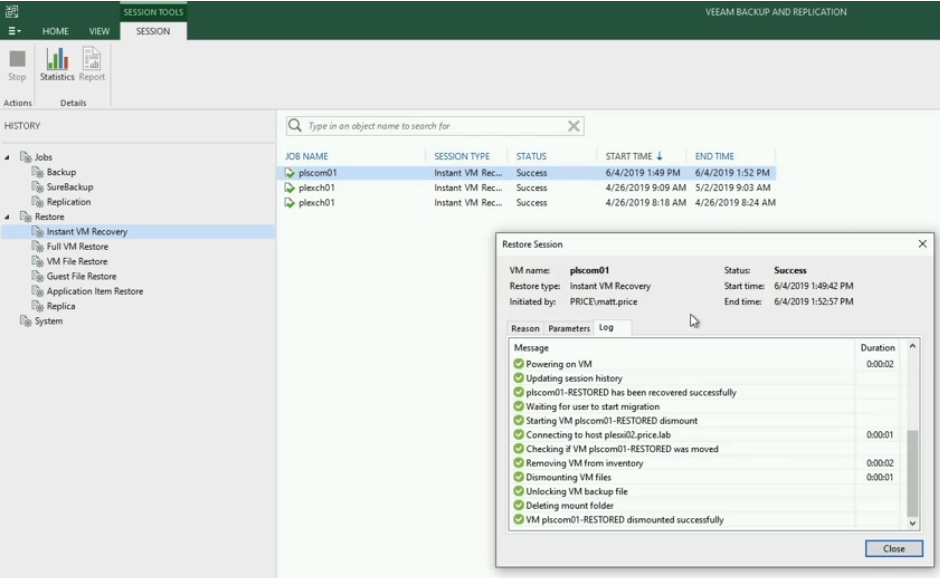
History is used to look at what has been occurring globally across the Veeam Backup & Replication environment.
For example we can investigate who and when has been performing Instant VM recoveries.
When looking at detailed backup job results, an administrator can use the keyboard arrow keys to change the results to a previous run.
Throttling Traffic and Rules
Network Traffic rules such as Throttling are available via the menu button in the top left and select Network Traffic Rules.
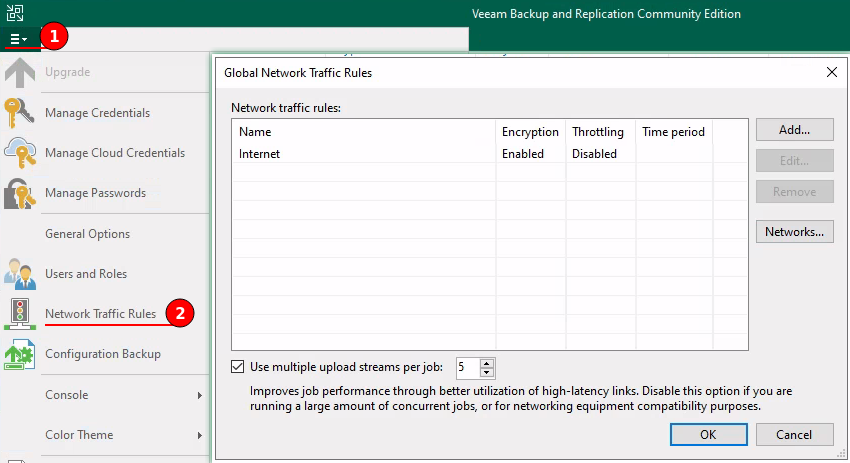
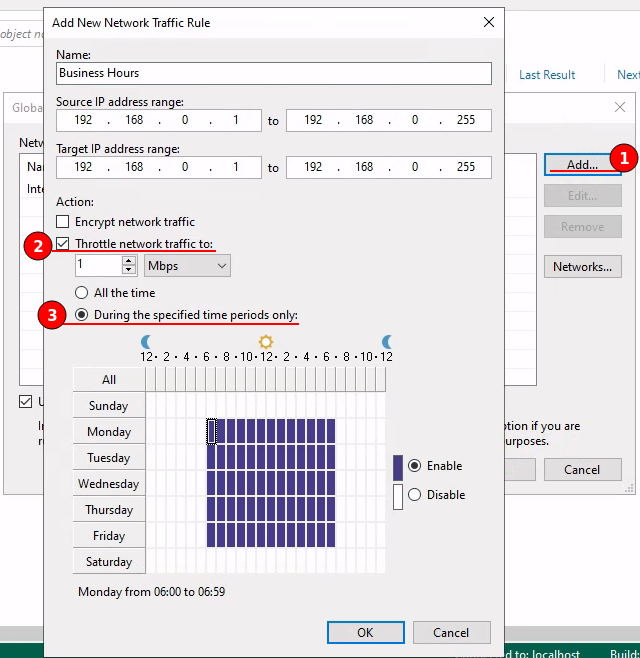
A new rule can be created using the “Add…” button, when creating the new rule we can enable Encryption and Throttling of network traffic, in the figure below I have created a “Business Hours” rule that enables network throttling to 1 Mbps on Monday to Friday at 06:00 until 18:59.
Network rules can also be used to create routes and preferred networks.
Configuration Backup Settings
Configuration backup settings are available via the menu button in the top left and select Configuration Backup.
Its important, that if file encryption is enabled on a backup job that it is also enabled in Configuration Backup Settings, otherwise it will be configured, but not running.
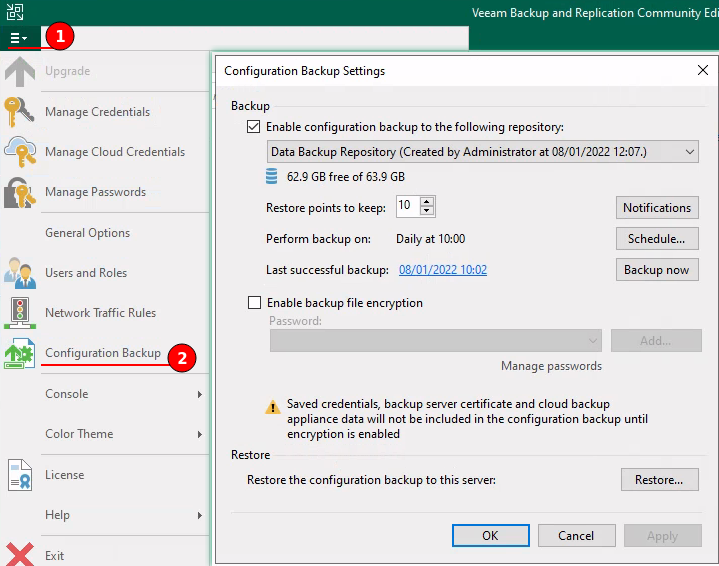
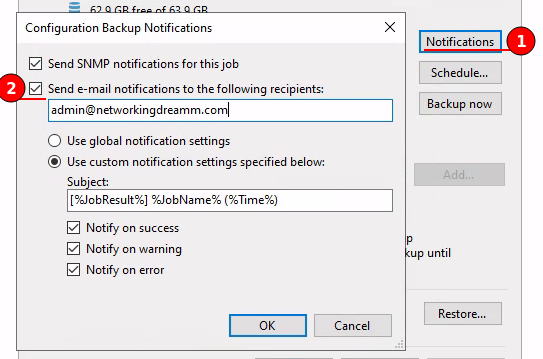
Its also worth enabling Notifications so we are notified about any Successes, Warnings or Errors. Click the Notifications button and check “Send e-mail notifcations to the follow recipients”.
IO Control
Requires Enterprise Edition
This is important for when backup jobs are running that Veeam does not create a performance hit on the production storage array.
- Stop assigning new tasks to datastore at a threshold of 20 ms (default)
- Throttling I/O of existing tasks at a threshold of 30 ms (default)
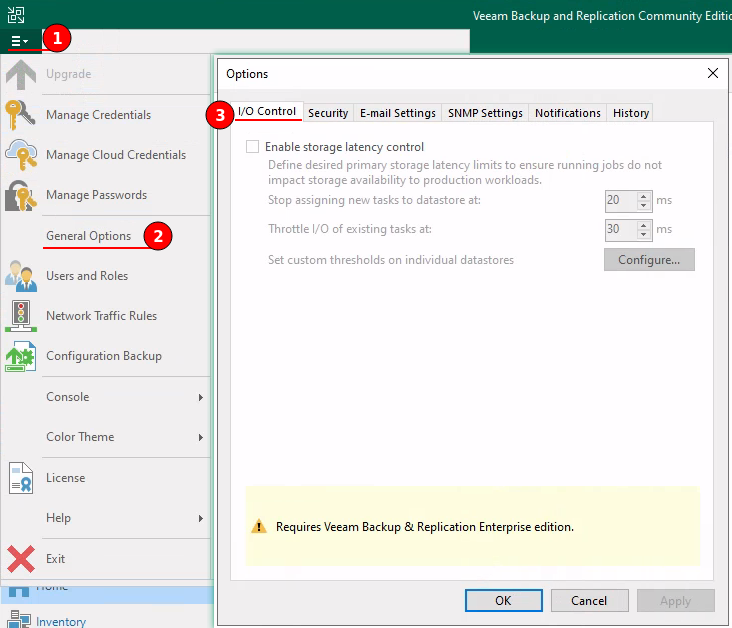
Veeam Enterprise Plus allows for individual datastores to be configured.
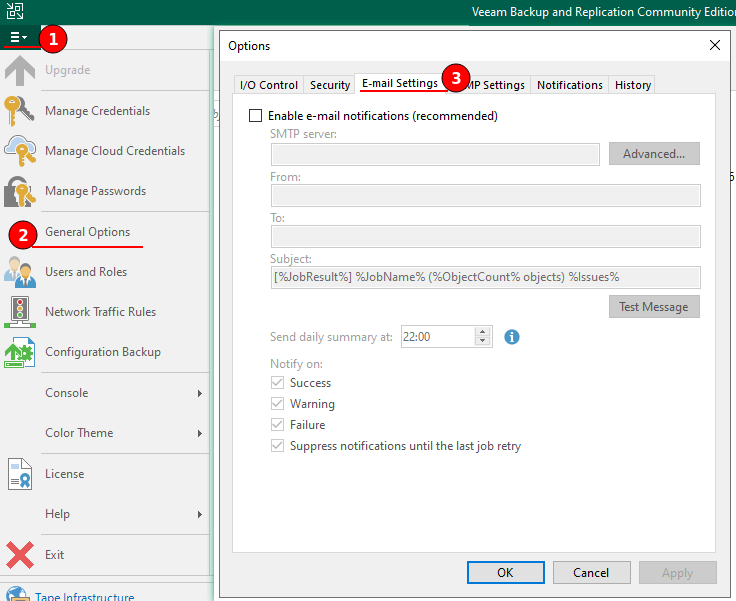
Enable Email Notifications
To enable email notifications navigate to the menu button, located in the top left and select General Options.
Now switch to the E-mail Settings tab and enable and configure.
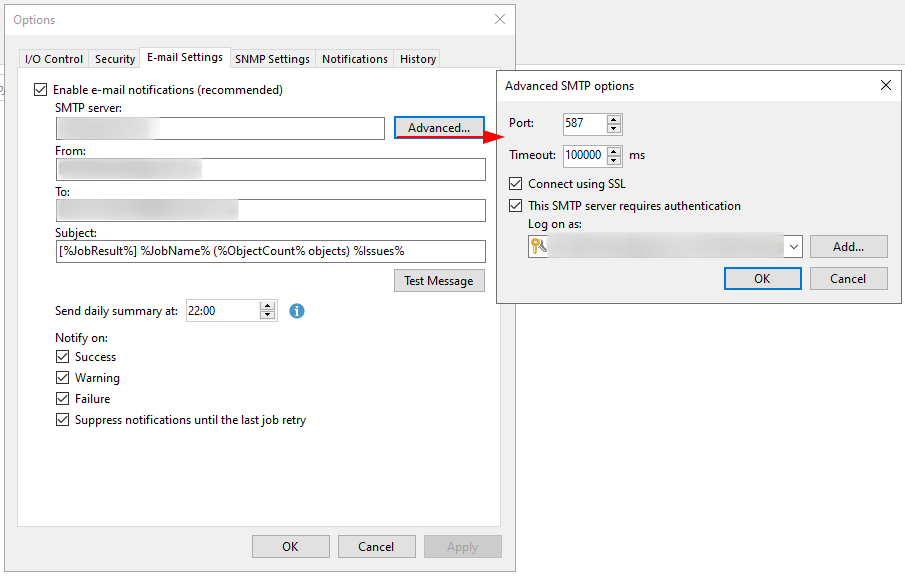
I have a blanked example in the figure below, “Advanced” is used to provide further information regarding port and login credentials for the SMTP server.
Don’t forget to send a Test Message to ensure everything is working correctly.
Additional notifications can be found on the Notifications tab in the Options window.
DataLabs - Virtual Lab
Requires Enterprise Edition - A brief introduction to Veeam DataLabs
A secure, sandbox virtual environment to bring up VMs from backup. Veeam DataLabs uses a Managed Linux proxy appliance to allow access from Production to this network space.
Sandbox DataLabs are useful for; DevOps, Training, Patching, Upgrades and Application Development and use Data Backups, Replicas and Storage Snapshots.
Veeam DataLabs can be found by navigating to Backup Infrastructure > SureBackup
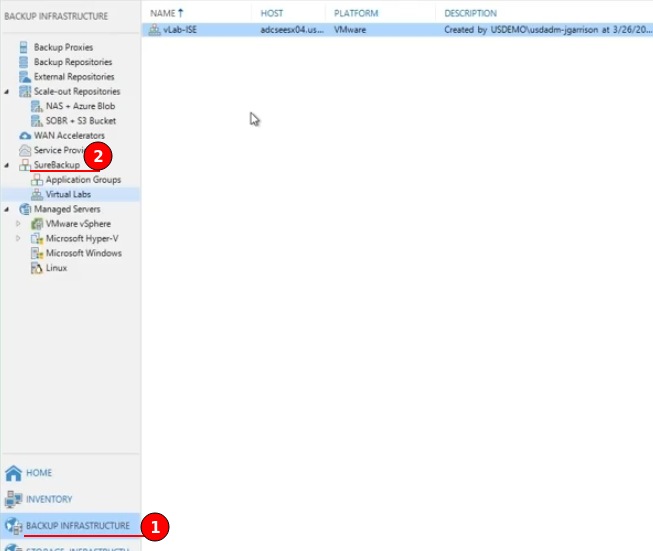
The first option “Add Virtual Lab” will start a wizard to help administrators setup their own DataLabs Virtual Lab.
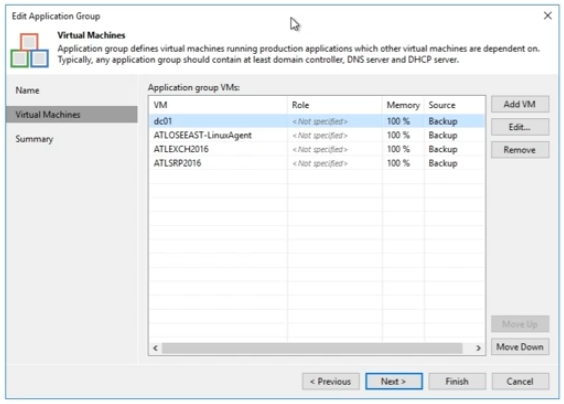
The next option is “Add Application Group” this allows the administrator to configure groups of VMs, such as running an appliance that has requirements for a Domain Controller (DC), DNS and DHCP. The administrator can also configure the priority/order of boot by moving the VMs up and down.
Roles with pre-configured tests and startup options such as Memory can also be configured per VM.
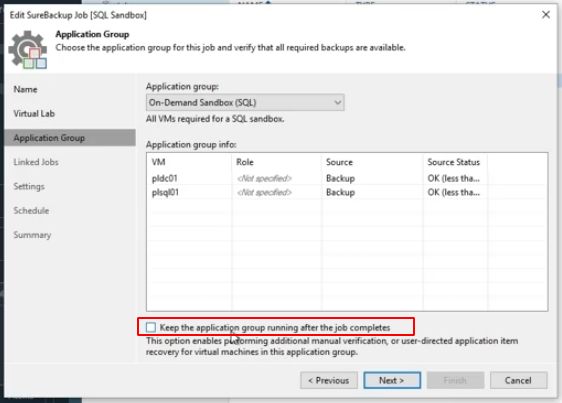
Application groups are then used within the SureBack job creation. Application groups are used for creating the core dependent services and the linked jobs are the actual tested VMs.
Checking the “Keep the application group running after the job completes” will enable the on-demand sandbox environment, keeping the VMs running after the tests have completed instead of powering everything down.
Administrators can also perform application item-level restore (U-AIR) on on-demand sandbox VMs.
SureReplica utilises VM replicas instead of backups, this increases the performance of the sandbox experience as the full hydrated replicas are isolated and powered on, instead of using VMs from backup.
On-Demand Sandbox will be shutdown when a scheduled backup job is due, as a backup takes priority, therefore its important to give consideration to running on-demand sandboxes.
Staged Restore
Staged Restore leverages Full data backups and the DataLab technology. Staged Restore was built around GDPR and ‘the right to be forgotten’.
Staged Restore allows the administrator to perform a restore into a virtual lab, remove the sensitive information and merge back into production. Staged Restore can also be useful for Software updates and patches.
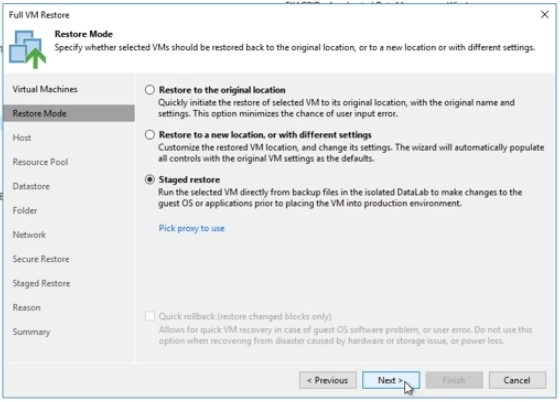
Scripts are required with Staged Restore, a restore cannot occur unless a script is provided during the Staged Restore wizard.

Once the changes have been applied Veeam will migrate back into production.
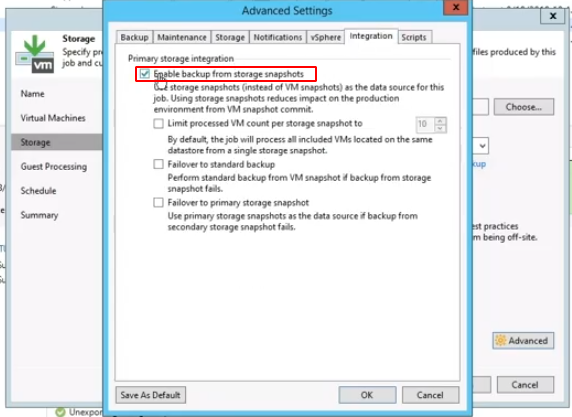
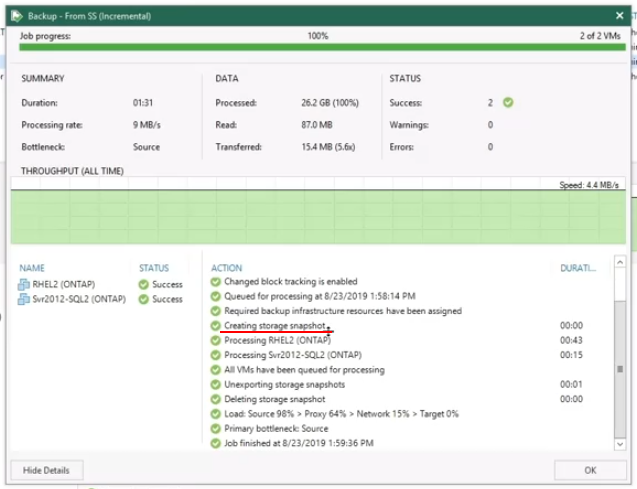
Storage Snapshots
Requires Enterprise Edition & Supported SAN
Veeam Storage Snapshots instruct VMware to stun and snapshot the VM, this snapshot is sent to the Storage (SAN) and cleaned from VMware.
Veeam Backup & Replication reads data of processed VMs from storage snapshots, which speeds up backup and replication operations, minimises VM Stun and improves Restore Point Objectives (RPO).
Storage snapshots are configured in backup job, under Storage > Advanced > Integration.
Veeam Backup Enterprise Manager
Requires Enterprise Edition
The Veeam Backup Enterprise Manager is a web based management tool used for Federating of multiple Veeam servers, it also provides a search-able file level index and role access levels with 1-click restores and self service abilities.
Microsoft Office 365
System requirements for up to 20,000 objects, 5000 users - per user is roughly 4 objects:
- 8 CPU
- 32GB
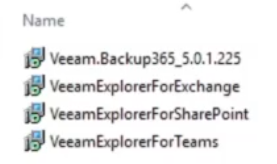
Download Veeam Backup for Microsoft Office 365 and extract the files. Installation is comprised of 4 installers, the Office 365 backup software itself and the available explorers.
Veeam CE entitles administrators to 10 free users.
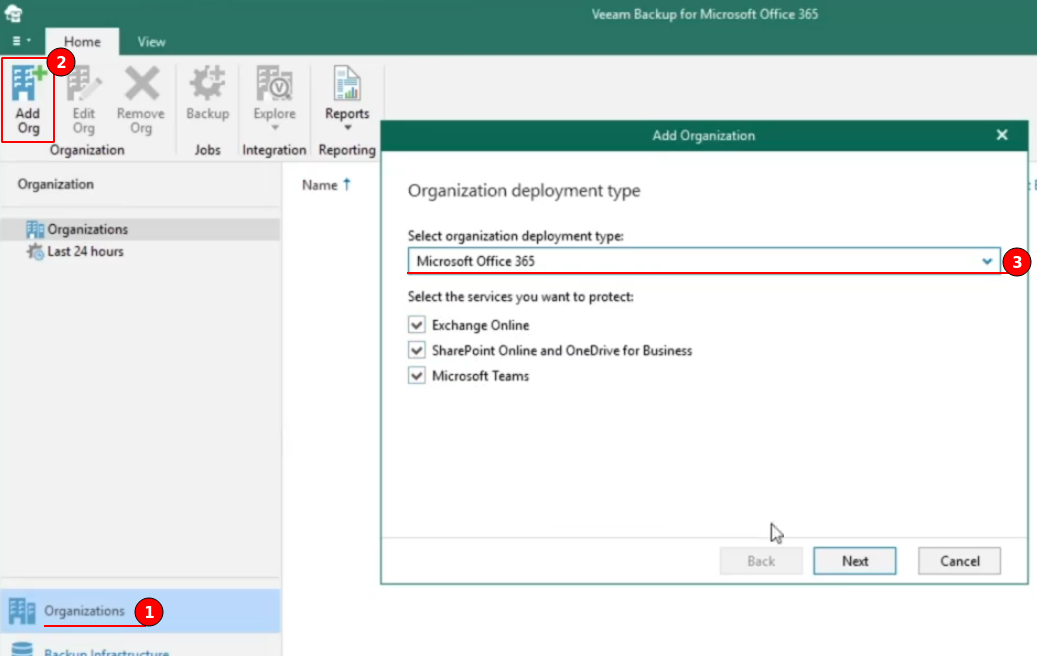
Adding Organisiations
To add an organisation to Veeam Microsoft Office 365, first navigate to Organizations > Add Org and select your deployment type from the drop down menu.
- Microsoft 365
- Hybrid
- On-premises
Select the preferred region from the drop down menu and type of authentication method, either Basic authentication for legacy or the newer Modern authentication.
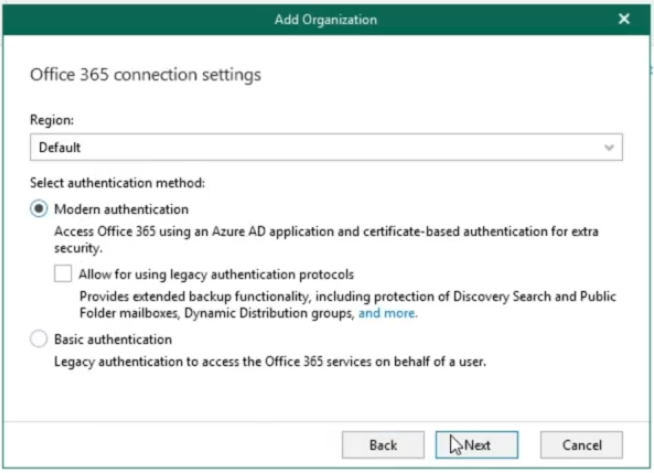
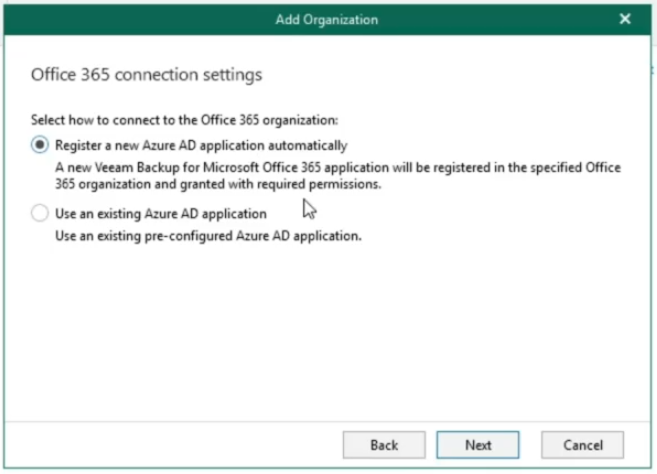
If you do not already have an existing Azure AD application, choose Register a new Azure AD application automatically.
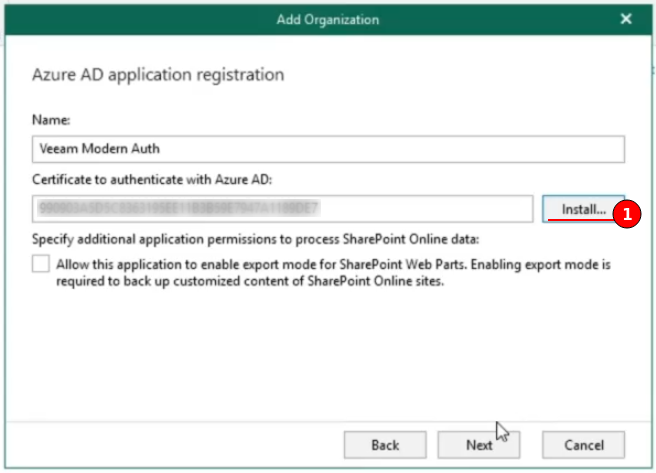
Provide a name for this application registration and create a new self-signed certificate using the Install button.
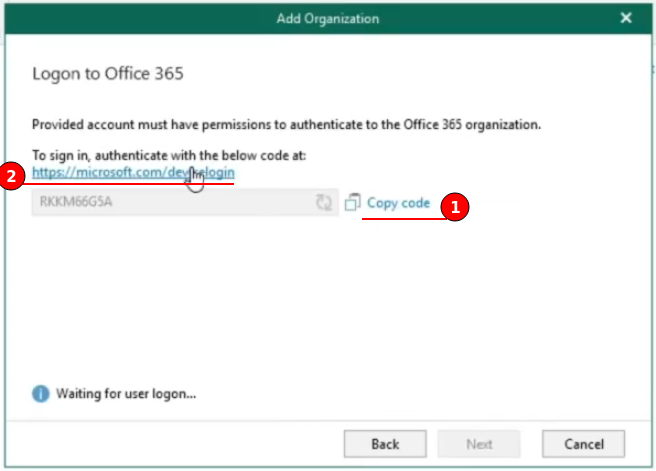
Use the provided code to authenticate against Microsoft Office 365, the account used should have permission to create and use the command line interface (CLI).
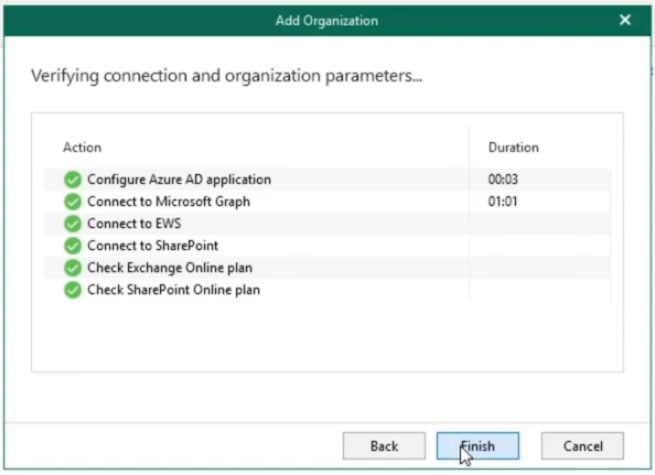
Configuration should complete successfully.
Auxiliary Backup Account
Microsoft throttles SharePoint Online and OneDrive site data. This throttling is based on per account to a single site, auxiliary backup accounts to help mitigate this throttling issue, increasing backup speeds from SharePoint Online and OneDrive by connecting over more streams.
It is recommended to start a security group with at least 8 auxiliary accounts per configured proxy.
To start configuring the Auxiliary accounts, first navigate to Organizations > Your Organisation and from the right click context menu select Manage backup applications.
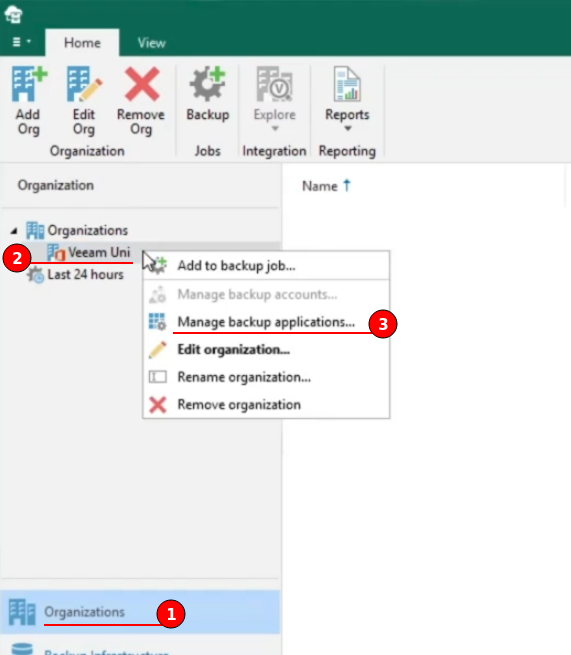
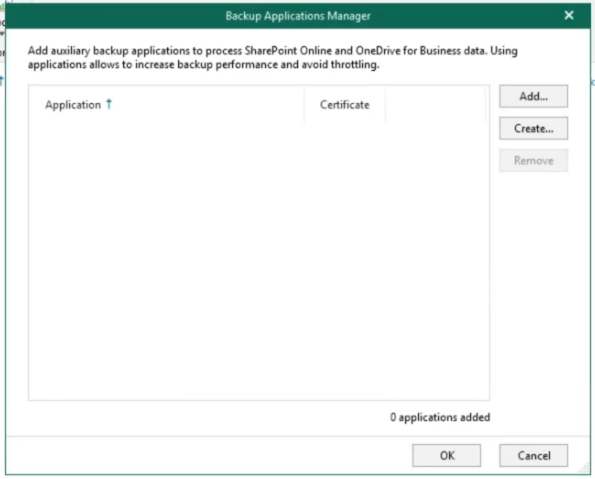
If you already have Auxilary backup accounts then use the Add button to include these accounts. In this demonstration, there are no accounts and will create new ones.
Click the Create button.
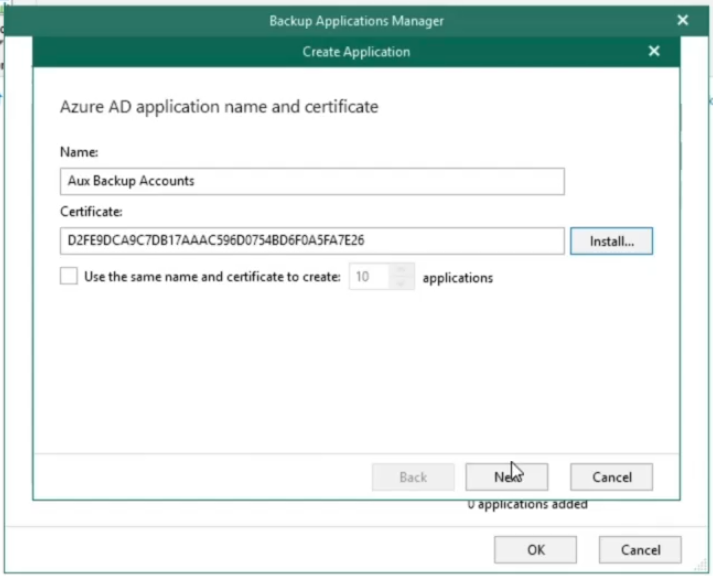
Creating an Auxiliary Backup Application uses same authentication method as when adding the organisation.
Provide a name for this application and ceate new self-signed certificate using the Install button. If you wish for Veeam to create multiple accounts then check the box called “Use the same name and certificcate to create xx applications”, changing the number to the required amount.
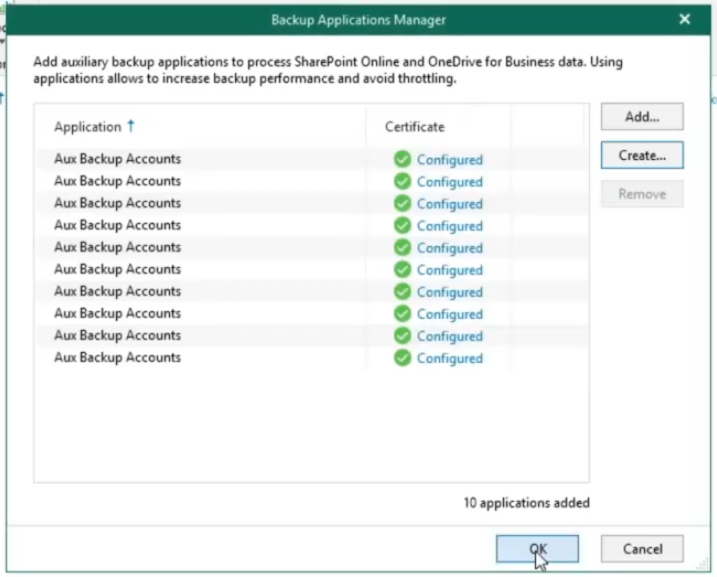
Veeam will then successfully create all of the accounts.
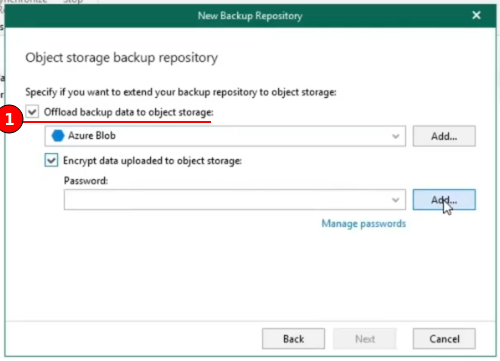
Adding Offloaded Cloud Repositories
Create a Object Storage Repository for Azure Blob

Create Backup Repository locally for caching (1% of total storage) and offloading to the Azure Blob.
Check the Offload backup data to object storage and then from the drop down menu select the Object Storage Repository created in the previous step.
It is recommended to encrypt data, enable by checking the Encrypt data uploaded to object storage box and adding credentials.
Creating Backup Jobs
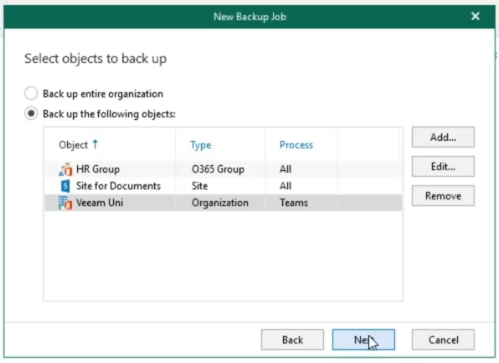
To start creating backup jobs for Microsoft Office 365, first navigate to Organizations > Your Organisation and click the Backup ribbon button.
Progress through the wizard, adding all the objects you wish to backup, such as; Users, Groups, Sites, Teams and Organizations.
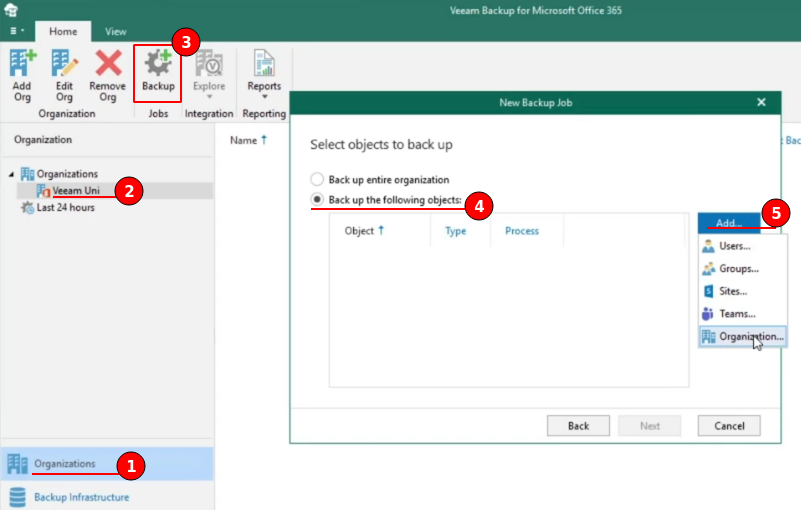
The administrator is able to edit down to individual objects, by clicking the “Edit” button.
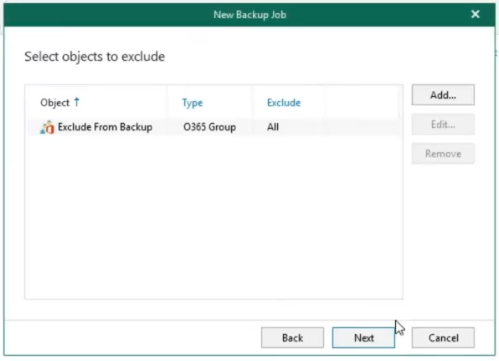
Exclusions can also be created to remove objects from the backup job. Its recommended to create an Office 365 group to dynamically exclude content from backup, instead of editing the job.
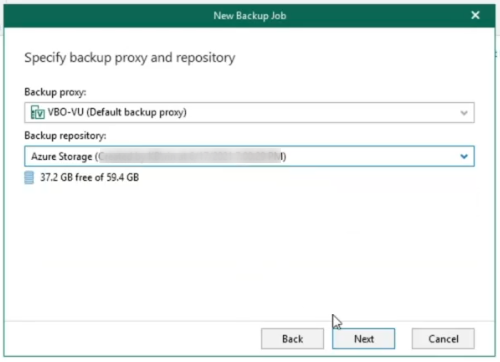
Select proxy and repository
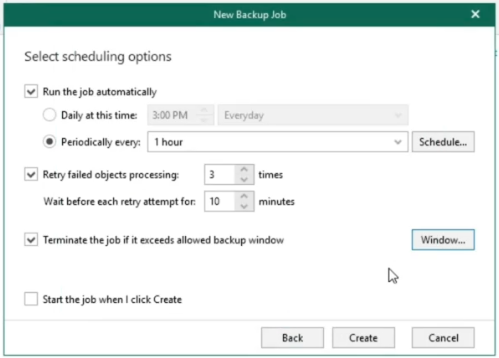
Then configure the backup schedule, by selecting the Periodically every option enables a near continuous backup.
Restore Explorers
The restore explorers are available from either the backup job or using the Explore button from the ribbon.
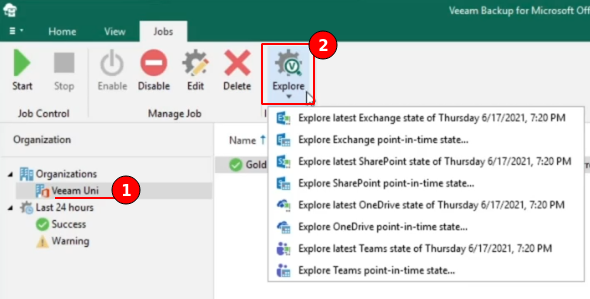
The Microsoft Office 365 restore explorers are similar to that of other restore explorers throughout Veeam.
Administrators have access to RESTful API, Advanced Logging, Compare to Production features as well as Advanced search and Reports.
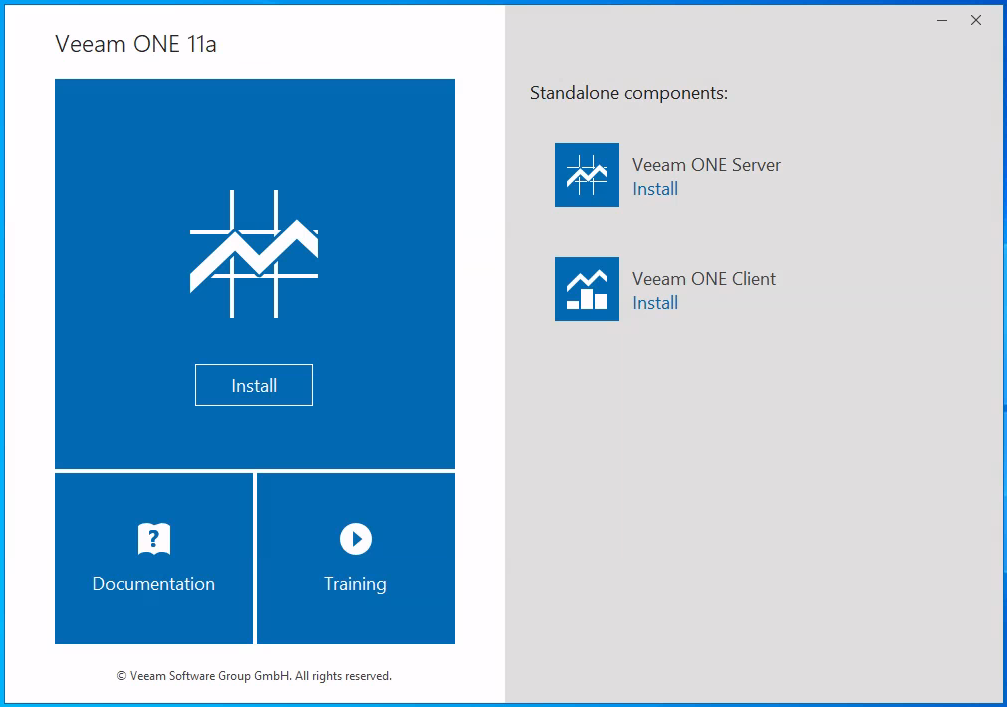
Veeam ONE
Veeam ONE is available in Community Edition and available for download. Veeam ONE is used to bring
- Monitoring
- Automation
- Analytics
Veeam ONE Installation
Mount the installation media then run the “Setup”. From the splash window choose the Install button on the left side.
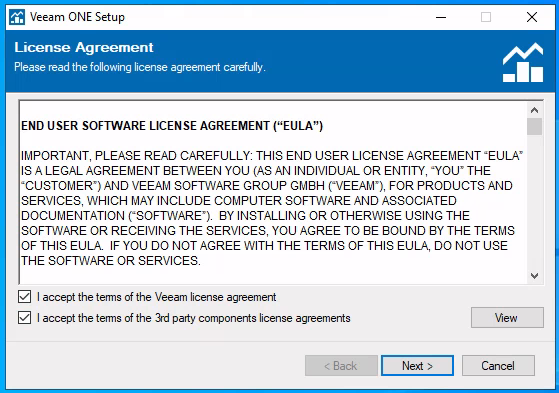
To use Veeam ONE, agreement to terms for Veeam license and 3rd party components must be given.
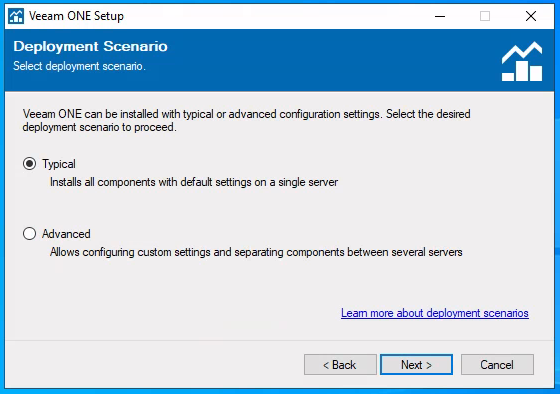
In this demonstration all components will be installed on a single server therefore the Typical installation will suffice.
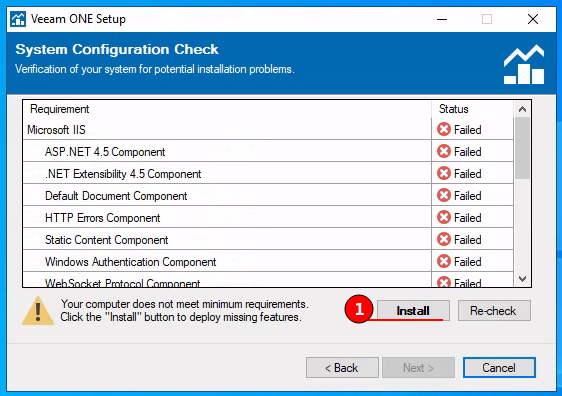
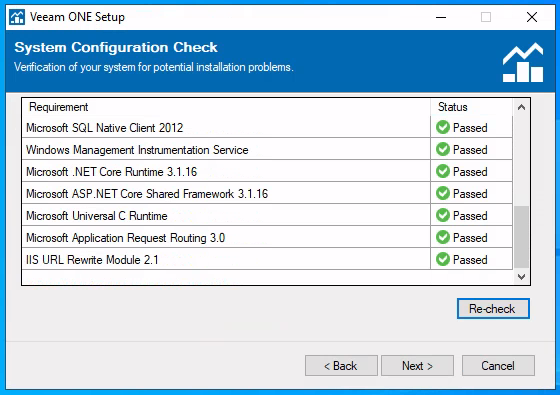
The next screen is the system configuration check, where all required components will be listed, as shown by default most if not all requirements will have a status of “Failed”.
Click the install button and Veeam ONE setup will attempt to install these components.
Installation succeeded and all components are now listed as “Passed”.
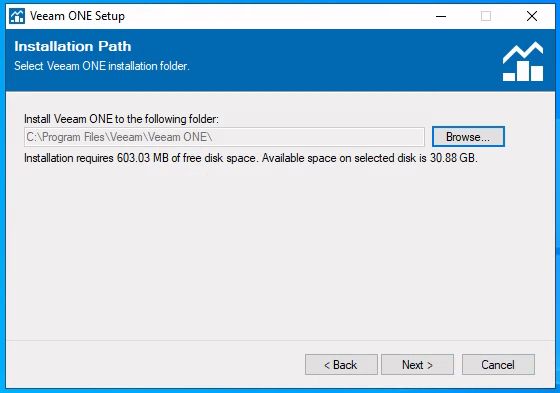
Now choose an installation path or keep to the default, In this demonstration I will be installing the to default location.
Provide a service account credentials, the account must have local administrator permissions.

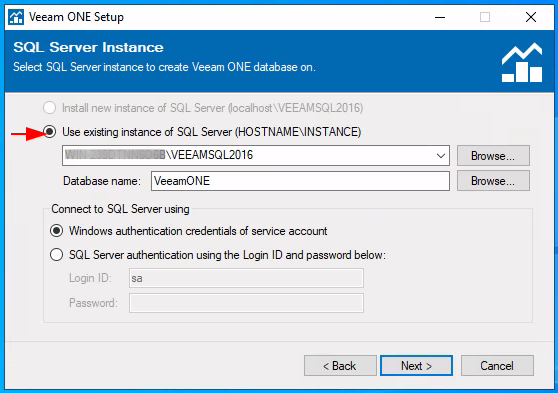
Specify the SQL server instance, because this is located on the same server as the Veeam Backup & Replication the setup will use an existing instance as shown in the figure below.
The instance, database name and authentication can be configured from this screen.
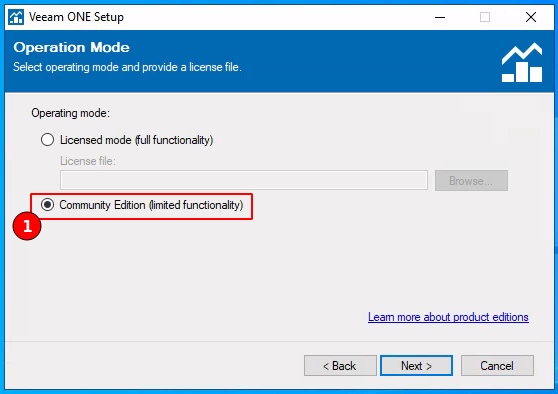
Provide a license file if you have one, either for paid or trial. In this demonstration I will be deploying the Community Edition.
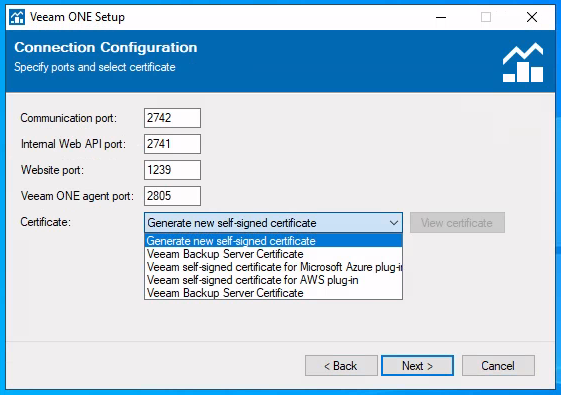
The next screen contains the configuration for service ports, these will be kept at the default values. Administrators can also configure a certificate or create a self-signed.
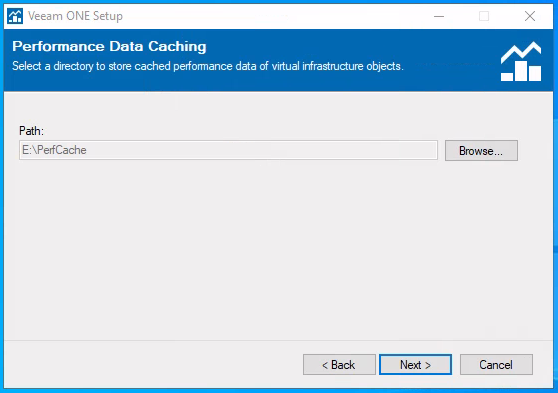
The performance cache location is space on disk to which Veeam ONE stores real-time performance data, as this data is collected.
Disk-based performance cache allows significantly decrease RAM utilisation on the machine that runs the Veeam ONE Server component. It is recommended to use a local SSD for larger monitoring environments.
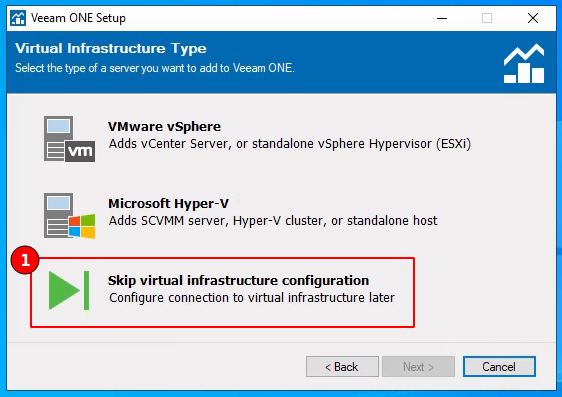
On the next screen administrators can choose to connect a vCenter Sever or Hyper-V infrastructure server (Failover Cluster, SCVMM, Hyper-V Server). In this demonstration I will be skipping as I do not have access to VMware vSphere or Hyper-V.
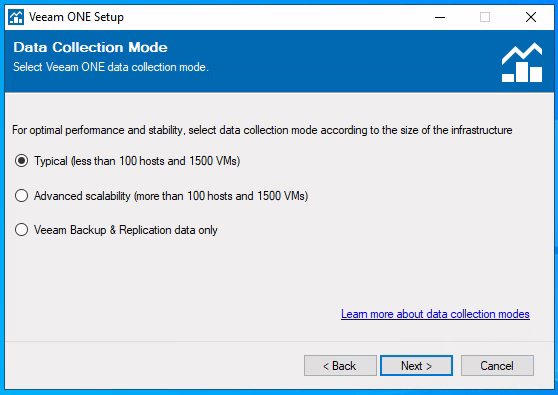
The Veeam Backup & Replication data only mode is recommended for users who want to focus on Veeam Backup & Replication monitoring and reporting, and do not need a deep visibility of the virtual infrastructure.
In this demonstration I will be installing the Typical data collection mode.
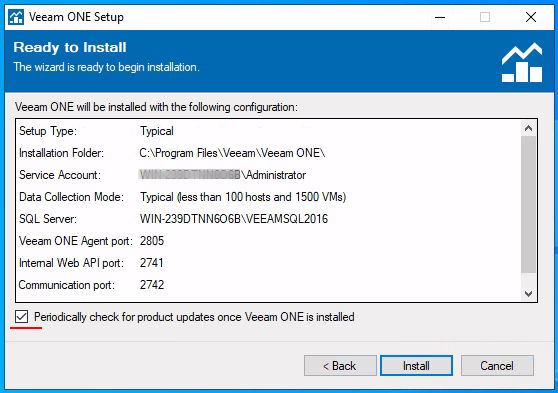
The final screen is a review and checkbox for Periodically check for product updates once Veeam ONE is installed.
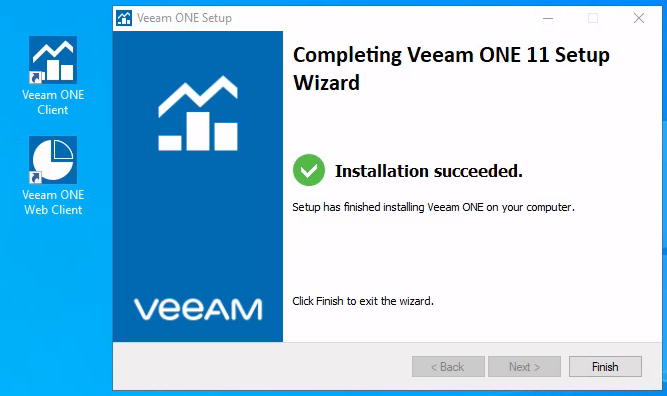
Desktop shortcuts have been created and the installation process succeeded, the last step is a requirement to log off.
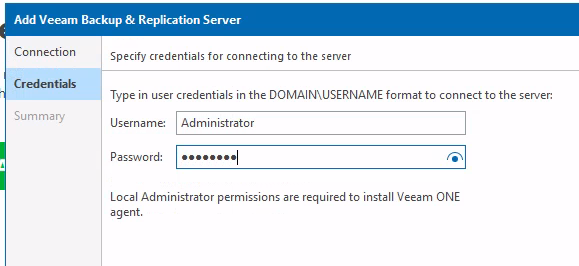
Adding Veeam Backup & Replication
To add our existing Veeam Backup & Replication server to Veeam ONE, first navigate to Data Protection View > Backup Infrastructure and click Add Server.
From the pop out window choose Veeam Backup & Replication.
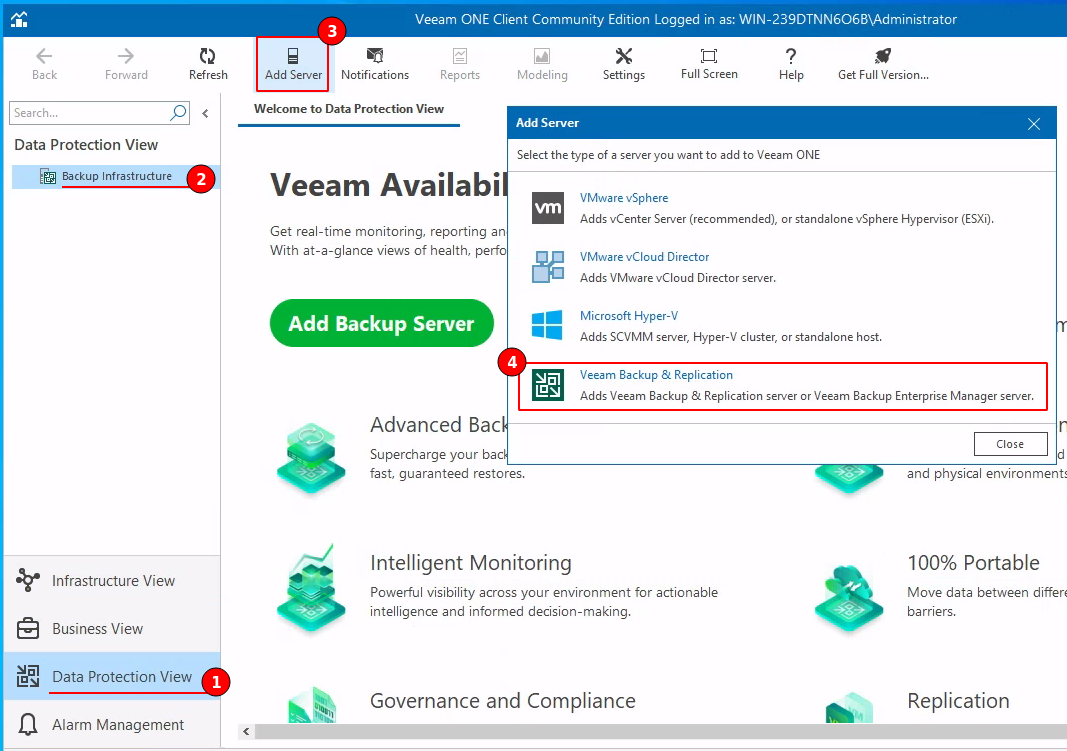
In this demonstration the Veeam ONE service is located on the same server as Veeam Backup & Replication. I have entered localhost as the server, selected Veeam Backup & Replication and choose to install Veeam ONE agent to analyse server logs and perform remediation actions.
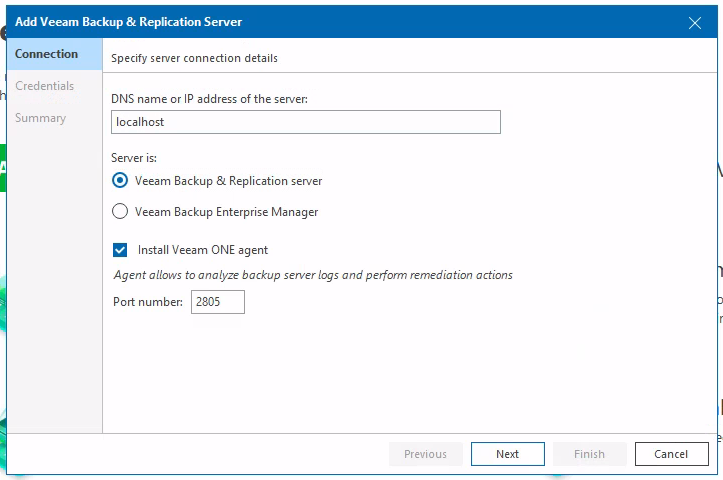
Next we must provide Veeam ONE with credentials for our backup server.
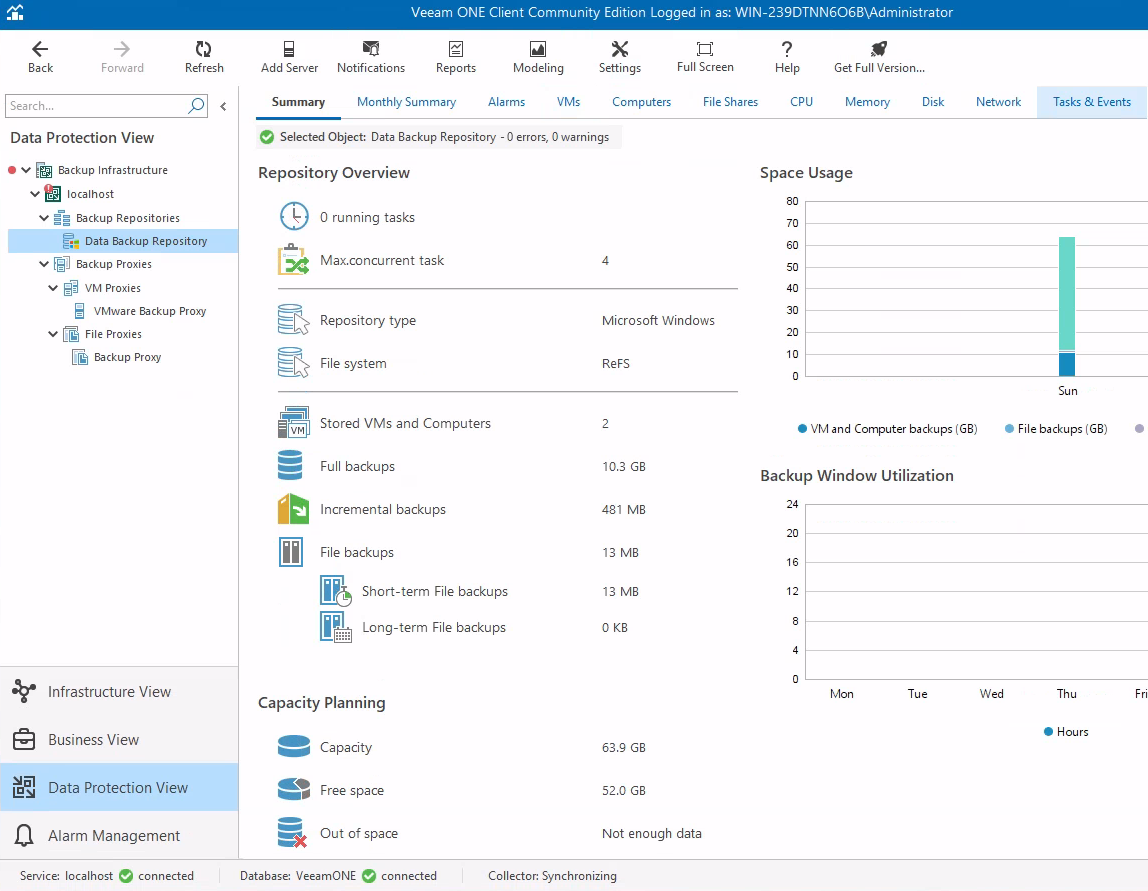
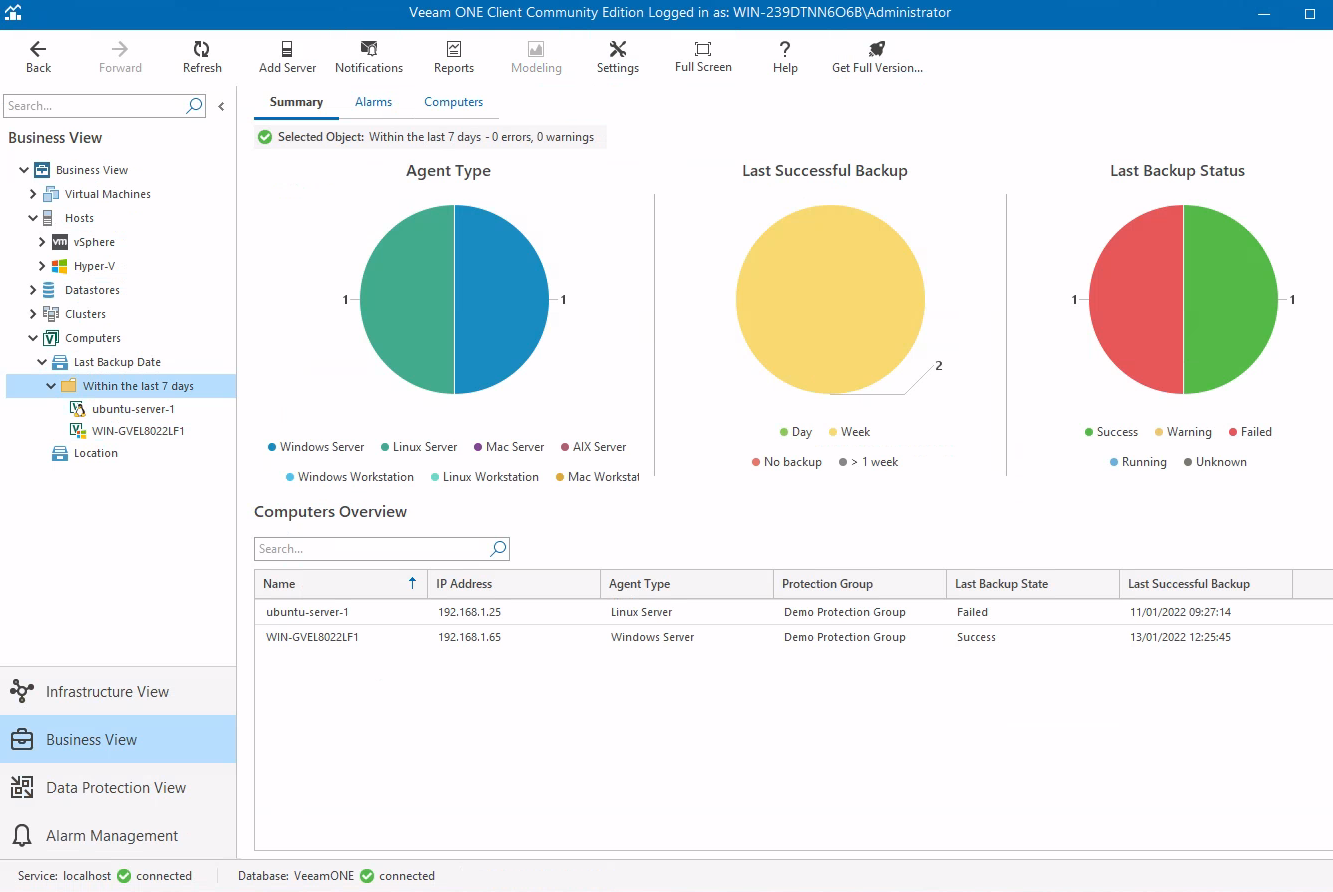
Once complete the collector will start to synchronise logs.
There are many great logs, statistics and reports available from the Veeam ONE console. Below are two examples of the Data Protection View and Business View.
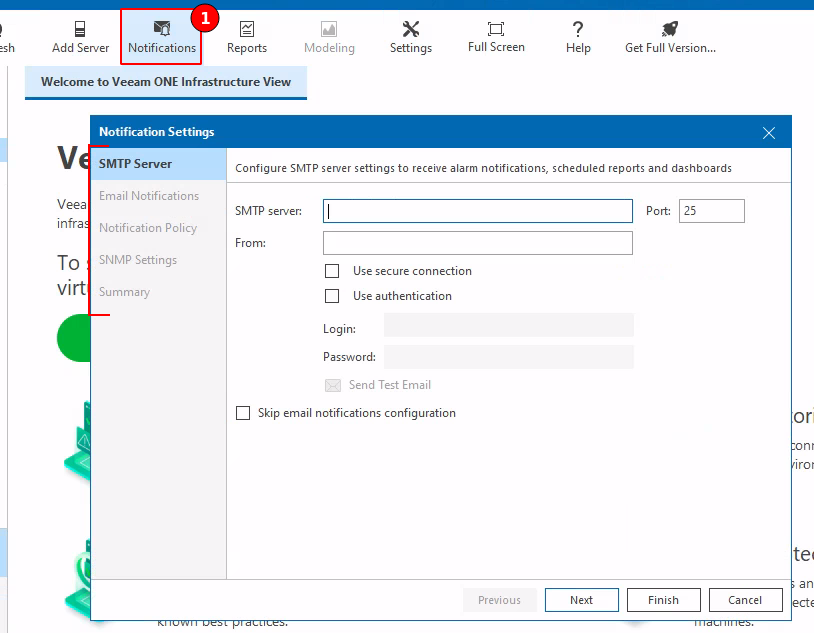
Notifications
On the top ribbon select “Notifications”. The notification settings window is similar to that of Veeam Backup & Replication notifications.
Web Client
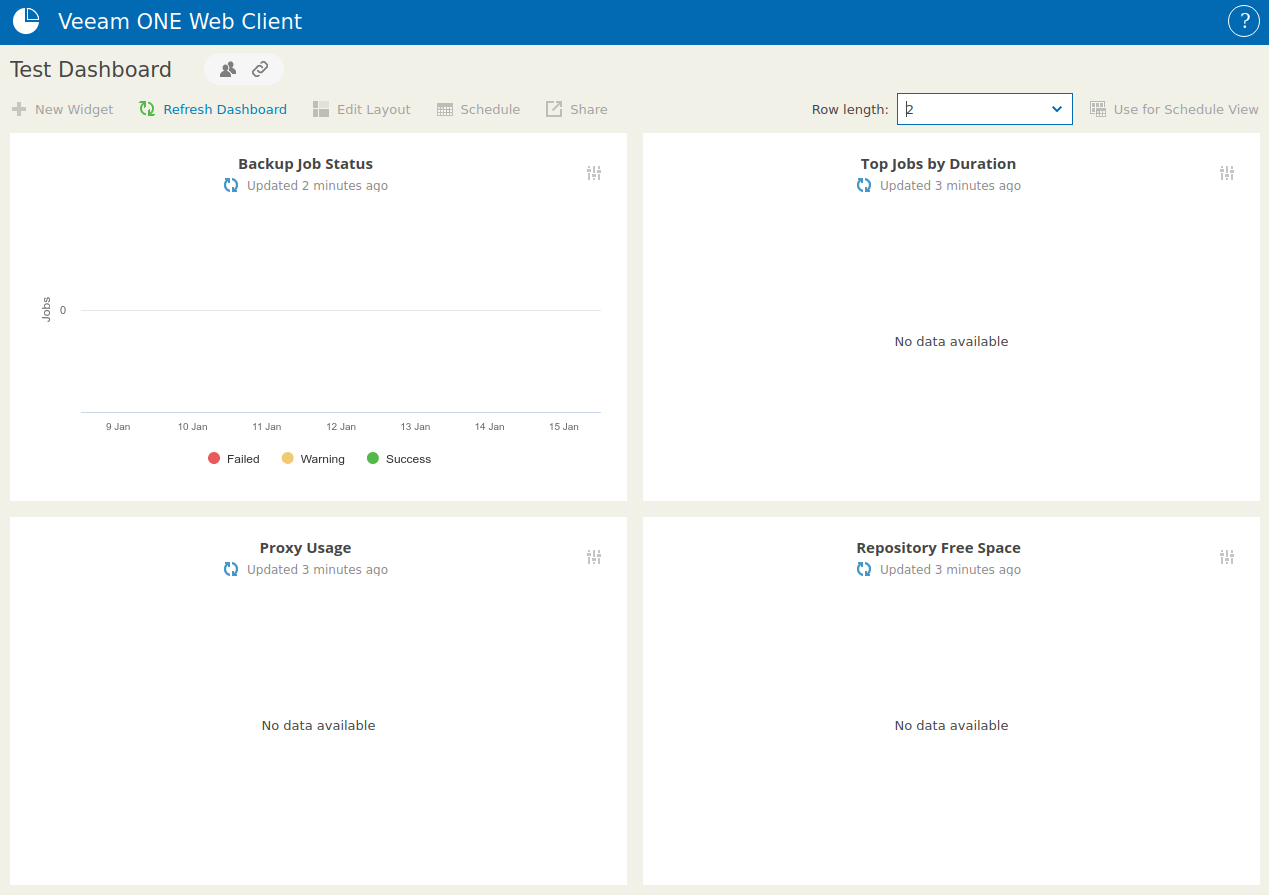
The Veeam ONE web client (previously known as reporter) provides quick access to critical environment details, heat maps and customised widgets as well as pre-configured and custom reports all from a web browser. These can also be used to share content and even use for digital signage or NOC.
The web client is installed along side the Veeam ONE server.
Below is an example of a custom dashboard that I publicly shared, although in my demonstration I do not have any actual stats to view.