OPNsense VM
18 May 2024
In this article, I will be creating a virtual firewall using OPNsense, configuring it with key services, which empower the home lab hobbyist.
Creating a Virtual Machine
Download the DVD image of OPNsense and unpack it using the Linux command, details for other operating systems can be found on the docs.opnsense.org website.
bzip2 -d OPNsense-<filename>.bz2
Upload the ISO to your Proxmox server, then create a new Virtual Machine (VM).
A few settings to change:
- Start at boot: Enabled
- Start/Shutdown Order: 1
- Guest OS Type: Other
- Disk Bus/Device: SCSI
- Discard and IO thread: Enabled
- CPU Type: Host
- Network Model: VirtIO (paravirtualised)
- Add a second network, WAN and LAN.
Install OPNsense
Start the VM and open a console, once booted you’ll need to enter the ‘Installer’ mode by logging in using the default credentials.
- Username: installer
- Password: opnsense
Step through the installation wizard, in my demo environment I installed using UFS, but in most cases the more reliable option is ZFS.
After installation completes there will be a prompt to assign the interfaces, if this is skipped the default values will be assigned.
- WAN - IPv4 DHCP
- LAN - IPv4 Static 192.168.1.1/24
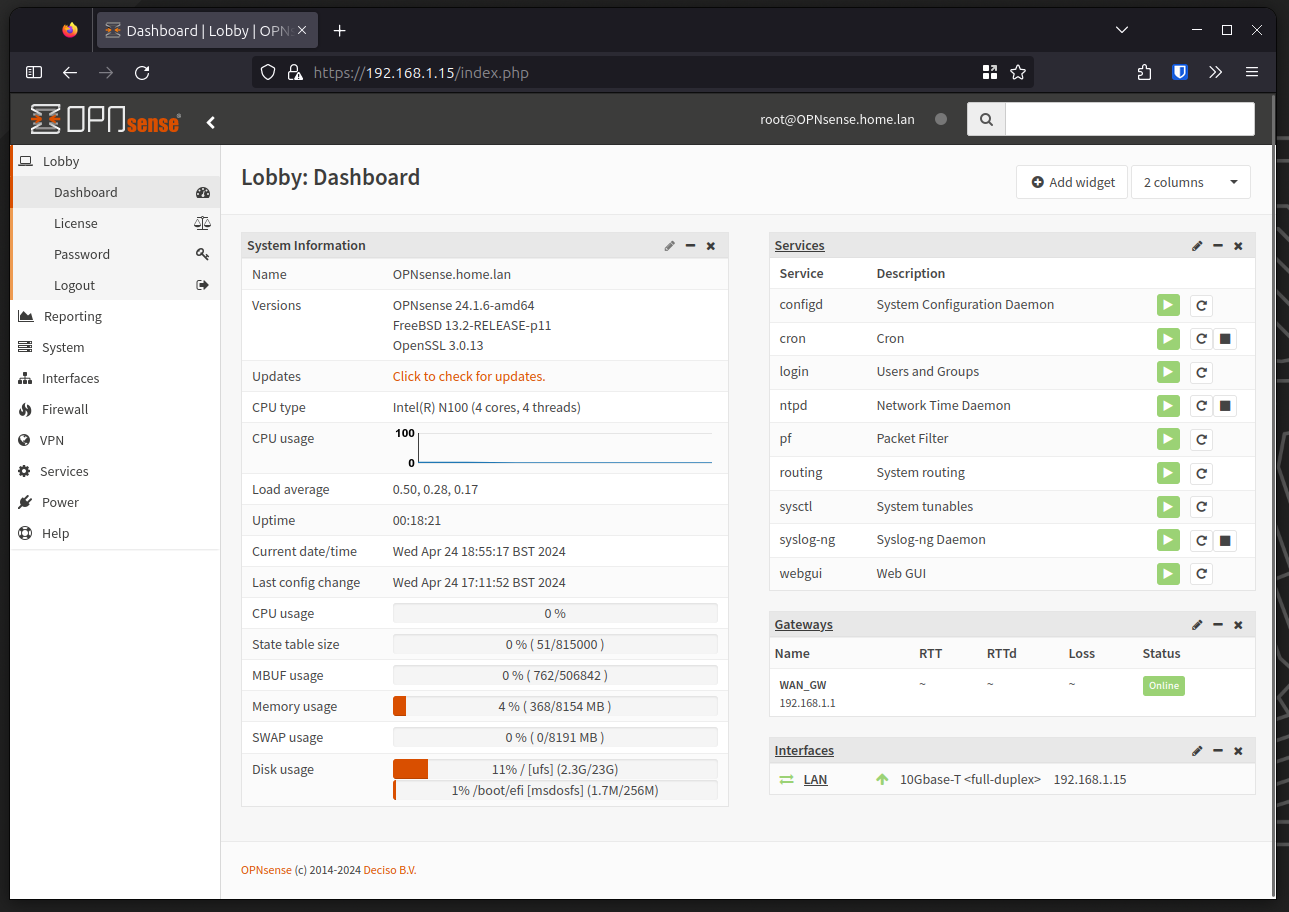
Now using a browser navigate to the LAN IP address, which should present the OPNsense dashboard after logging in.
The screenshot below shows a default dashboard with the expandable navigation on the left side.
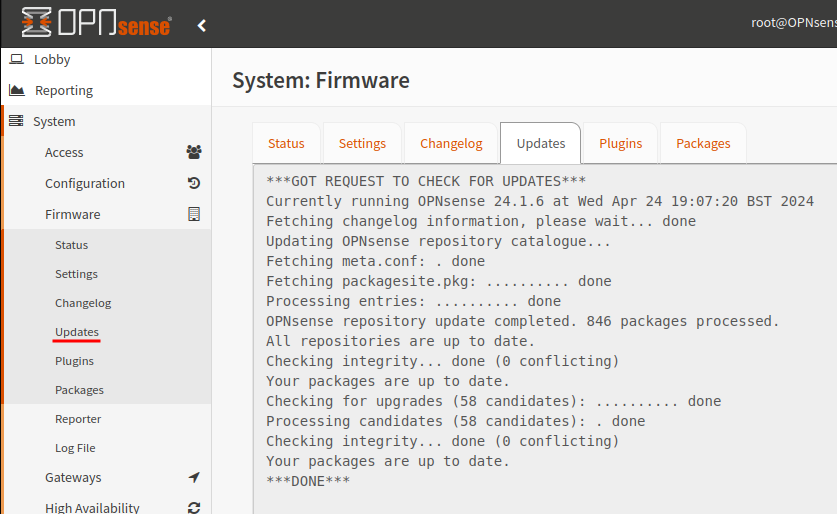
Updates
First step should be to update the packages. Updates can be found under the menu item System > Firmware > Updates.
If you require the update Mirror and Type can be changed under the Settings tab.
Dark Theme
OPNsense doesn’t have a dark theme by default but, if you are like me having a darker theme can help with eye strain. Therefore I will install a darker theme.
Navigate to System > Firmware > Plugins and search for “Theme”, then download.

To apply the theme navigate to System > Settings > General and change the theme to your preferred style. I will be using ‘Rebellion’.

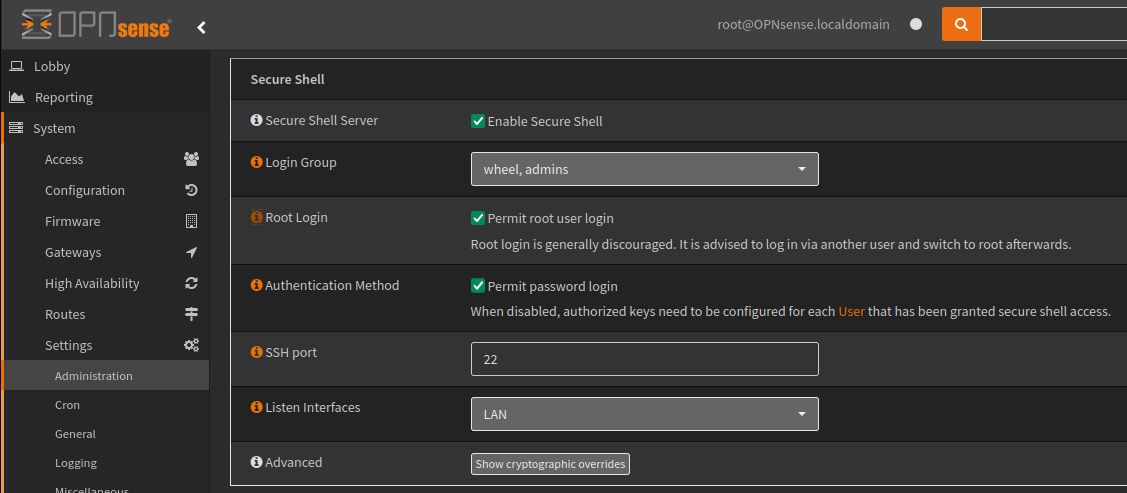
Enabling SSH
SSH can be a security concern, and therefore by default OPNsense does not enable SSH. To enable this service navigate to System > Settings > Administration
In the example below I have enabled the SSH service on the LAN interface and permitted root login using a password.
In production you would create an additional user and authorise it using a key.
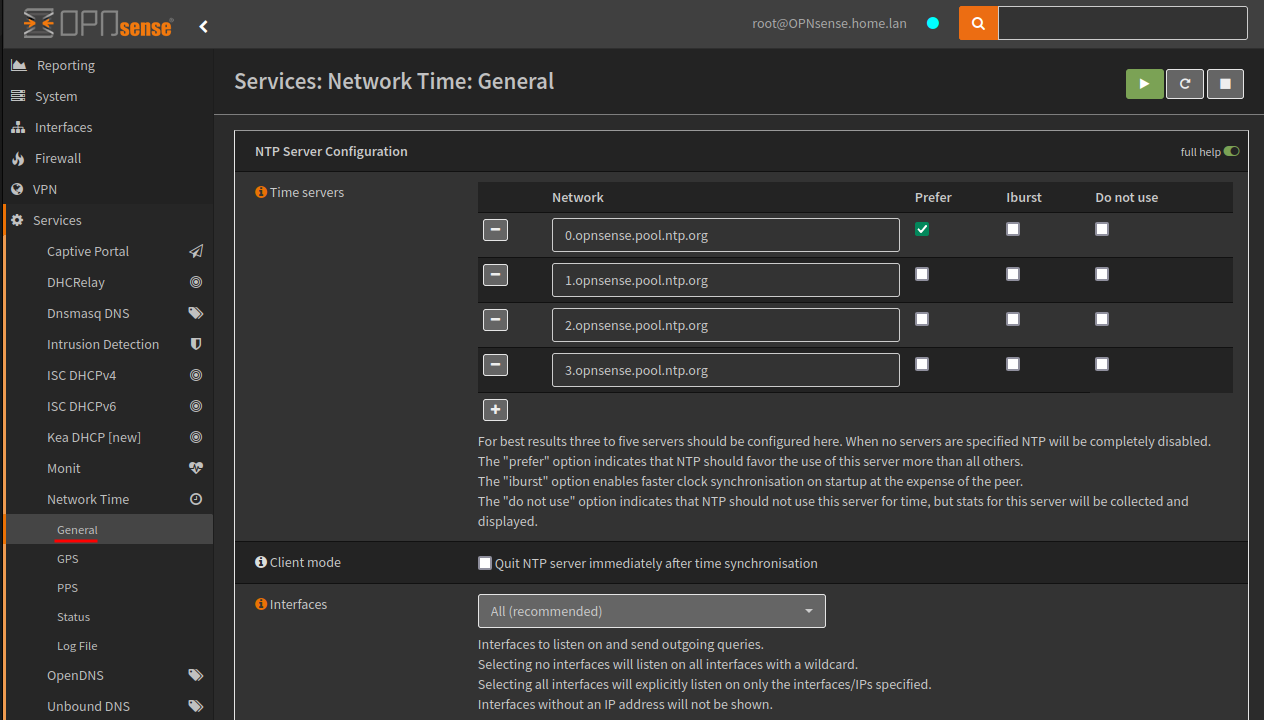
NTP Configuration
By default OPNsense will act as a NTP server, and by default will use “0-3.opnsense.pool.ntp.org” for time servers. These settings are available under Services > Network Time > General.
You may wish to use another time server for example the NTP Pool Project, if you didn’t want to use OPNsense as a server you would simply enable ‘Client mode’ and if you only wanted to serve as a NTP server on specific interfaces you would change the ‘Interfaces’ dropdown.
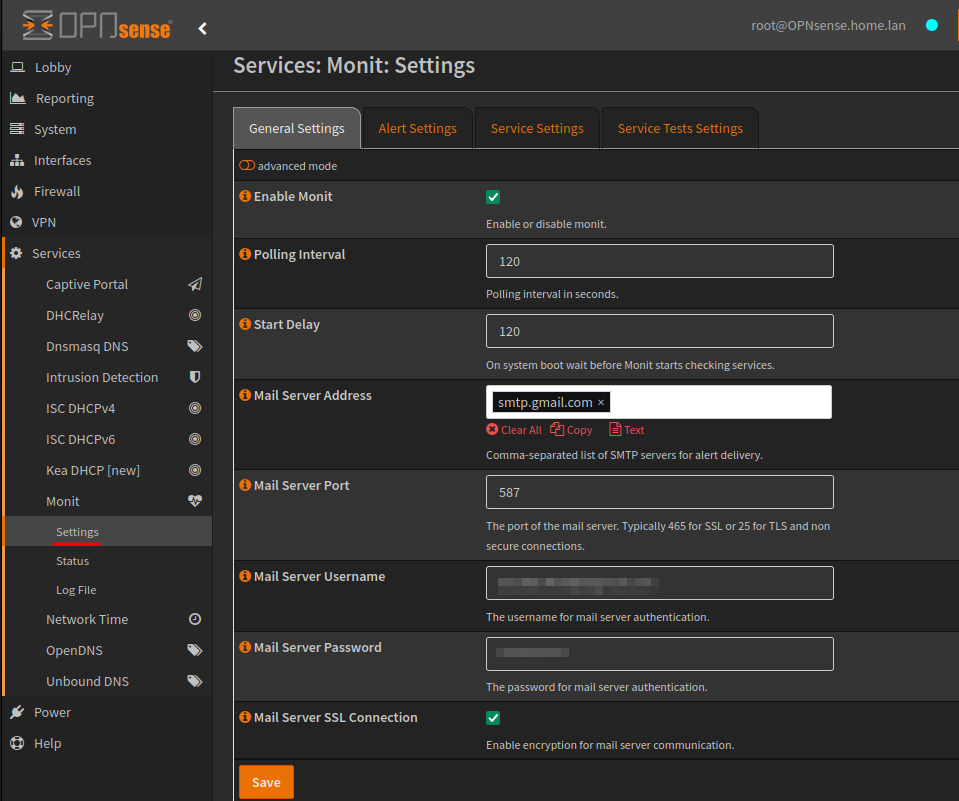
Monit SMTP Configuration
OPNsense uses the Monit for monitoring and notifications, this is under the Services > Monit > Settings tab. Below is an example screenshot using Gmail as a mail server.
Monit has extensive monitoring capabilities and is well documented on OPNsense and MMonit.
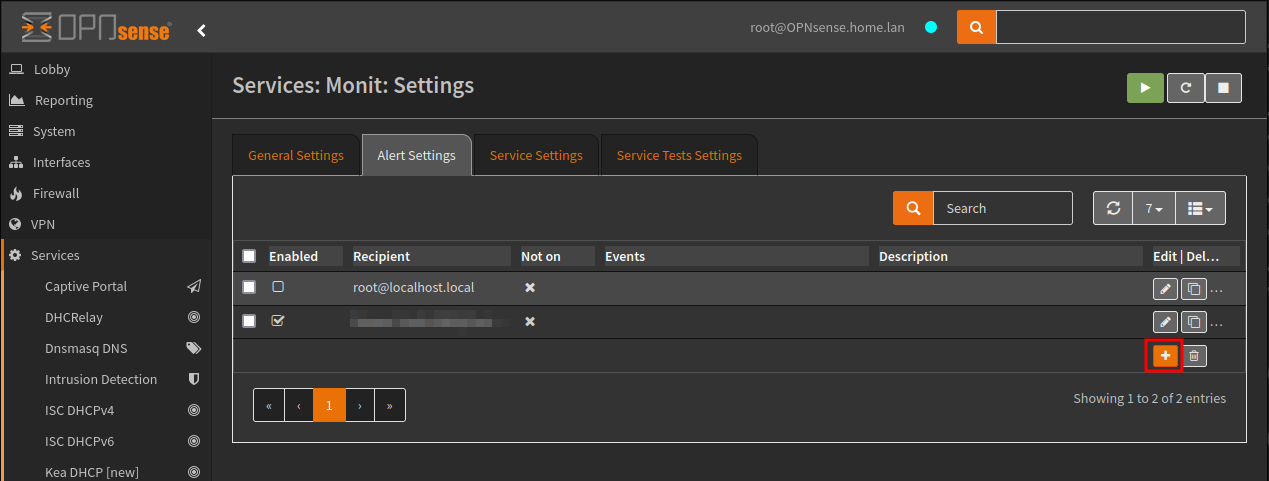
At this point I am only interested in setting up email notifications so I will need to configure a Recipient, which is available under the Alert Settings tab.
I’ll be creating a new recipient to receive all events, click the plus + button to add a new.
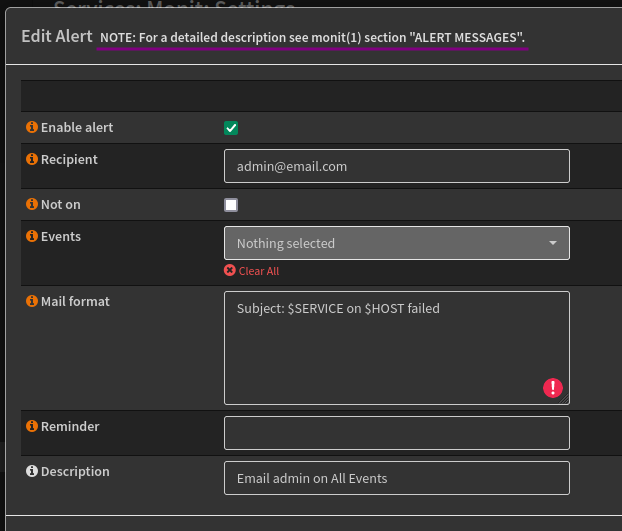
Below is an example to receive all events, which is likely to be unnecessary. This is a good starting point and an introduction to Monit.
As highlighted in the screenshot, for a detailed description see monit (1) section “ALERT MESSAGES”.
ISC DHCP - more mature, but EoL
ISC is a mature DHCP service, and can offer different functions over Kea DHCP.
ISC DHCP is part of OPNsense so no additional packages are required, it can be found under Services > ISC DHCPv4 and ISC DHCPv6.
The example below is configuring DHCPv4.
Enable the service, which will start acting as the DHCP server for the LAN interface. Additional configuration including IP ranges, additional pools, DNS servers, gateways etc can all be configured from this page.
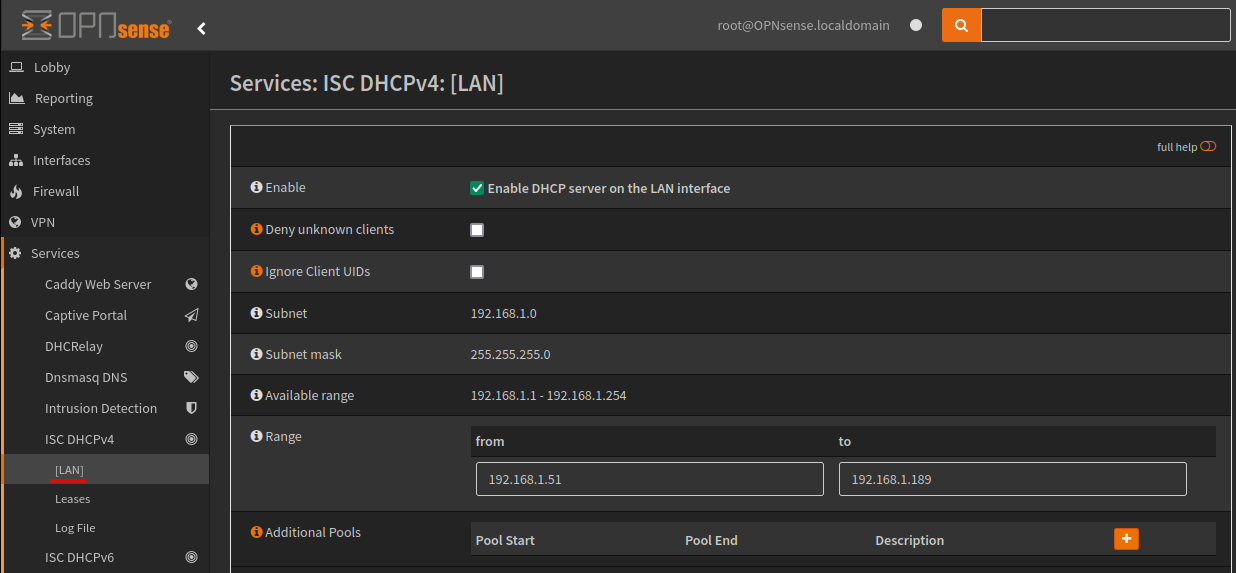
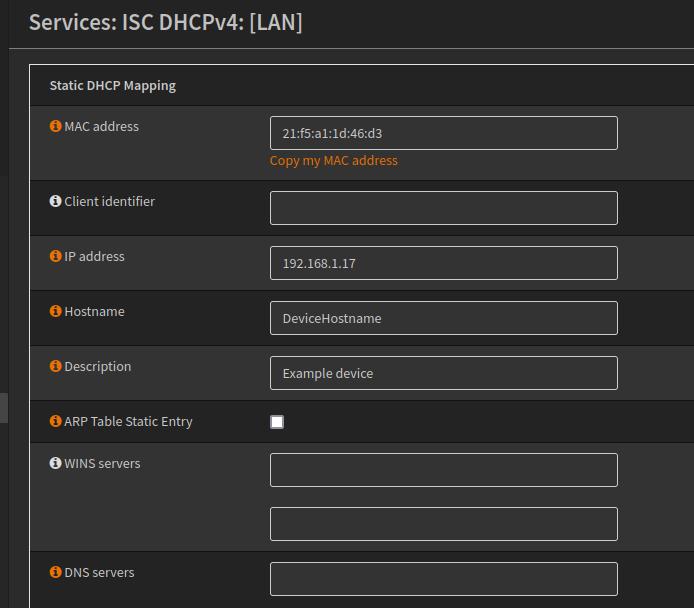
At the bottom of this page you will found the static mappings, here you can create IP reservations.
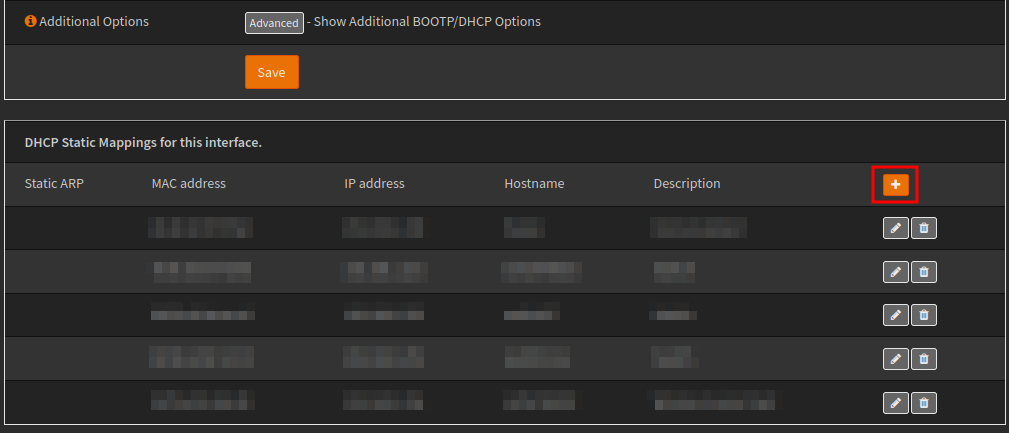
Below is a basic example of creating a static DHCP mapping.
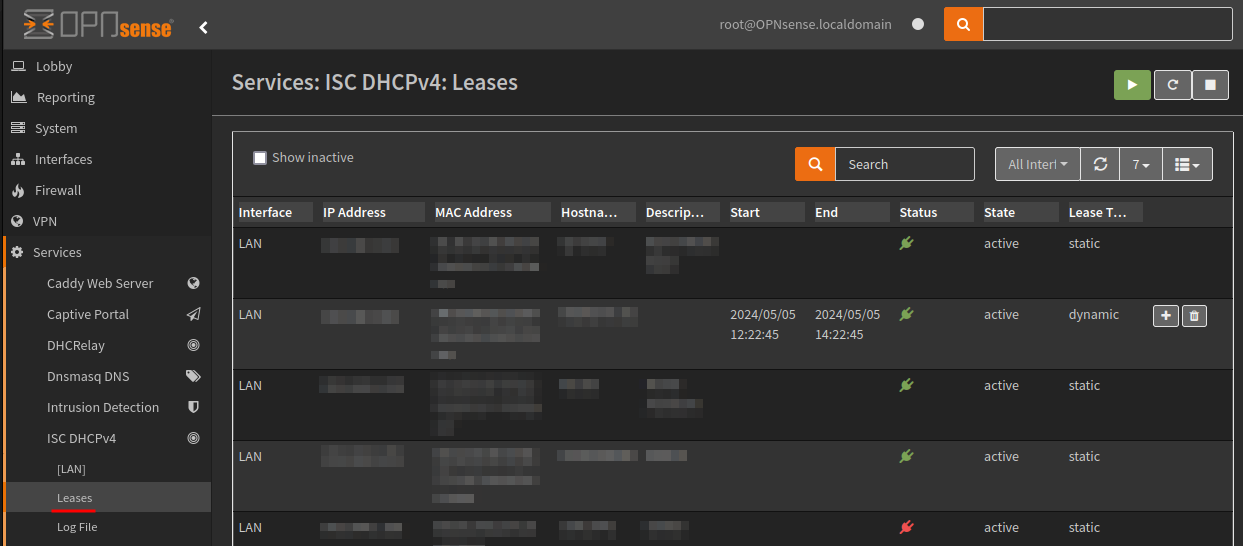
The Leases menu item shows lease information including the ability to delete and add to static mappings.
Kea DHCP - newer
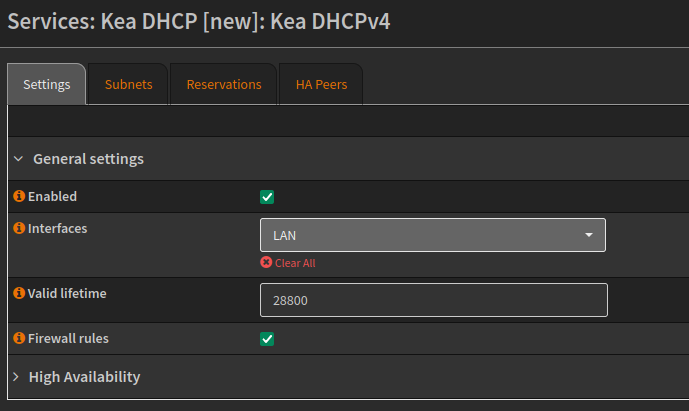
To providing dynamic IP addressing to the network, we will configure the Kea DHCP service, this is part of OPNsense so no additional packages are required.
Navigate to Services > Kea DHCP > Kea DHCPv4
First go to the Subnets tab and create a new, here we will specify our DHCP scope.
Subnet is the network segment, and pool is the addresses, or range of addresses that will be offered to clients.

If a reserved address is required, this would be created via the Reservations tab, as shown in the screenshot below.
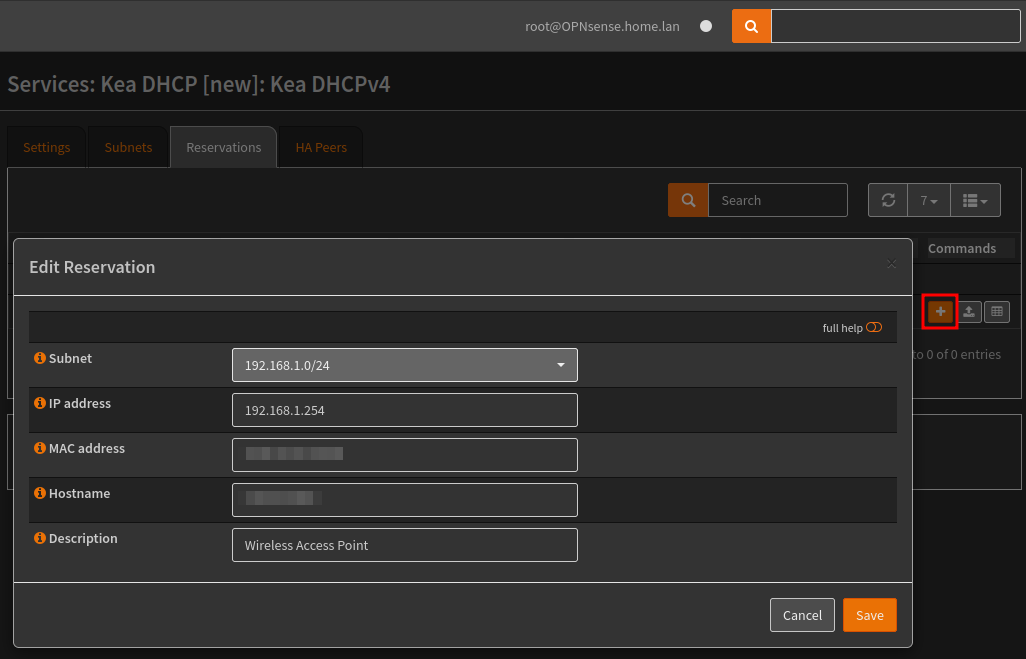
This can also be imported and exported as a CSV file.
In the Settings tab, we can enable the service and set which interface the DHCP service should be listening on and how long the lease should last, in seconds.
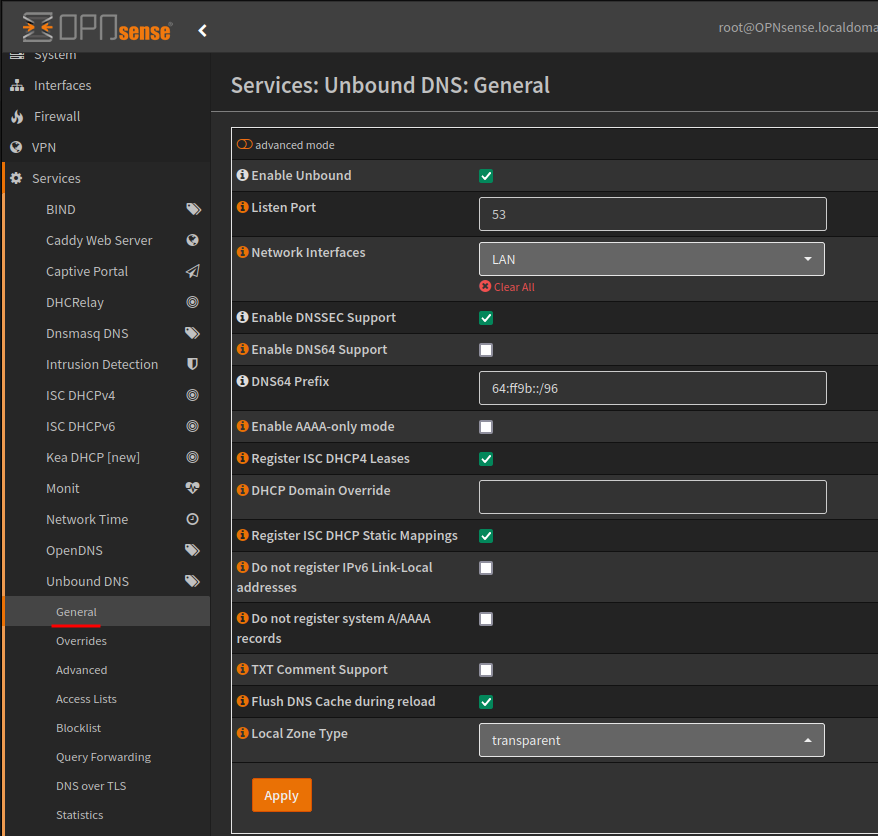
Unbound DNS - validating, recursive, caching DNS resolver
To providing name resolution to the network, we will configure the Unbound DNS service, this is part of OPNsense so no additional packages are required.
Navigate to Services > Unbound DNS and the General menu item.
The service needs to be enabled, and I have also set the following:
- DNSSEC support to be enabled
- Register ISC DHCP leaves and static mappings
- Flush DNS Cache during reload
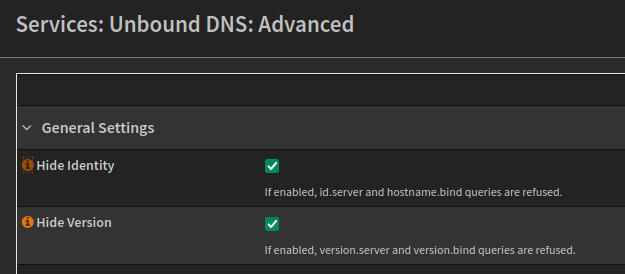
The Advanced menu item, has a number of settings, in this example I will be enabling Hide Identity and Hide Version
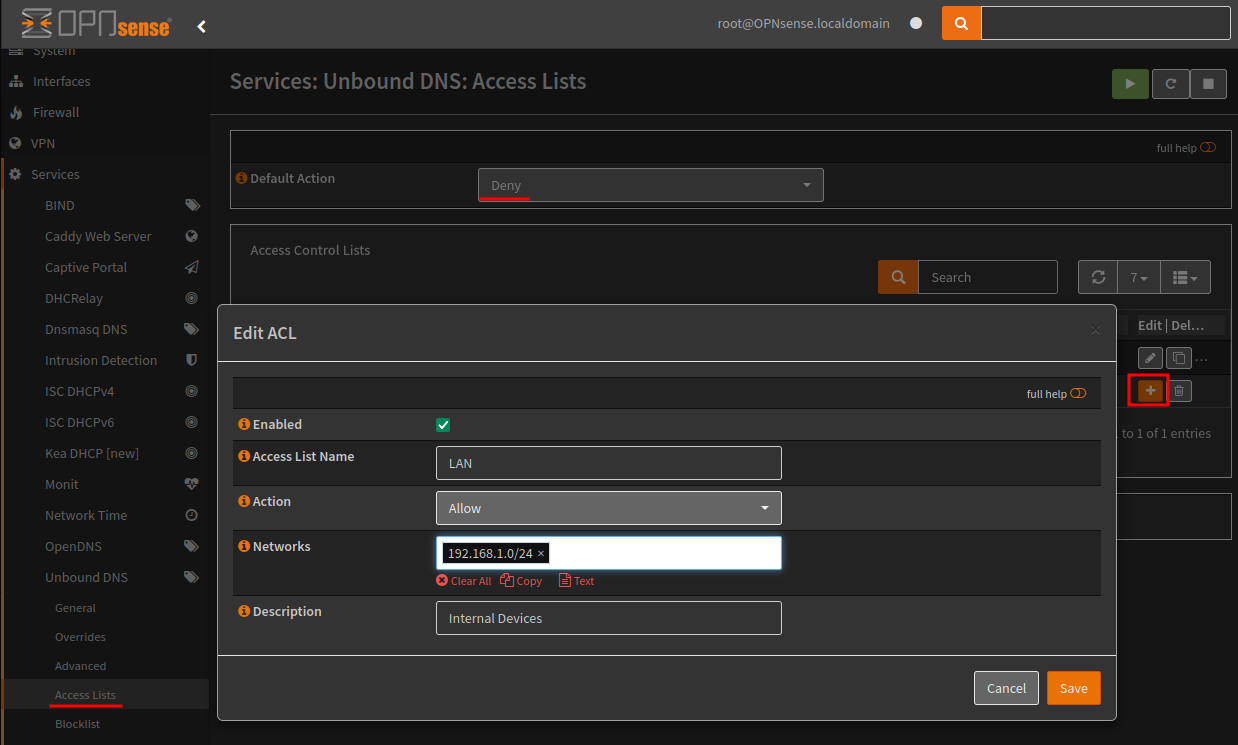
Access Lists can be used to Allow, Deny and Refuse permission to query against this server. The default action can be set to deny, then we can create Allow networks to permit access.
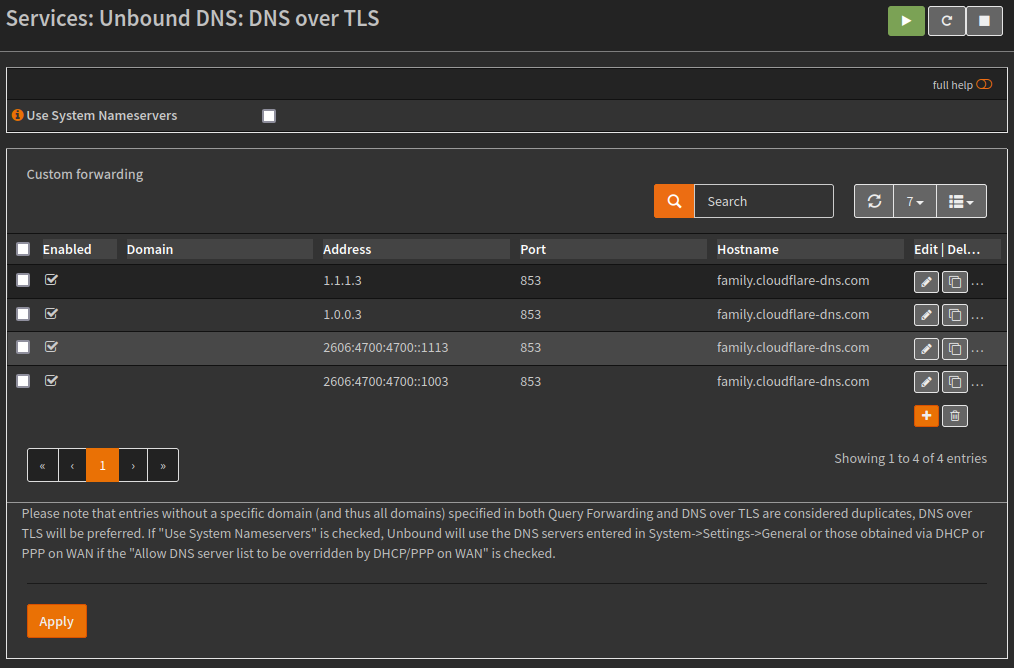
DoT (DNS over TLS) can be configured via the menu item ‘DNS over TLS’, and below I have configured the Cloudflare servers as the forwarding address and certificates are verified using family.cloudflare-dns.com as per their documentation.
Can be test via Tenta.
1.1.1.3
1.0.0.3
2606:4700:4700::1113
2606:4700:4700::1003
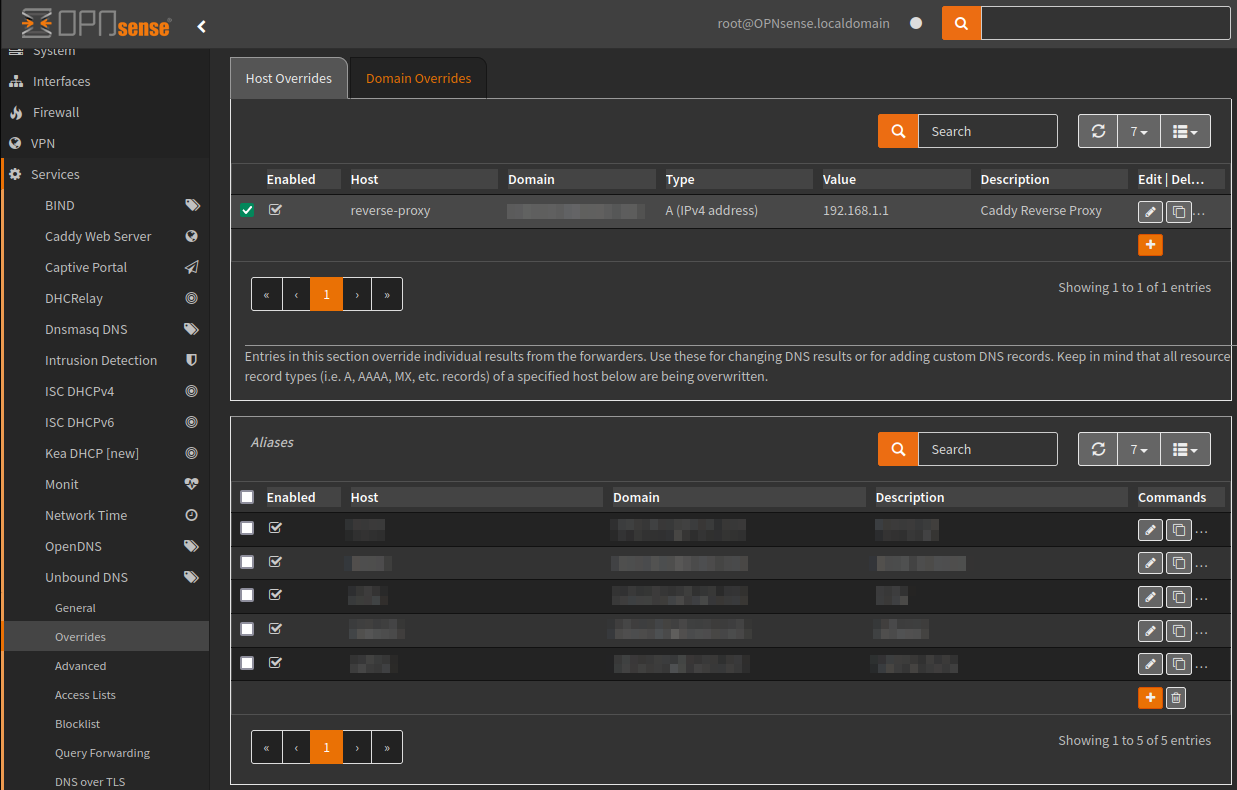
Overrides can be configured for either the host or domain, this is available via the menu item Overrides, this can be perceptually useful if you self host services (Split-horizon DNS) and do not want to configure NAT reflection.
In the example below I have created a fake sub-domain called “reverse-proxy”, which can be used to create alias’ for internal services.
Below applying this configuration the service would return an external address when using nslookup, after applying the configuration, it instead returns my reverse proxy address.
CNAME
Not available from the web interface, instead the conf file needs to be manually edited using the console or SSH.
Select option 8 for SHELL access.
In this example I will be reviewing the Safe Search implementation, which is located in the following location.
cat /var/unbound/etc/safesearch.conf
A snippet of this file is shown in the screenshot below, if you wanted to create a CNAME to redirect one domain to another you would require 2 lines.
local-zone "domainone.com" redirect
local-data "domainone.com IN CNAME domaintwo.com"
“IN” stands for internet and is used in records that resolve a domain name to an IP address on the internet, this helps to identify record types and the intended network.

We cannot add new custom configuration files because when the service restarts the unbound.conf and the custom includes within /var/unbound/etc/*.conf are cleaned up.
DNS Block Lists
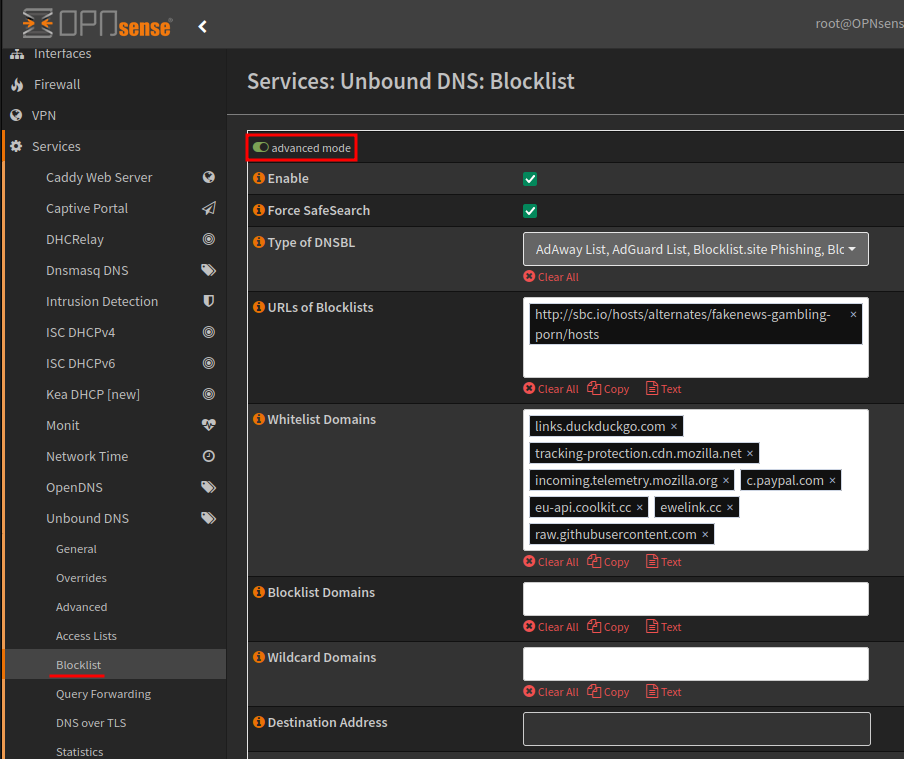
To enable DNS block lists, under the menu Services > Unbound DNS > Blocklist, enabling this service allow you to configure SafeSearch, pre-configured DNS blocklists and URLs of block lists (advanced option), also allowing for whitelist domains.
If you want to return a non-existant domain (NXDOMAIN) values, you can do this under the advanced options.
URLs of Blocklists
http://sbc.io/hosts/alternates/fakenews-gambling-porn/hosts,
https://raw.githubusercontent.com/crypt0rr/public-doh-servers/main/dns.list
Whitelist domains
links.duckduckgo.com
tracking-protection.cdn.mozilla.net
incoming.telemetry.mozilla.org
c.paypal.com
eu-api.coolkit.cc
ewelink.cc
raw.githubusercontent.com
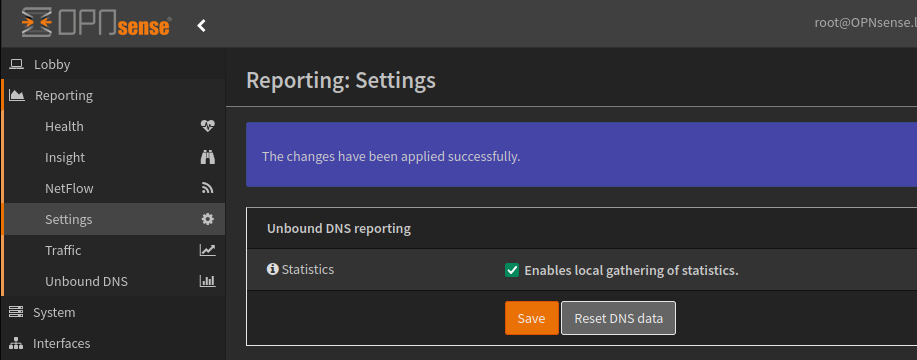
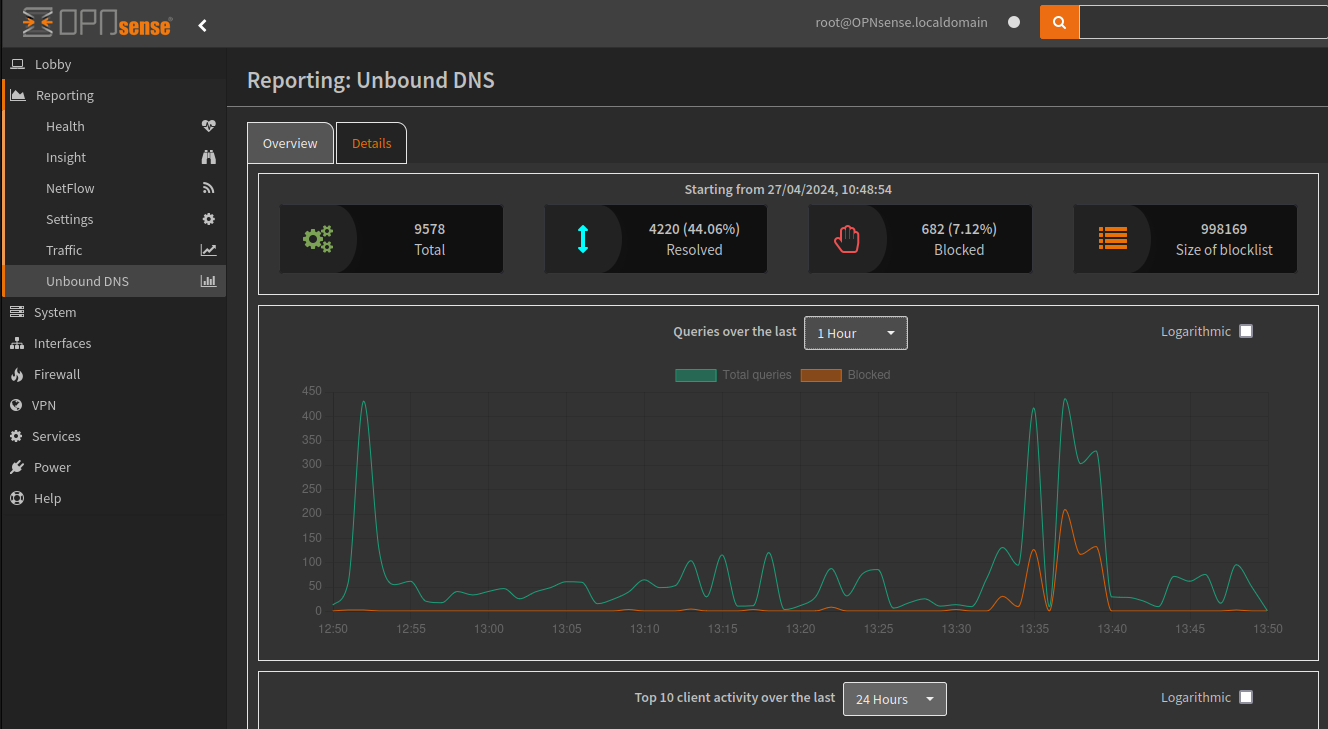
Lastly under the Reporting > Settings menu, enabling Statistics provides access to the Unbound DNS stats page, which is similar to PiHole, showing the number of resolved, blocked queries, top blocked domains etc.
Example of the dashboard.
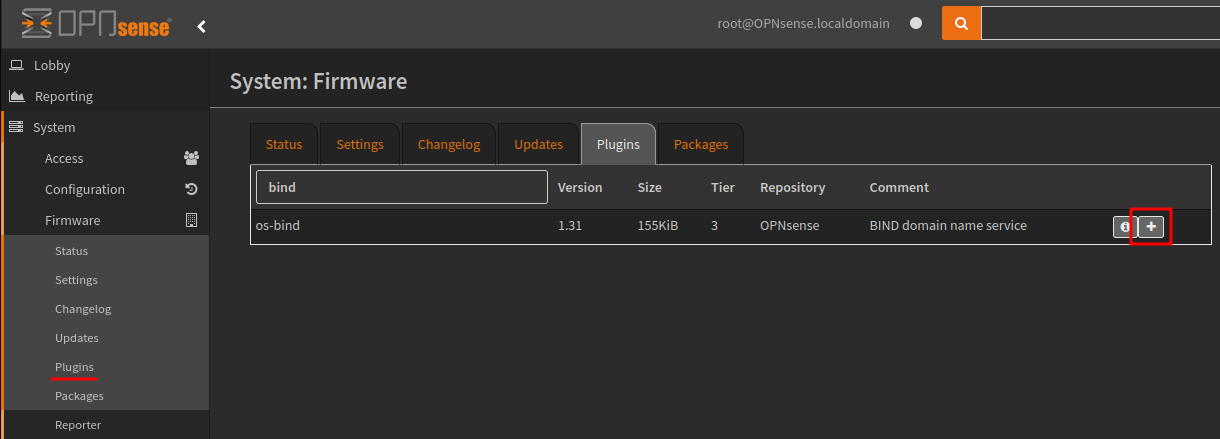
BIND DNS - authoritative DNS resolver
Use of Bind in OPNsense will require the os-bind plugin to be installed.
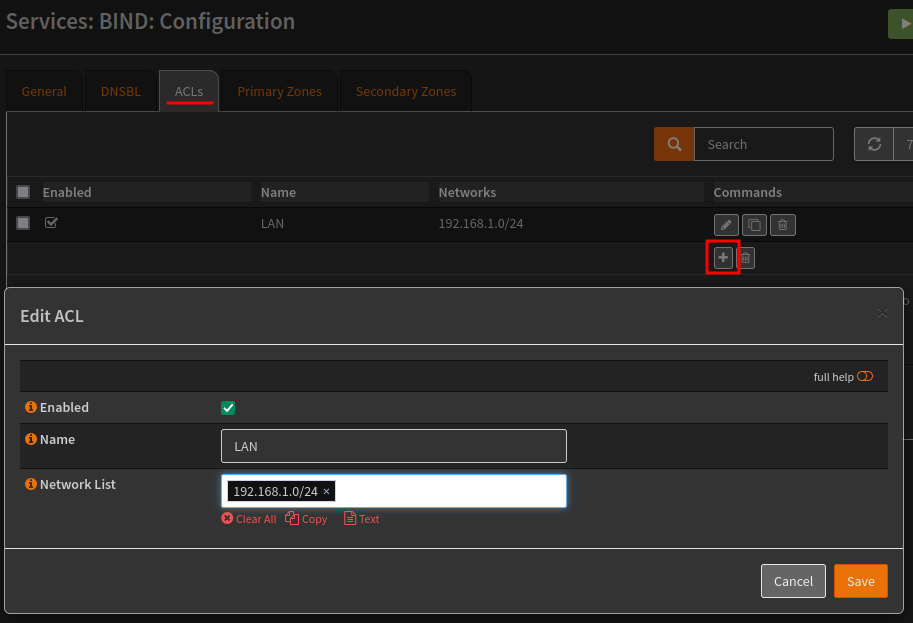
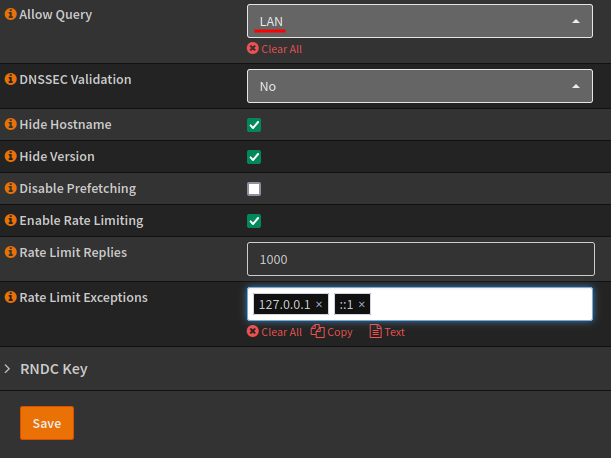
Once installed navigate to Services > BIND > configuration. From the configuration page, change to the ACLs tab and create an ACL (Access Control List) for the LAN network, this will be used to limit who can query the DNS server.
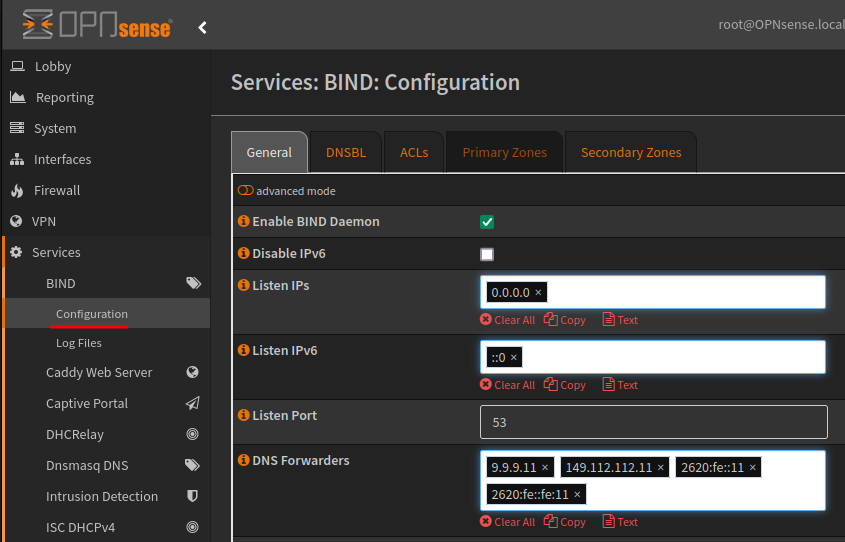
Going back to the General tab, enable the advanced options.
I have changed the default listen port from 53530 to 53 as I will not be using Unbound or DNSmasq. I also have configured the Quad 9 servers as the forwarding address.
Secured w/ECS: Malware blocking, DNSSEC Validation, ECS enabled
9.9.9.11
149.112.112.11
2620:fe::11
2620:fe::fe:11
Scrolling down, limit who can query the server and apply our LAN ACL, I have also enabled the hide hostname and version options and enabled rate limiting, which can help protect against DoS (Denial of Service).
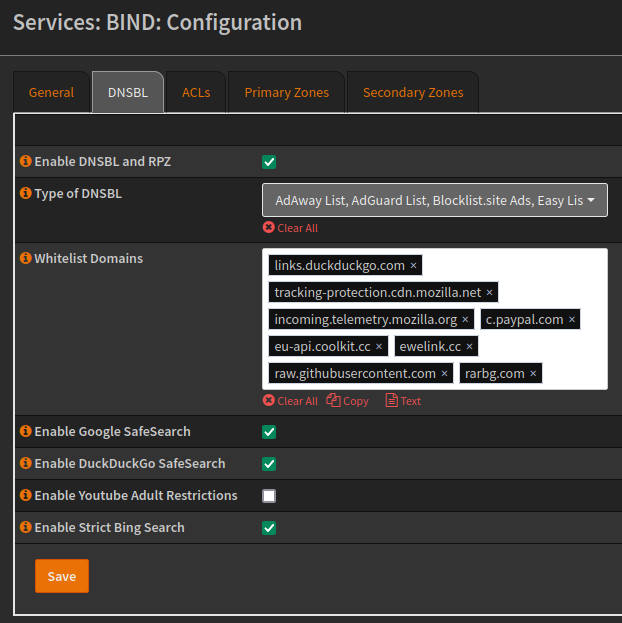
DNS Block Lists
The BIND plugin has a DNSBL tab, this allows for enabling of Safe Searches and blocking of URLs based upon lists.
IP Blocking
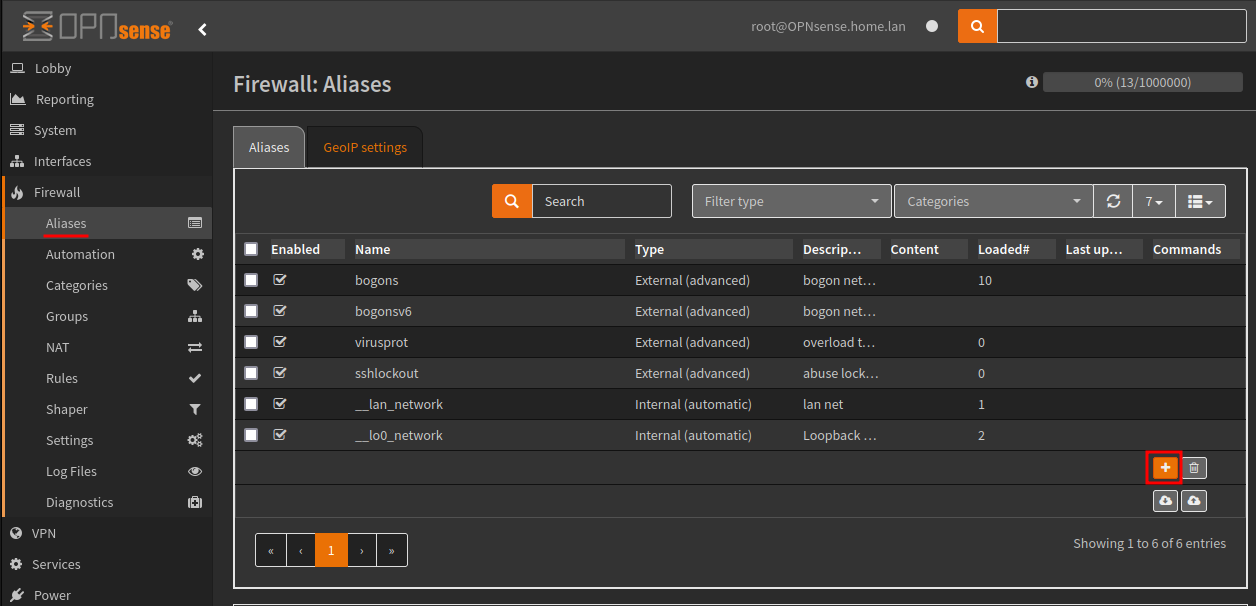
In pfSense we would use pfBlockerNG, but this isn’t available for OPNsense, instead we will use Aliases with a Firewall Rule to achieve the same outcome.
Start by creating a new Alias group, this is available via Firewall > Aliases
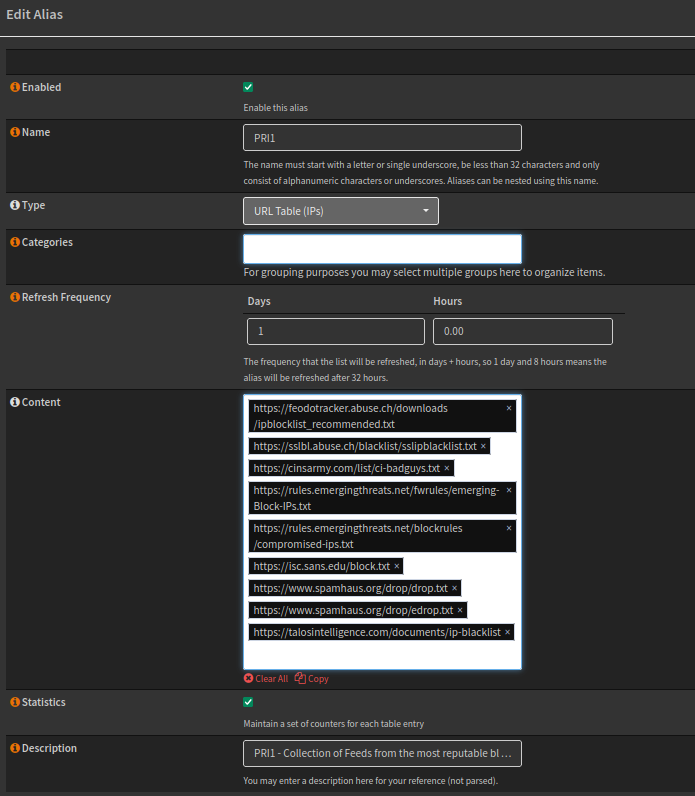
Using the pop up wizard populate the following information, example screenshot below.
- Name: PRI1
- Type: URL Table (IPs)
- Refresh Frequency: 1 Day 0 Hours
- Content: Copy the code below
https://feodotracker.abuse.ch/downloads/ipblocklist_recommended.txt,
https://sslbl.abuse.ch/blacklist/sslipblacklist.txt,
https://cinsarmy.com/list/ci-badguys.txt,
https://rules.emergingthreats.net/fwrules/emerging-Block-IPs.txt,
https://rules.emergingthreats.net/blockrules/compromised-ips.txt,
https://isc.sans.edu/block.txt,
https://www.spamhaus.org/drop/drop.txt,
https://www.spamhaus.org/drop/edrop.txt,
https://talosintelligence.com/documents/ip-blacklist,
https://raw.githubusercontent.com/firehol/blocklist-ipsets/master/firehol_level1.netset
- Statistics: Enabled
- Description:
PRI1 - Collection of Feeds from the most reputable blocklist providers. (Primary tier)
Save the Alias, which will also download the IPs.

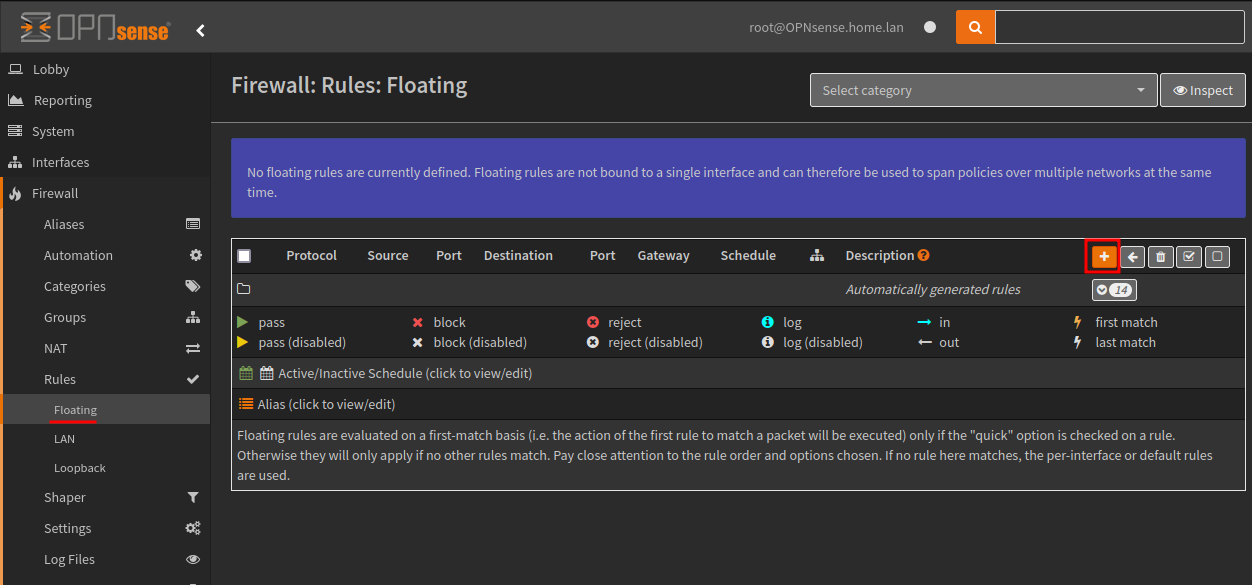
Now we’ll create two floating Firewall Rules to drop based on this Alias, one for inbound traffic and the other for outbound traffic.
The Firewall Rules can be found via Firewall > Rules > Floating, create a new floating rule using the plus (+) button.
Create a two new rules with the following values:
| Property | Value |
|---|---|
| Action | Block |
| Interface | WAN |
| Direction | In |
| TCP/IP Version | IPv4 |
| Protocol | Any |
| Source | PRI1 |
| Destination | Any |
| Log | Disabled |
| Description | Block Inbound Bad IP Addresses |
| Property | Value |
|---|---|
| Action | Block |
| Interface | WAN |
| Direction | Out |
| TCP/IP Version | IPv4 |
| Protocol | Any |
| Source | Any |
| Destination | PRI1 |
| Log | Disabled |
| Description | Block Outbound Bad IP Addresses |
This will prevent traffic coming into or leaving the network to those identified bad IP addresses.
Enforce our DNS server
To enforce our DNS server on the network and prevent users from bypassing our security measures we will use a NAT to redirect this traffic to our DNS service.
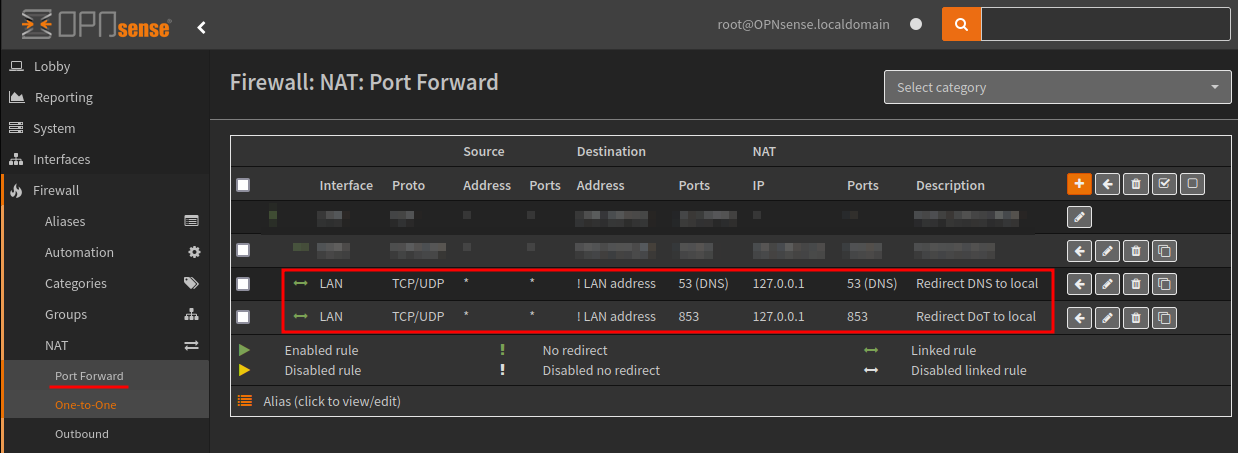
The rules shown above are:
If you wanted to exclude a client, then you can create an Alias group and invert select the source address using the alias. I did this to exclude my VPN clients from this NAT rule.
| Property | Value |
|---|---|
| Interface | LAN |
| Protocol | TCP/UDP |
| Destination / Invert | Checked |
| Destination | LAN address |
| Destination port range | DNS (53) |
| Redirect target IP | 127.0.0.1 |
| Redirect target port | DNS (53) |
| Description | Redirect DNS to Local |
| Property | Value |
|---|---|
| Interface | LAN |
| Protocol | TCP/UDP |
| Destination / Invert | Checked |
| Destination | LAN address |
| Destination port range | (Other) 853 |
| Redirect target IP | 127.0.0.1 |
| Redirect target port | (Other) 853 |
| Description | Redirect DoT to Local |
Safe Search
The Force SafeSearch option in Unbound is an all or nothing, BIND offers more flexibility. Below is a table of some of the common services and additional reference material.
| Service | URL | Safe Search |
|---|---|---|
| DuckDuckGo | duckduckgo.com | safe.duckduckgo.com |
| Bing | www.bing.com edgeservices.bing.com |
strict.bing.com nochatstrict.bing.com |
| PixaBay | pixabay.com | safesearch.pixabay.com |
| YouTube | www.youtube.com m.youtube.com youtubei.googleapis.com youtube.googleapis.com www.youtube-nocookie.com |
restrict.youtube.com restrictmoderate.youtube.com |
| Yandex | yandex.ru | 213.180.193.56 |
| Qwant | qwant.com | safeapi.qwant.com |
| Supported Domains | forcesafesearch.google.com |
References
-
Google Lock SafeSearch for accounts, devices & networks you manage
-
How to use Safe Search Setting to adjust adult content in DuckDuckGo search results
-
Bing Blocking adult content with SafeSearch or blocking chat
Intrusion Detection - Suricata
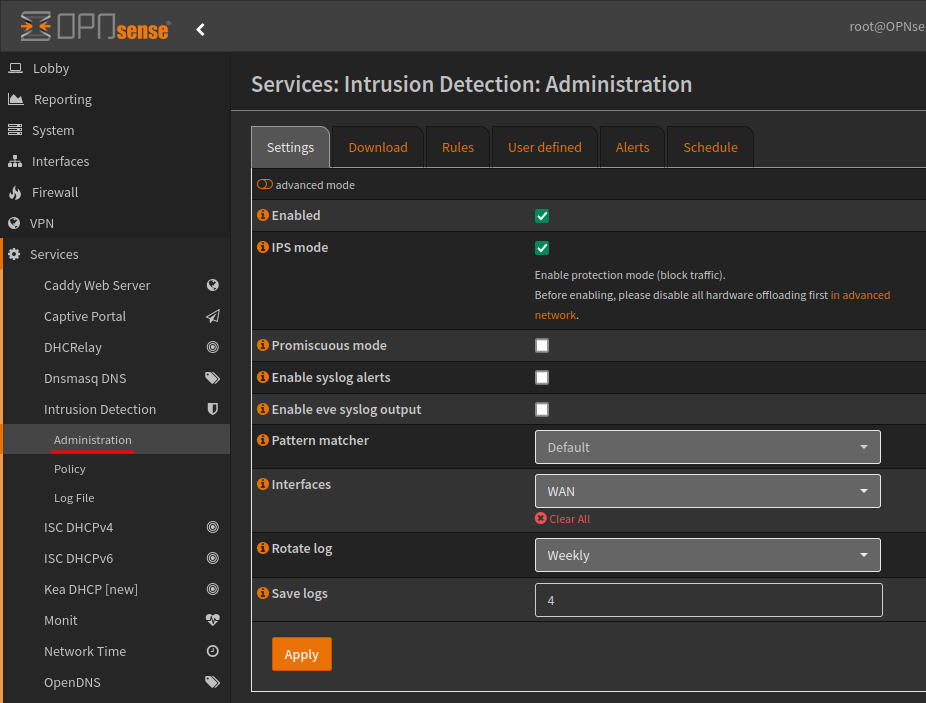
The Intrusion Prevention System (IPS) system of OPNsense is based on Suricata and utilises Netmap to enhance performance and minimise CPU utilisation. This deep packet inspection system is very powerful and can be used to detect and mitigate security threats at wire speed.
Its already installed within the base OPNsense image, and is available via Services > Intrusion Detection.
We can enable the service and protection mode, which blocks traffic (based on Rules) from the Administration > Settings tab, its noted that all hardware offloading needs to be disabled for IPS mode.
OPNsense recommendations for the pattern matcher:
Aho–Corasick is the default. On supported platforms, Hyperscan is the best option. On commodity hardware if Hyperscan is not available the suggested setting is “Aho–Corasick Ken Steele variant” as it performs better than “Aho–Corasick”.
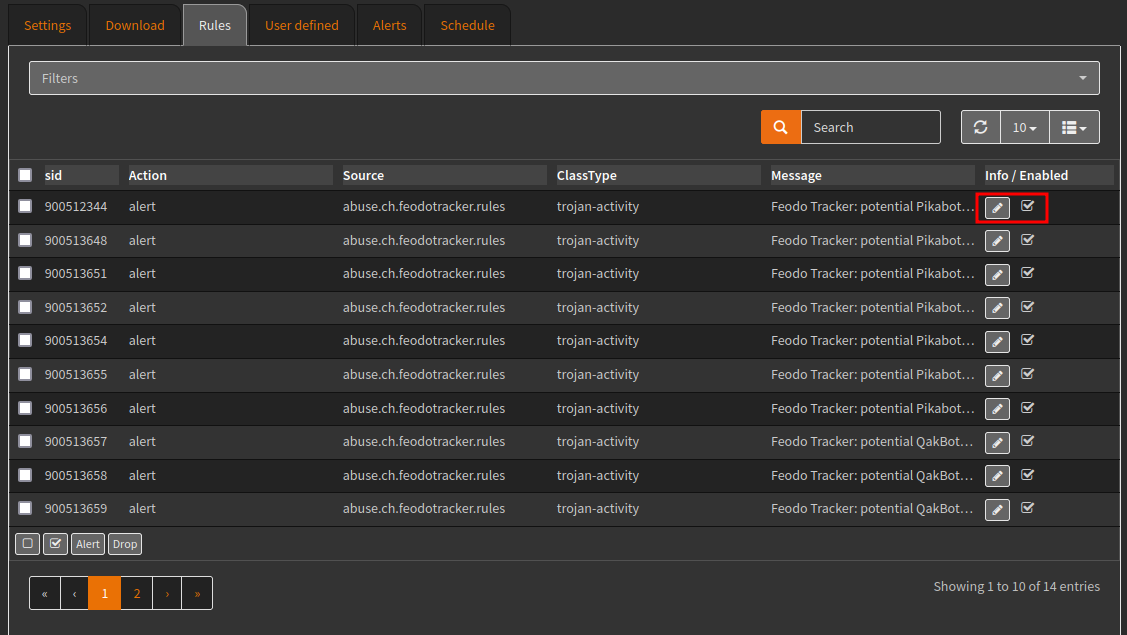
Within the Download tab, there are many free rules, such as Feodo Tracker.
First enable a list using the edit tool, then download and update rules.
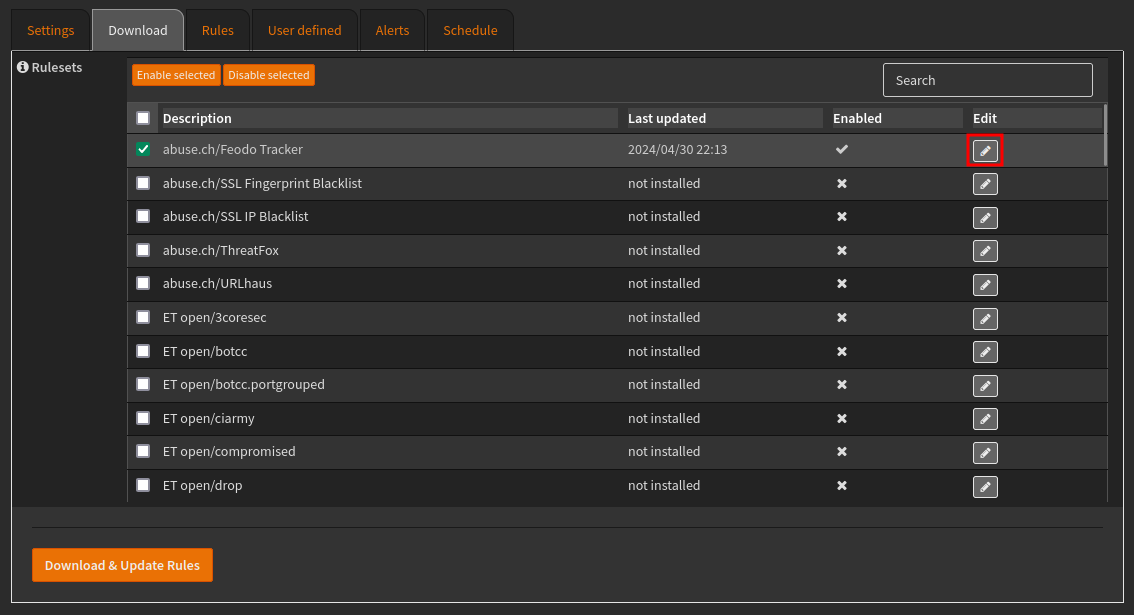
The rules will be added to the Rules tab, where they can be reviewed, disabled and have their action changed between alert and drop.
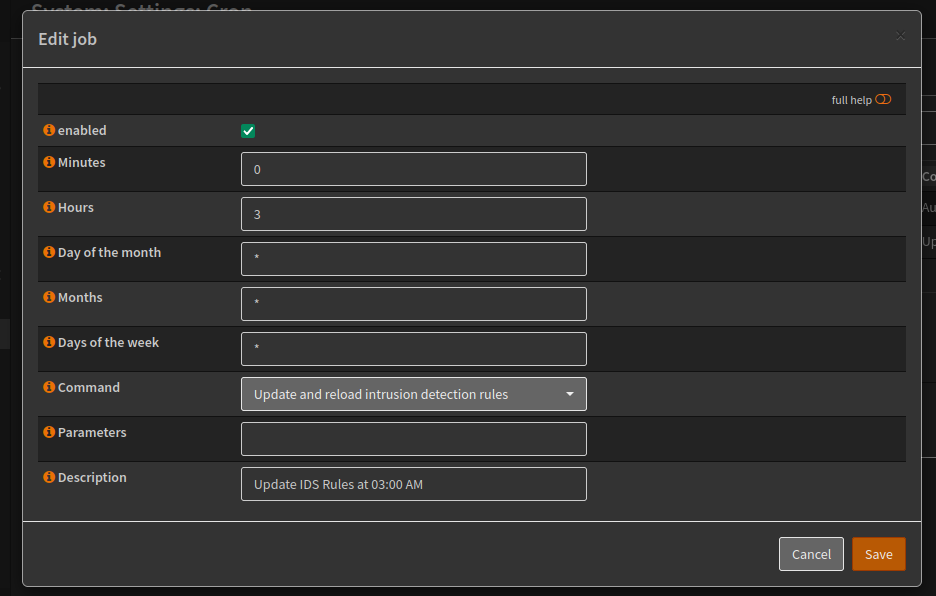
Use the Schedule tab to create a cron job for Update and reload intrusion detection rules, the example below will update each day at 03:00.
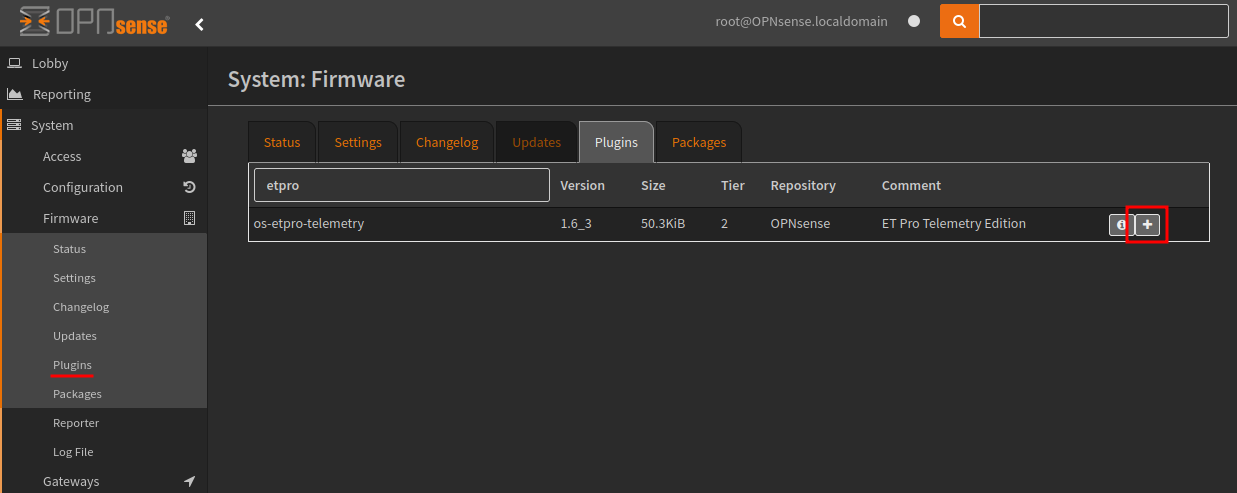
Free ET Pro Rules
Emerging Threats offer their ET Pro ruleset in exchange for your Threat Telemetry Data, this offer can be found via the OPNsense store. Purchase the free product and they will email the key to register the ET Pro ruleset.
Download the os-etpro-telemetry plugin.
Now the ET telemetry/ ruleset will be available for Download, you’ll also need to provide your key within the et_telemetry.token field, as shown in the screenshot below.
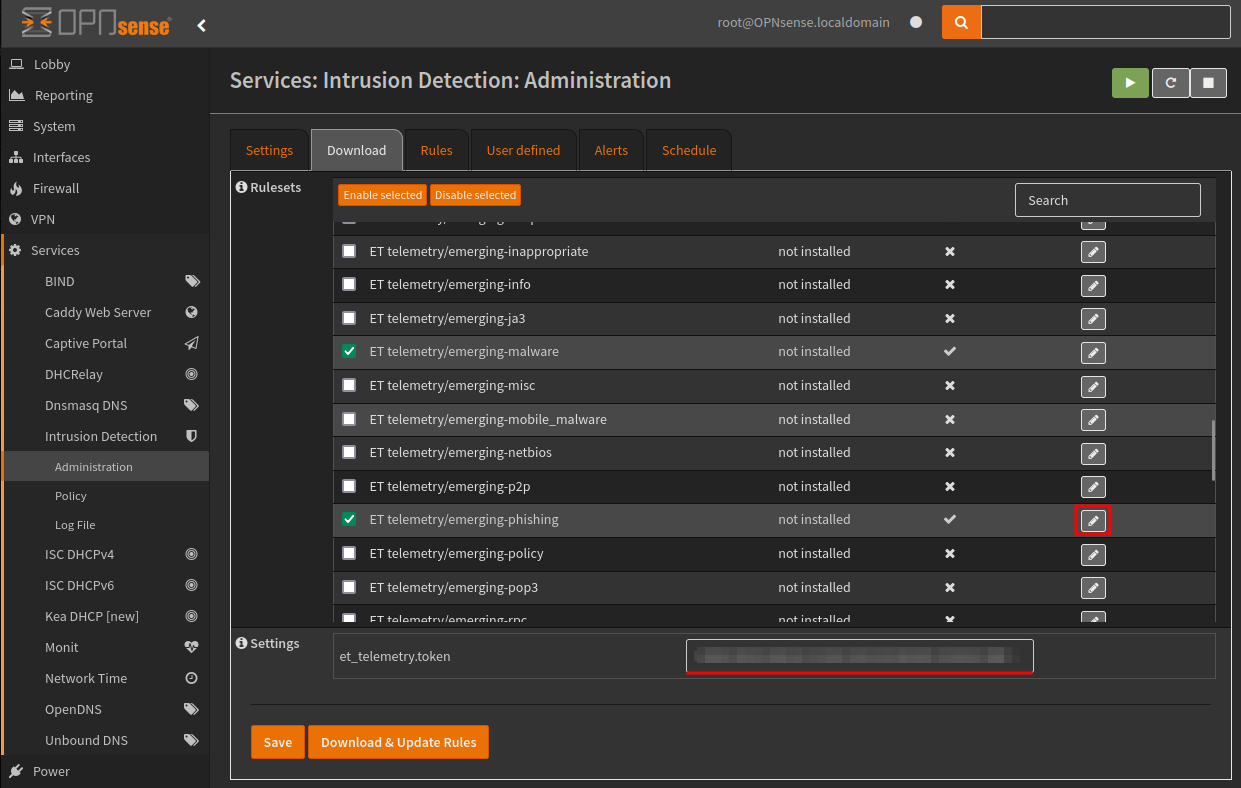
Then the Rules will be available same as before.
Caddy - Reverse Proxy, ACME and Dynamic DNS
To setup our reverse proxy, you will need to install Caddy via System > Firmware > Plugins menu.
- os-caddy
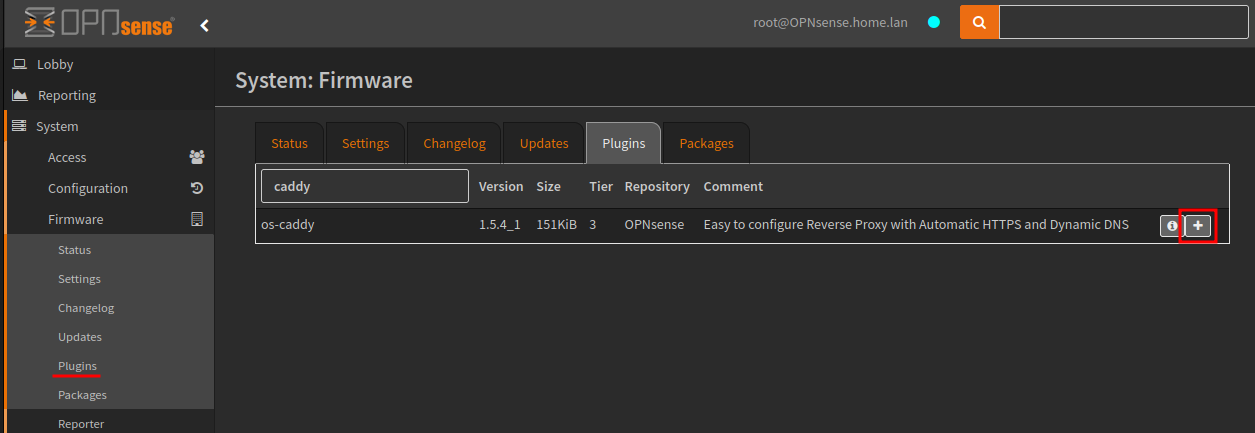
Once installed Caddy will be available under the Services menu, if it is not there, simply refresh the web interface.
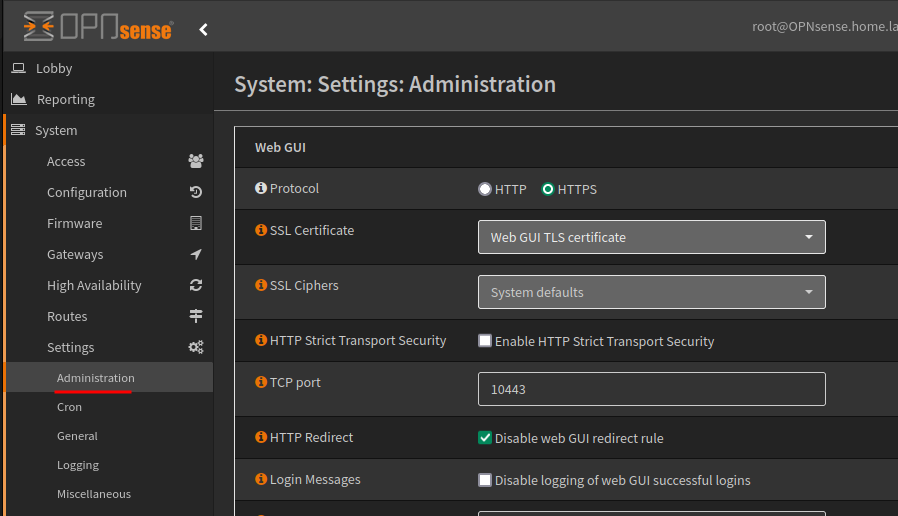
Caddy will bind to port 80 and 443 so we will need to make some adjustments to the OPNsense web panel and create a new firewall rule to allow this traffic.
Firstly navigate to System > Settings > Administration menu, then change the TCP port, for example 443 to 10443, and also enable the HTTP redirect.
On LAN there is a hidden anti-lockout rule, but if you want access from other networks then you’ll need to create a firewall rule to permit access on this port.
Now create four new Firewall Rules to permit access to Caddy, this is used for the reverse proxy and ACME elements.
| Property | Value |
|---|---|
| Action | Pass |
| Interface | WAN |
| Direction | In |
| TCP/IP Version | IPv4 |
| Protocol | TCP/UDP |
| Source | Any |
| Destination | This Firewall |
| Destination port range | HTTP |
| Description | Inbound WAN Caddy Reverse Proxy HTTP |
| Property | Value |
|---|---|
| Action | Pass |
| Interface | WAN |
| Direction | In |
| TCP/IP Version | IPv4 |
| Protocol | TCP/UDP |
| Source | Any |
| Destination | This Firewall |
| Destination port range | HTTPS |
| Description | Inbound WAN Caddy Reverse Proxy HTTPS |
| Property | Value |
|---|---|
| Action | Pass |
| Interface | LAN |
| Direction | In |
| TCP/IP Version | IPv4 |
| Protocol | TCP/UDP |
| Source | Any |
| Destination | This Firewall |
| Destination port range | HTTP |
| Description | Inbound LAN Caddy Reverse Proxy HTTP |
| Property | Value |
|---|---|
| Action | Pass |
| Interface | LAN |
| Direction | In |
| TCP/IP Version | IPv4 |
| Protocol | TCP/UDP |
| Source | Any |
| Destination | This Firewall |
| Destination port range | HTTPS |
| Description | Inbound LAN Caddy Reverse Proxy HTTPS |
We can use Caddy for generating free HTTPS certificates using Let’s Encrypt or ZeroSSL, updating our DNS providing to ensure our external IP is correct and as a reverse proxy for hosting services.
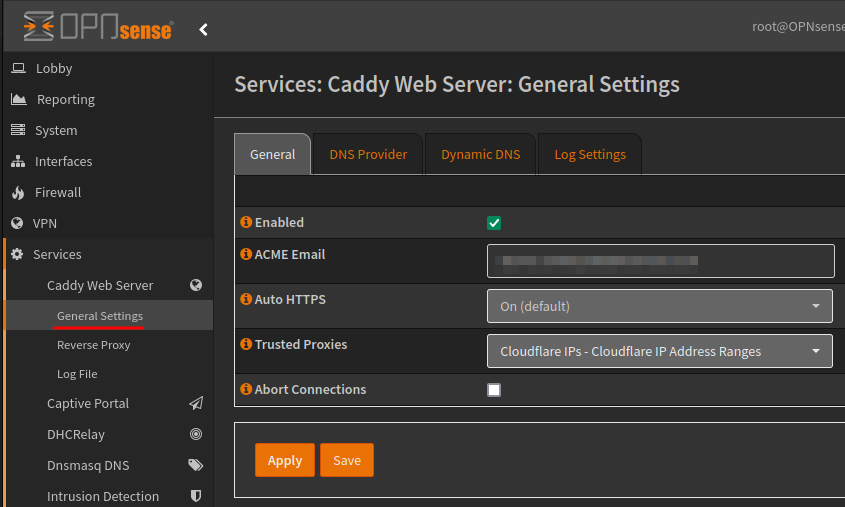
Under the General tab, you’ll need to enable the service and provided your email for updating about the certificates.
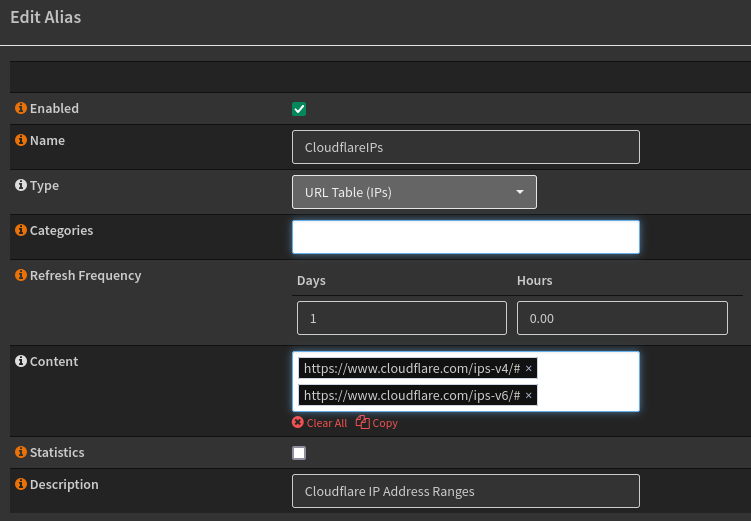
As I will be using a CDN (Content Delivery Network) in front of my proxy, I need to enter their IP addresses within the Trusted Proxies section.
This requires moving to the Reserve Proxy menu item, under the Access tab, creating a new Access List.
173.245.48.0/20
103.21.244.0/22
103.22.200.0/22
103.31.4.0/22
141.101.64.0/18
108.162.192.0/18
190.93.240.0/20
188.114.96.0/20
197.234.240.0/22
198.41.128.0/17
162.158.0.0/15
104.16.0.0/13
104.24.0.0/14
172.64.0.0/13
131.0.72.0/22
2400:cb00::/32
2606:4700::/32
2803:f800::/32
2405:b500::/32
2405:8100::/32
2a06:98c0::/29
2c0f:f248::/32
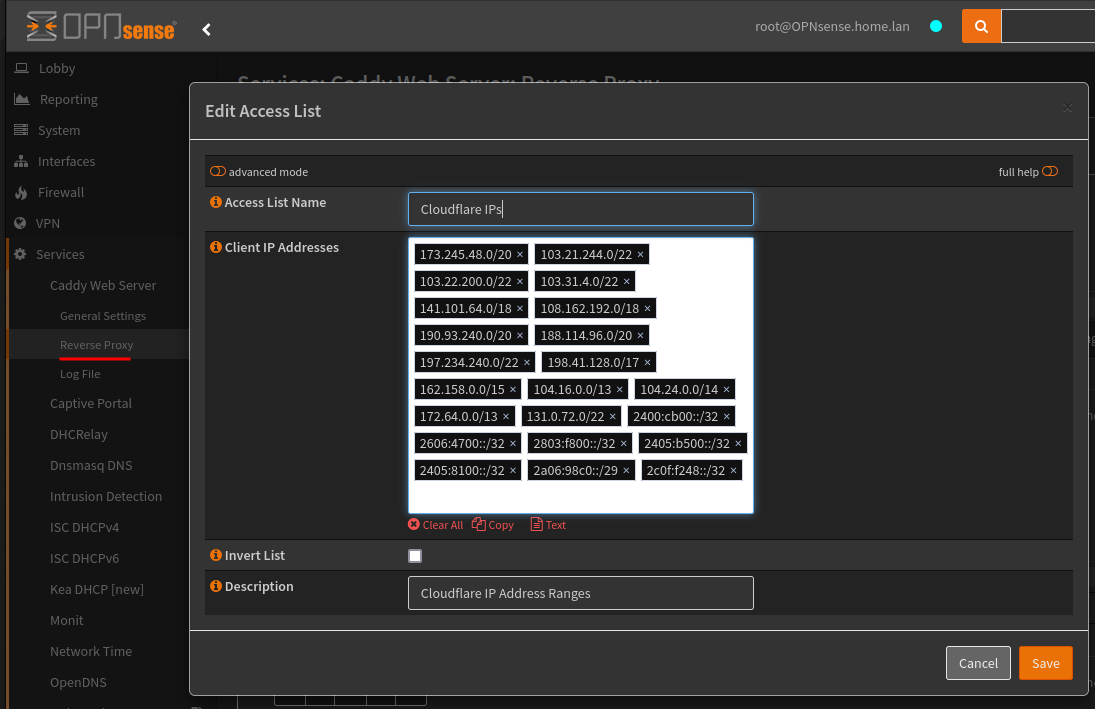
After the Access List was created I could add this to the Trusted Proxies drop down menu.
Using the address links above I also created an Alias URL Table object, this can be useful later.
Moving to the DNS Provider tab, we can set our DNS provider and add our API key, this is used for wildcard certificates and dynamic DNS.
To create a Cloudflare API key you’ll need to use the DNS edit template.

Lastly within the Dynamic DNS tab, I will change this to only use IPv4 addresses.
Now moving onto the Reverse Proxy menu item, under the Domains tab we can start to create the reverse proxy settings and add the final touches to Dynamic DNS.
The domain will be a wildcard domain, which sub domains can be created from.
- Domain:
*.domain.com
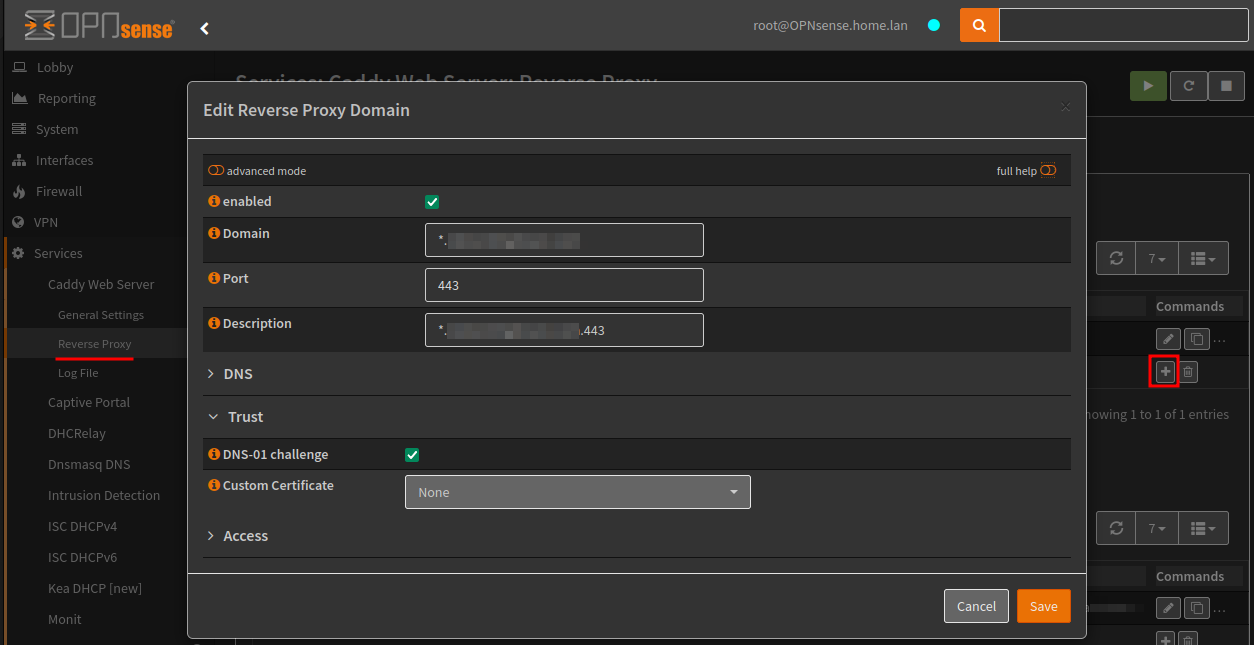
The first sub domain will be used as part of the Dynamic DNS, which will be updated if the external IP address changes.
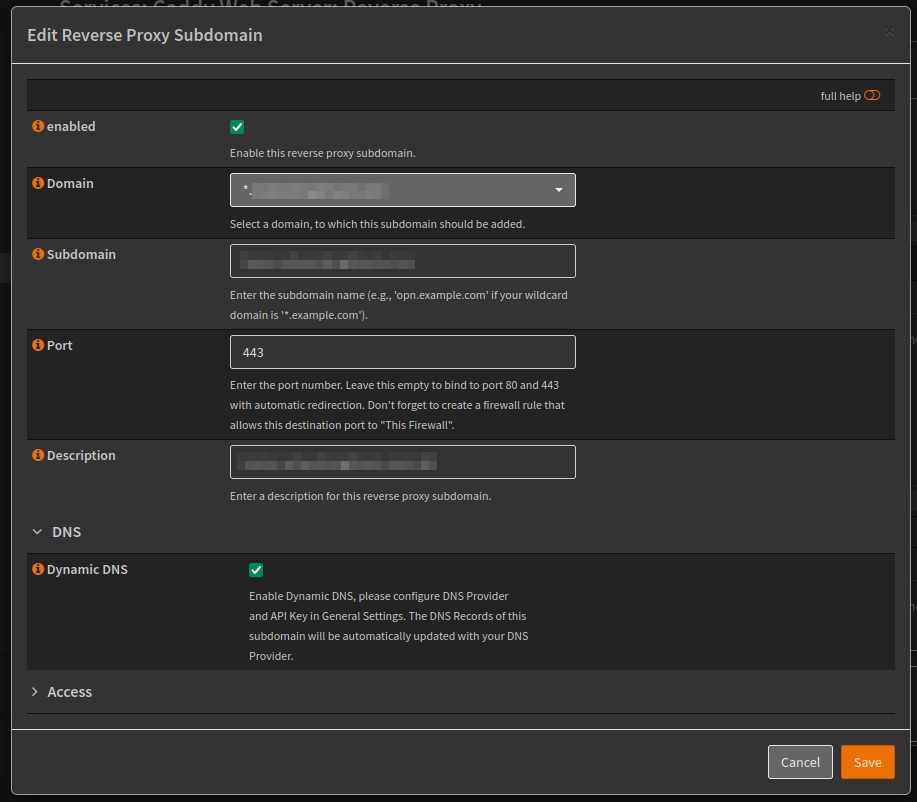
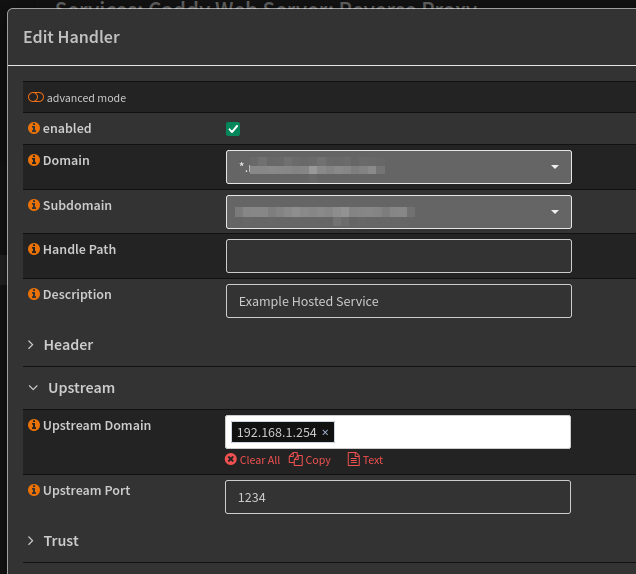
Once we have all of our services created as sub domains, we can add the handlers. In the example below I have a sub domain that gets redirected to the upstream service.
- Domain:
*.domain.com - Subdomain:
example.domain.com - Upstream Domain: Internal IP or hostname of the service
- Upstream Port: Internal service port
If you specify multiple upstream destinations, they will be load balanced with the default random policy.
WireGuard VPN server
In this example I will configure a Wireguard VPN service, via VPN module is available in the menu.
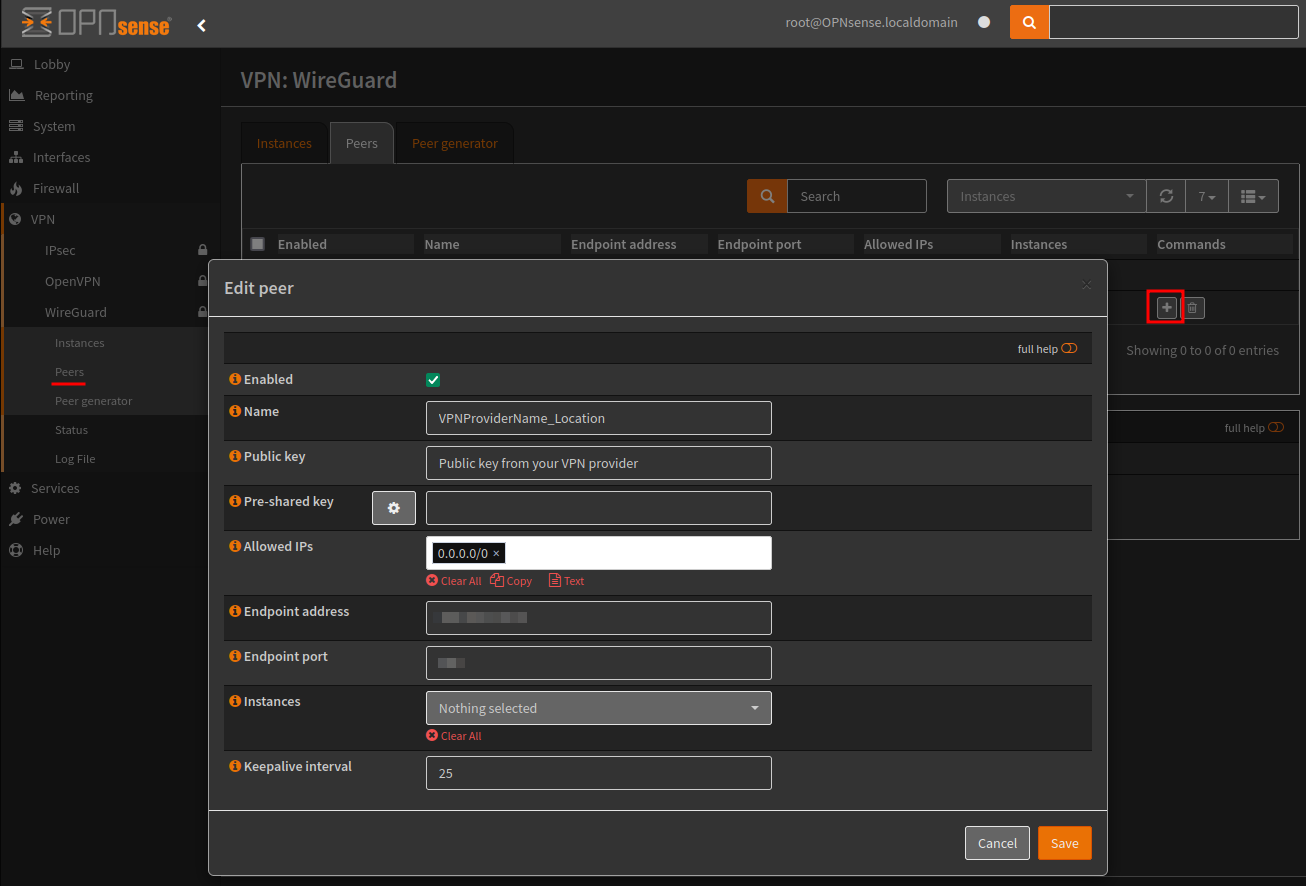
Start by creating a new WireGuard peer, you’ll need the information from your VPN provider to hand, in the example below:
- Name
- Public key, (VPN provider peer information)
- Pre-shared key, (VPN provider peer information)
- Allowed IPs:
0.0.0.0/0, include::/0for IPv6 - Endpoint and port, (VPN provider peer information)
- Keepalive interval, usually 25.
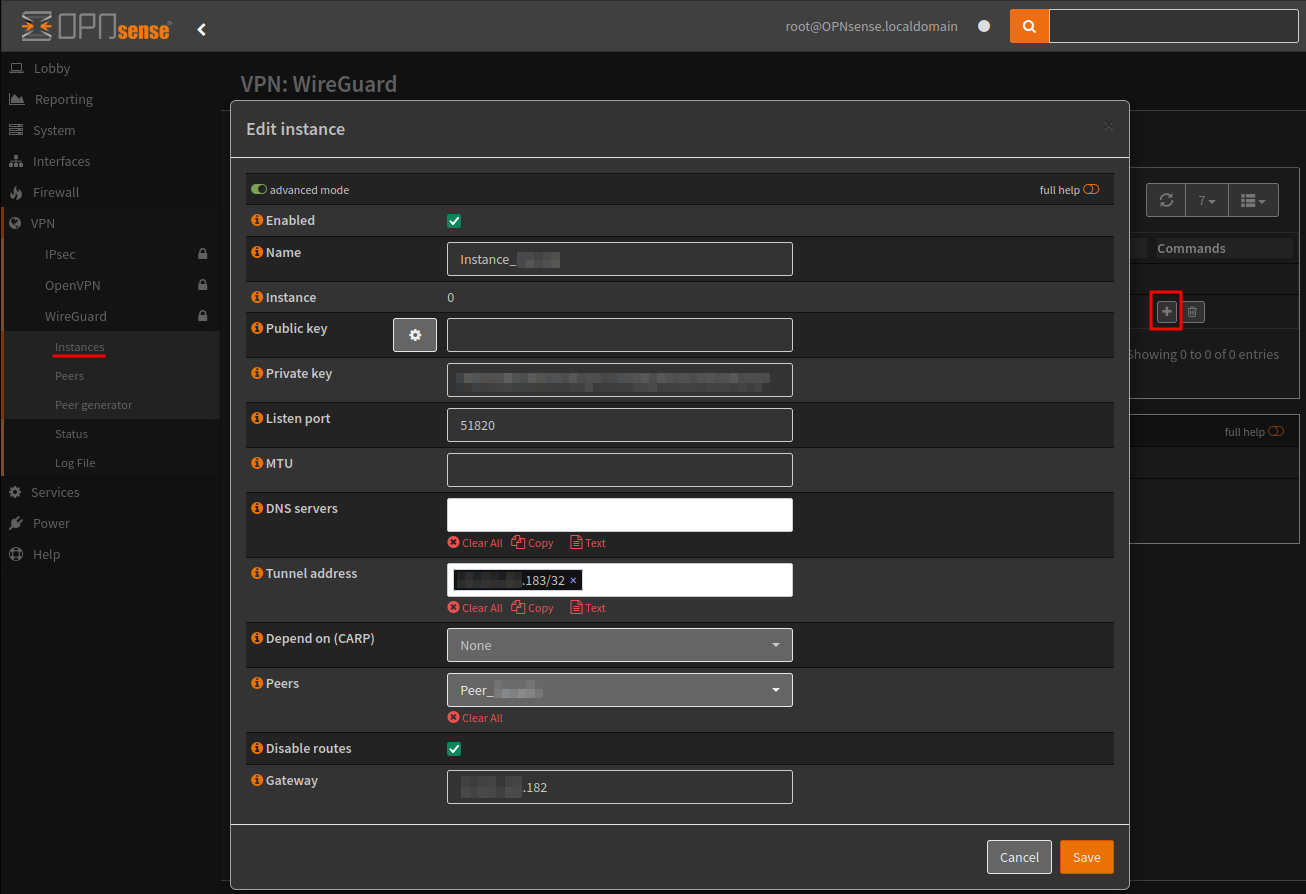
Next we create a WireGuard instance, here we add:
- Name
- Public key, leave blank
- Private key, (VPN provider instance information)
- Set the listen port
- leave the DNS servers empty
- Add our tunnel address, (VPN provider instance information)
- Set our peers to use the above peer
- Configure the gateway to be 1 less than the tunnel address.
Now apply and enable Wireguard.
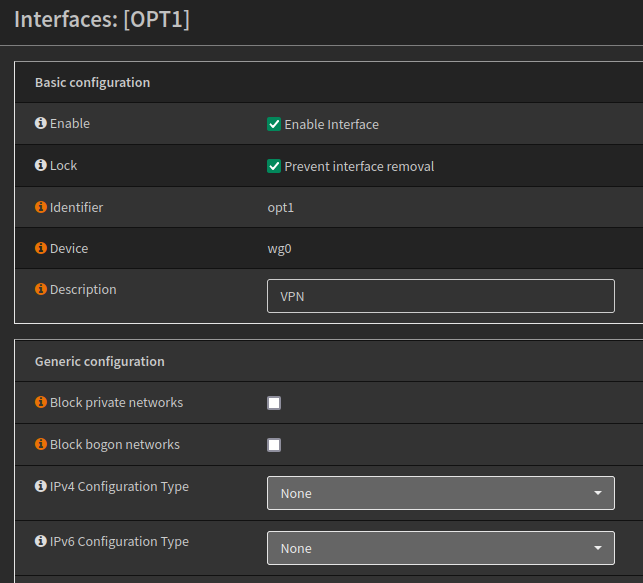
Navigate to Interfaces > Assignments and add the new VPN interface.
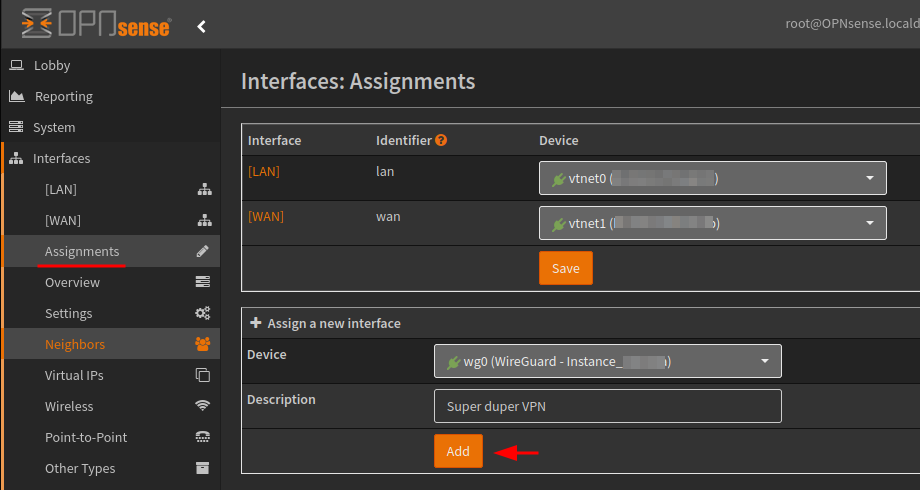
Within the interface, enable, lock it from accidental deletion, and leave the IPv4 and IPv6 configuration types to None.
Then restart the service from the dashboard.
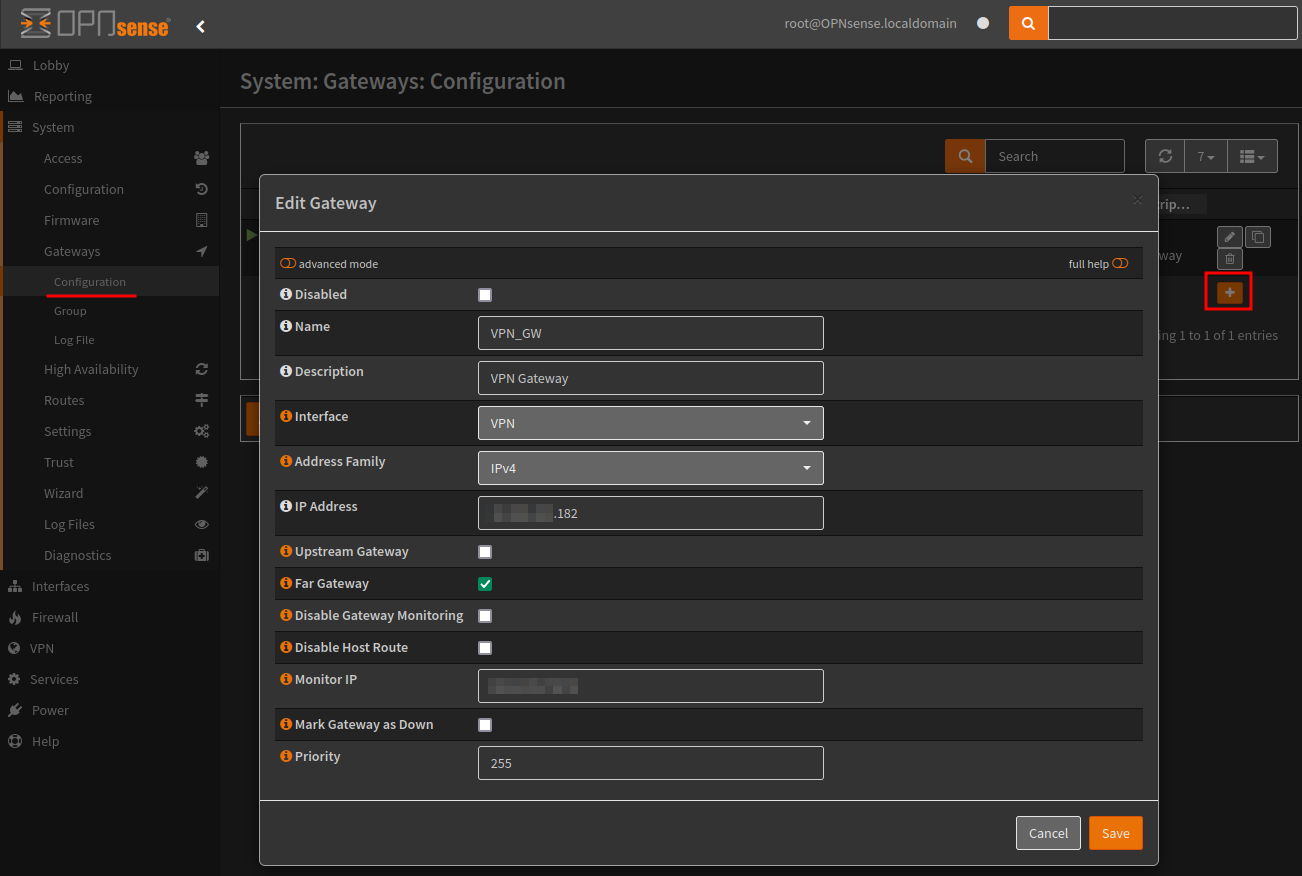
Now create a new gateway from System > Gateways > Configuration.
Here we need to configure the following:
- Name,
- Set the interface to the VPN previously created
- Set the IP address to be gateway address configured in the instance
- Check Far Gateway
- Uncheck Disable Gateway Monitoring
- Set the monitor IP to peer endpoint address, (can use any external address)
Next create two alias’ one for the VPN clients. In the example below I have a hosts alias with a single IP address, you can also use a Network type.
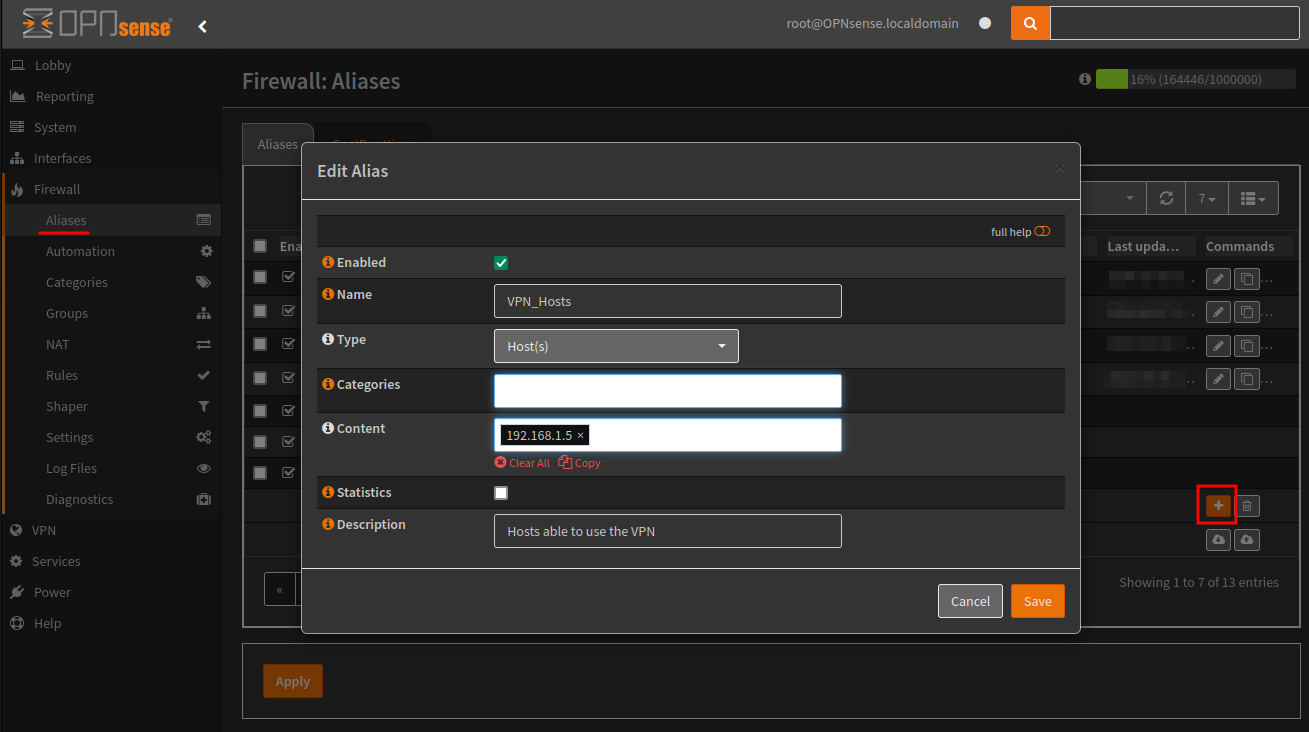
The other will be for private address ranges, as shown below. Mine is called “Local_192_Address_Ranges”, and I only added /16 within the content.
- Name: RFC1918_Networks
- Type: Networks
- Content:
192.168.0.0/16, 10.0.0.0/8, 172.16.0.0/12
Now we create a LAN Firewall Rule. Once the rule has been created ensure its above the “default allow LAN to any rule”.

| Property | Value |
|---|---|
| Action | Pass |
| Interface | LAN |
| Direction | In |
| TCP/IP Version | IPv4 |
| Protocol | Any |
| Source | VPN_Hosts (Alias) |
| Destination / Invert | Checked |
| Destination | RFC1819_Networks (Alias) |
| Destination port range | Any |
| Description | VPN hosts non-local traffic |
| Gateway | VPN_GW |
| Set local tag (kill switch tag) | NO_WAN_EGRESS |
Next create two floating Firewall Rules, as shown below.
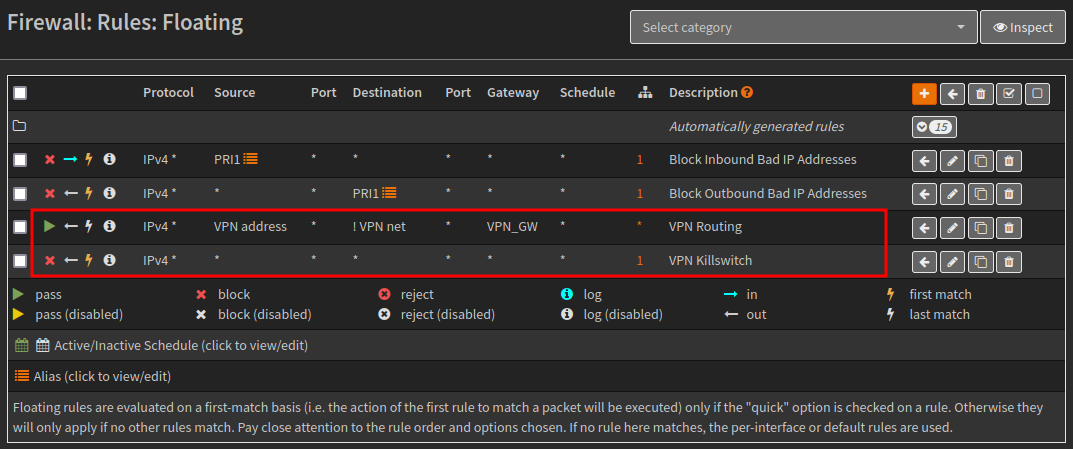
| Property | Value |
|---|---|
| Action | Pass |
| Quick | Unchecked |
| Interface | None |
| Direction | Out |
| TCP/IP Version | IPv4 |
| Protocol | Any |
| Source | VPN Address |
| Destination / Invert | Checked |
| Destination | VPN Net |
| Destination port range | Any |
| Description | VPN Routing |
| Gateway | VPN_GW |
| Allow options | Checked |
The next rule is for the VPN killswitch.
| Property | Value |
|---|---|
| Action | Block |
| Interface | WAN |
| Direction | Out |
| TCP/IP Version | IPv4 |
| Protocol | Any |
| Source | Any |
| Destination | Any |
| Description | VPN Killswitch |
| Match local tag | NO_WAN_EGRESS |
Lastly we create an outbound NAT rule. Navigate to Firewall > NAT > Outbound.
Change the mode to Hybrid outbound NAT rule generate and create a new manual rule.
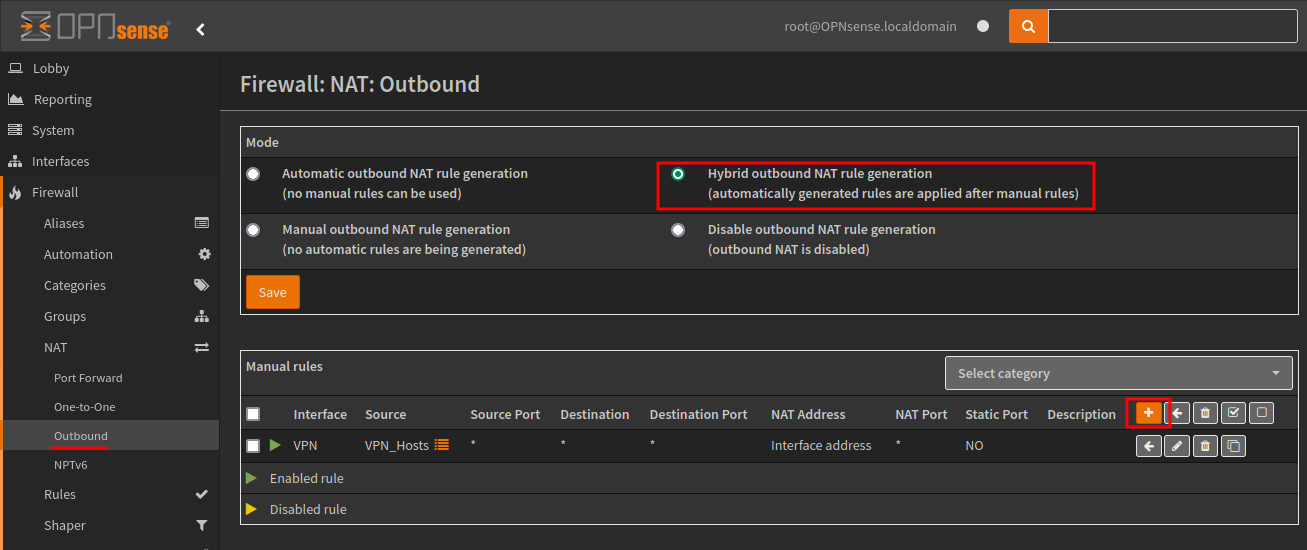
| Property | Value |
|---|---|
| Interface | VPN |
| TCP/IP Version | IPv4 |
| Protocol | Any |
| Source | VPN_Hosts (Alias) |
| Destination | Any |
| Translation / Target | Interface Address |
Restart the service again, and this completes the Wireguard VPN server setup.
CoDel Limiters for Bufferbloat
Bufferbloat is the undesirable latency that comes from a router or other network equipment buffering too much data. It is a huge drag on Internet performance created, ironically, by previous attempts to make it work better.
The FQ_CODEL limiter scheduler can help alleviate the effects of Bufferbloat.
To identify if you need to implement this, start with Waveform’s Bufferbloat Test, then perform some speedtests to confirm download and upload values.
| Download (Mbps) | Upload (Mbps) |
|---|---|
| 381.79 | 36.20 |
| 381.49 | 36.53 |
| 382.90 | 36.52 |
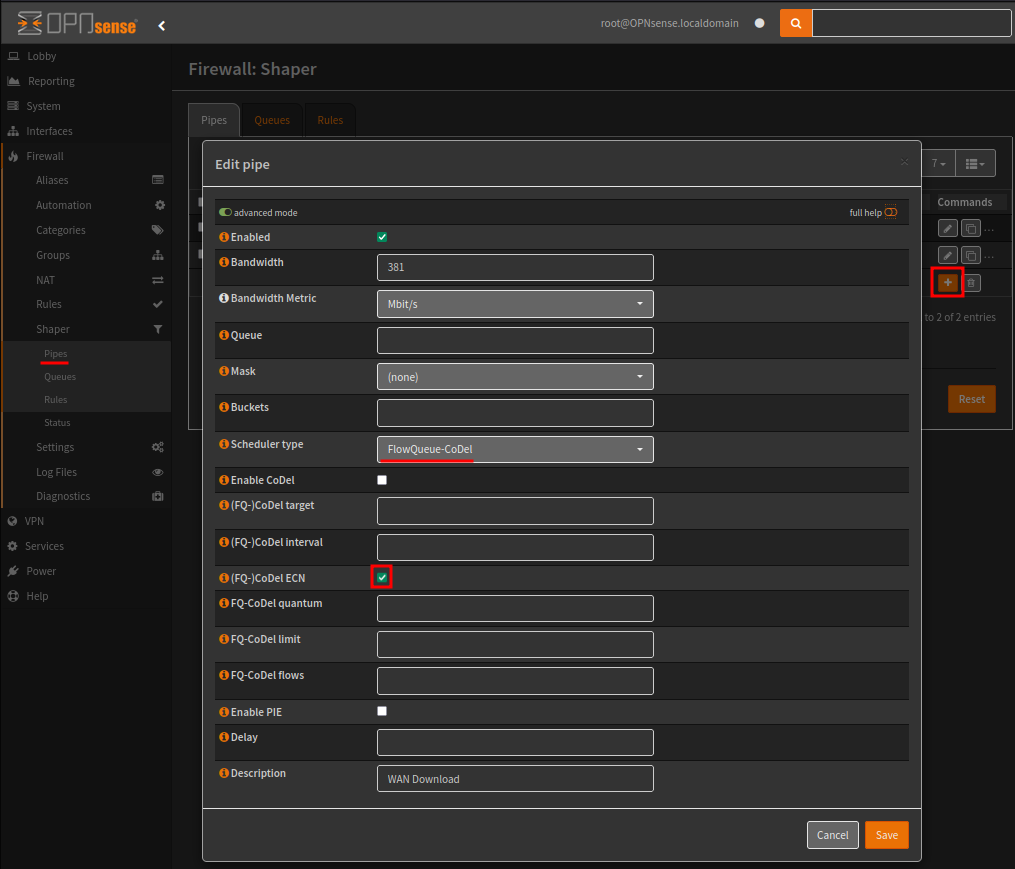
Under Firewall > Shaper > Pipes, create two pipes for our WAN download and upload values.
Enable the advanced mode, which will allow you to set the scheduler type to FlowQueue-CoDel, and enable CoDel ECN.
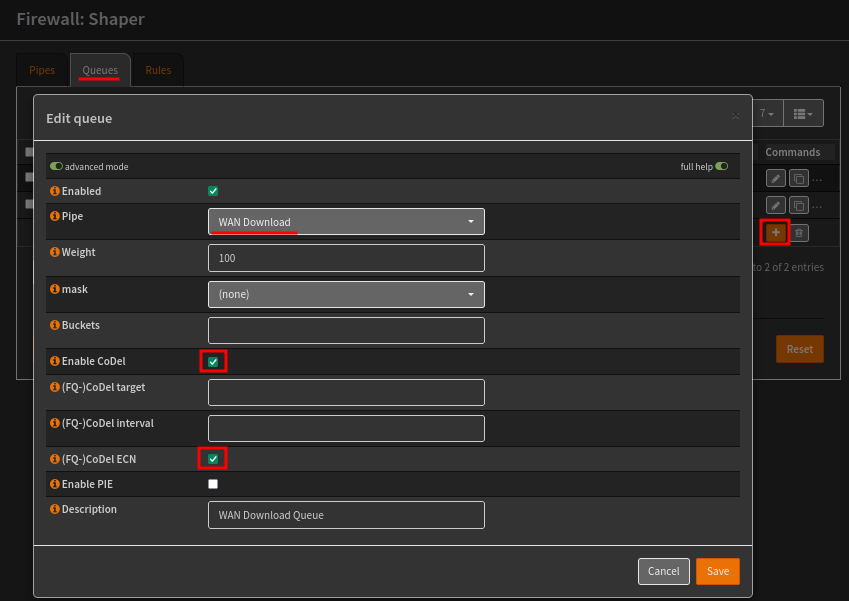
In the Queues tab, create two queues for WAN download and upload, using the pipes previously created.
The first queue will use the WAN Download pip, enable CoDel and CoDel ECN. The second queue will be similar but use the WAN Upload pipe.
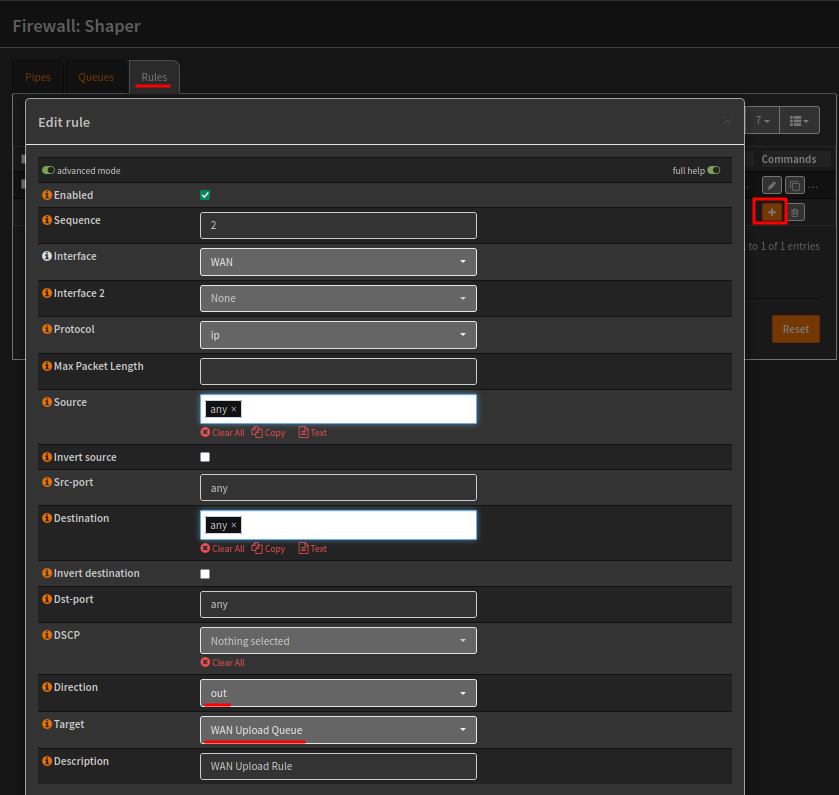
In the Rules tab, we’ll create two new rules, the first is WAN Download, and the second WAN Upload.
The main differences will be the Queue used and the direction.
- WAN Download Queue = In
- WAN Upload Queue = Out
Cron Job - Automatic Firmware Update
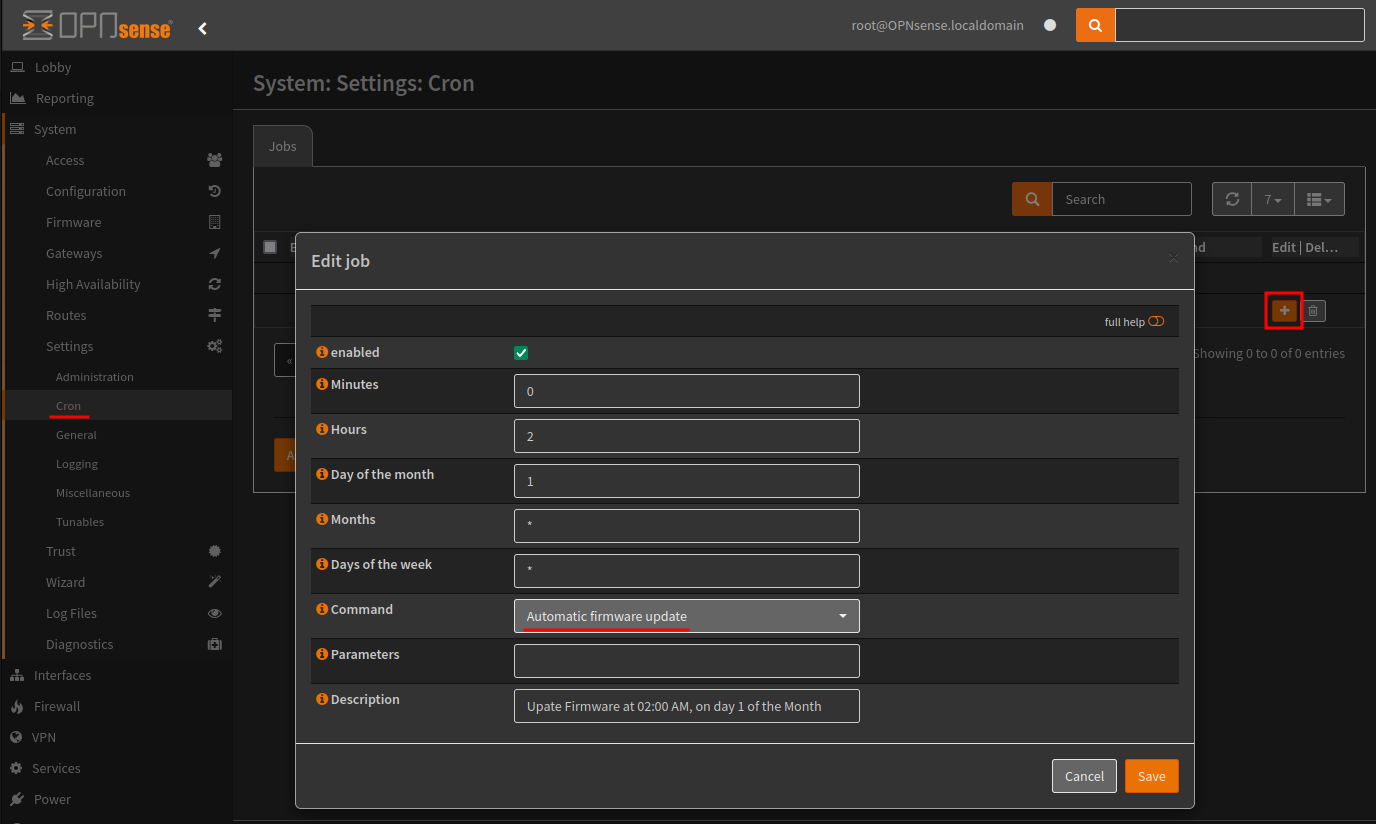
Cron jobs can be used to schedule tasks, for example an automatic firmware update at the beginning of each month.
Cron is available via System > Settings > Cron, the example below will automatically update the firmware at 02:00 AM, on day 1 of the Month.
The command is running configctl firmware auto-update in the background, which will perform a minor update if applicable.
Port Forward - Transmission
https://github.com/transmission/transmission/blob/main/docs/Port-Forwarding-Guide.md
Transmission recommends you pick a random number between 49152 and 65535. The default is 51413.
This port needs to be forwarded through OPNsense to the Transmission client, this can be completed using a Port Forward rule.
From the menu select Firewall > NAT > Port Forward, create a new rule using the example below.
| Property | Value |
|---|---|
| Interface | WAN |
| Protocol | TCP/UDP |
| Destination | This Firewall |
| Destination port range | From 51413 - To 51413 |
| Redirect target IP | Transmission client IP |
| Redirect target port | 51413 |
| Description | Transmission |