NextCloud VM
14 Jul 2024
Nextcloud is a popular open source content collaboration platform, providing functionality similar to Dropbox, Office 365 or Google G Suite.
In this article I will discuss how to manually install it on top of a virtualised platform. The Nextcloud docs are a fantastic resource and should be used as a reference.
There are quite a lot of steps, but I have broken them into 4 main headings, containing their own subheadings. Although I’d recommended reading from start to finish.
Requirements
Below is the system requirements table provided by Nextcloud, but I have stripped everything except the recommended options.
| Platform | Options |
|---|---|
| Operating System (64-bit) | Ubuntu 22.04 LTS (recommended) Red Hat Enterprise Linux 9 (recommended) |
| Database | MySQL 8.0+ or MariaDB 10.3/10.5/10.6 (recommended)/10.11 SQLite (only recommended for testing and minimal-instances) |
| Webserver | Apache 2.4 with mod_php or php-fpm (recommended) |
| PHP Runtime | 8.2 (recommended) |
Although there is a minimum of 128 MB RAM per process, Nextcloud suggest a minimum of 512 MB RAM per process.
Installation Steps
Create a container
In this article I will be using Proxmox VE and creating a Ubuntu based container.
Create a new container
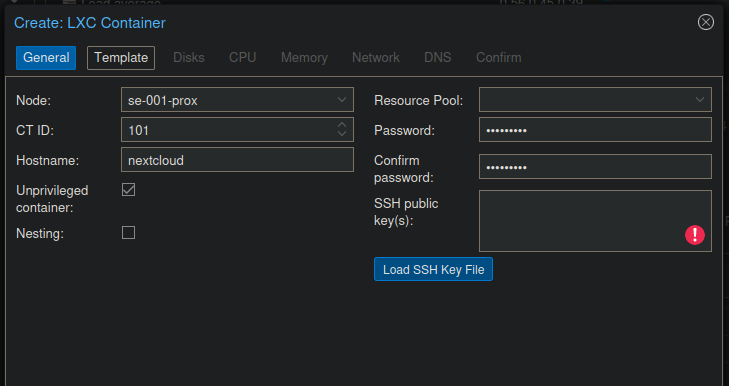
This container has the following specification, which is fine for a small deployment or lab environment.
- 32 GB of disk space
- 2 vCPU
- 1024 MB of RAM
- Static IP address
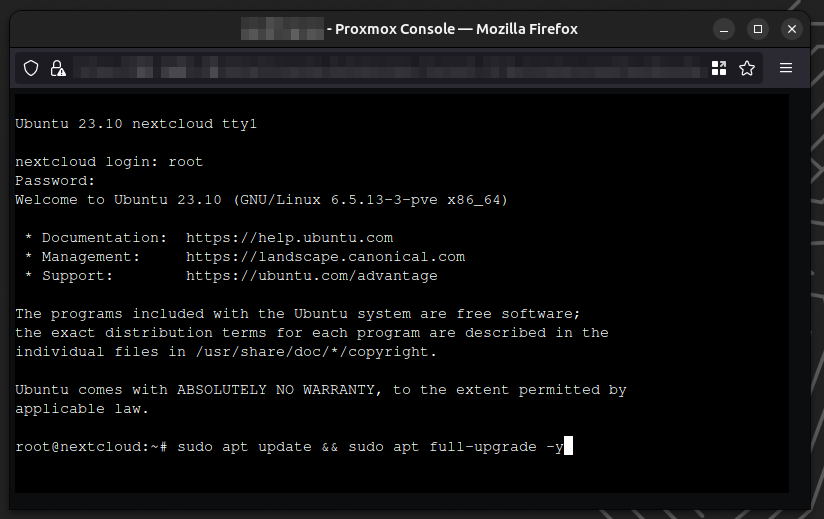
Update the packages
Ensure the package repositories are up-to-date and any installed packages are upgraded, this can be achieved using the following command.
apt update && apt full-upgrade -y
Apache web server
Search for the Apache package using apt search apache2, then continue to install that package with the command below.
apt install -y apache2
Also install PHP and the required modules. - PHP Modules & Configuration
apt install -y php-zip php-xml php-mbstring php-gd php-curl php-intl php-gmp php-bcmath php-mysql libapache2-mod-php
apt install -y imagemagick php-imagick
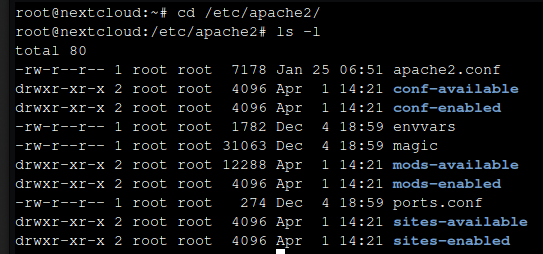
The Apache directory is located at /etc/apache2 and contains the following
Create the Nextcloud configuration file using the command.
nano /etc/apache2/sites-available/nextcloud.conf
For a virtual host installation, put the following in the nextcloud.conf file.
<VirtualHost *:80>
  DocumentRoot /var/www/nextcloud/
  ServerName  CHANGEME.server.com

  <Directory /var/www/nextcloud/>
    Satisfy Any
    Require all granted
    AllowOverride All
    Options FollowSymLinks MultiViews

    <IfModule mod_dav.c>
      Dav off
    </IfModule>
  </Directory>
</VirtualHost>
Save the file by pressing CTRL + O then exit using CTRL + X.
You can test the Apache configuration by using the command apache2ctl configtest.
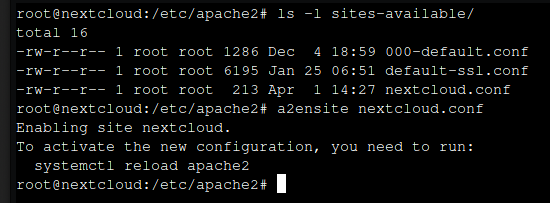
Enable the Nextcloud site and disable the default configuration by typing the command.
a2dissite 000-default.conf
a2ensite nextcloud.conf
Nextcloud requires the following Apache modules to be enabled
a2enmod rewrite
a2enmod headers
a2enmod env
a2enmod dir
a2enmod mime
Nextcloud has a built-in WebDAV server of its own, SabreDAV. If mod_webdav is enabled you must disable it for Nextcloud. Show all enabled modules, using the command below.
apachectl -M
Restart the Apache service using the command below.
systemctl restart apache2
Enable SSL
I will be setting this up using the built-in self-signed certificate.
Enable the SSL module
a2enmod ssl
Enable the default SSL site
a2ensite default-ssl
Edit the DocumentRoot of the default-ssl.conf file.
nano /etc/apache2/sites-enabled/default-ssl.conf
DocumentRoot /var/www/nextcloud
Reload Apache2
systemctl reload apache2
PHP Tweaks
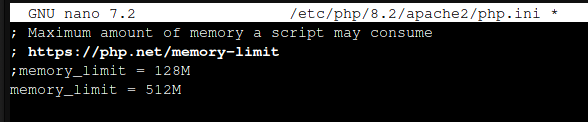
The PHP memory limit value needs modification as the recommended minimum value is 512 MB, this can be achieved by editing the PHP config file.
nano /etc/php/<version number>/apache2/php.ini
Scroll down and change memory_limit to at least 512M
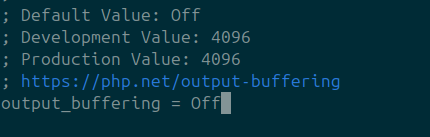
Also change output_buffering to Off.
Restart Apache for the changes to apply
systemctl restart apache2
MariaDB database
Install MariaDB by the command
apt install -y mariadb-server
A good starting point with configuring a SQL database is with the secure installation wizard.
mysql_secure_installation
- Enter current password for root: Enter
- Switch to unix_socket authentication: No
- Change the root password: Yes
- Remove anonymous users: Yes
- Disallow root login remotely: Yes
- Remove test database and access to it: Yes
- Reload privilege tables now: Yes
Now create a user and database for Nextcloud
mysql
CREATE USER 'USERNAME'@'localhost' IDENTIFIED BY 'PASSWORD';
CREATE DATABASE IF NOT EXISTS DBNAME CHARACTER SET utf8mb4 COLLATE utf8mb4_general_ci;
GRANT ALL PRIVILEGES ON DBNAME.* TO 'USERNAME'@'localhost';
FLUSH PRIVILEGES;
EXIT;
Nextcloud archive installer
You may need to install bzip2 to be able to decompress the downloaded file, this can be installed using the command.
apt install -y bzip2
Download the Nextcloud archive.
wget --directory-prefix=/var/www/ https://download.nextcloud.com/server/releases/latest.tar.bz2
Change directory cd /var/www then, extract (X) the compressed files (F) using tar in verbose (V) mode.
cd /var/www/
tar -xvf latest.tar.bz2
rm latest.tar.bz2
Remove the compressed file, as its no longer required rm latest.tar.bz2.
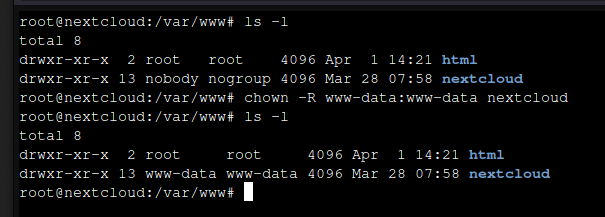
Change the ownership of the extracted nextcloud folder.
chown -R www-data:www-data /var/www/nextcloud/
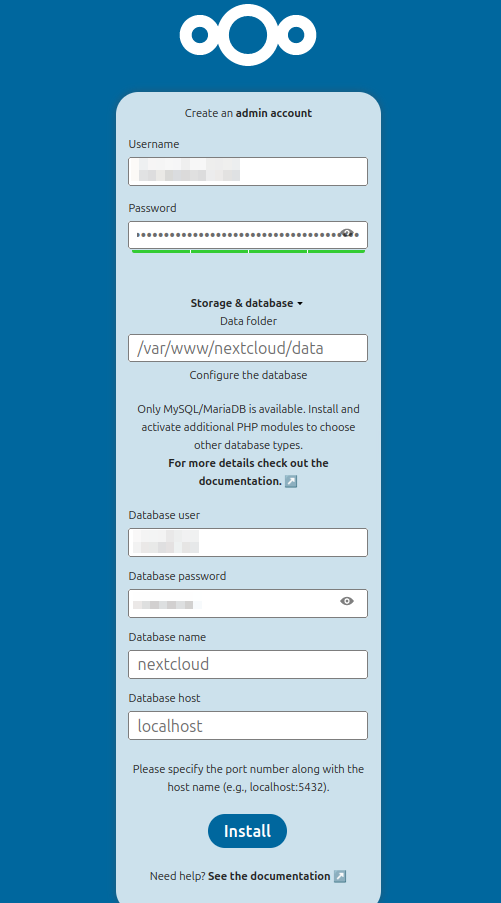
Navigate to http://SERVERADDRESS/nextcloud/ and complete the installation wizard.
This is the best time to change the data folder, for example to outside the Apache2 root directory or to a separate disk.
Additional Configuration
As reference, be aware of the Nextcloud configuration parameters page.
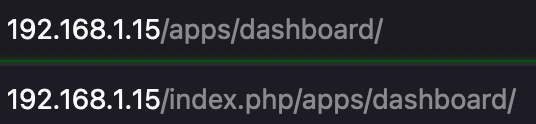
Pretty URLs
We can configure pretty URLs, which will change the address as shown below.
Edit NextCloud’s config file.
nano /var/www/nextcloud/config/config.php
Add the following under the overwrite.cli.url value
'overwrite.cli.url' => 'https://example.org/',
'htaccess.RewriteBase' => '/',
Then update the .htaccess file by using the command below
runuser --user www-data -- /usr/bin/php /var/www/nextcloud/occ maintenance:update:htaccess
Reverse Proxy
If you are using a reverse proxy, then you’ll likely see the error message “Access through untrusted domain”, to resolve this we need to modify our config.php file to permit access.
At the same time we will reconfigure the trusted proxies option, which will enable the client’s real IP address to be shown.
For guidance, view the sample config PHP file.
nano /var/www/nextcloud/config/config.php
Add the following
'trusted_domains' =>
array (
  0 => 'CHANGEME.DOMAIN.COM',
  1 => 'SERVER IPv4 ADDRESS',
),
'trusted_proxies' =>
array (
  0 => 'PROXY IPv4 ADDRESS',
),
Redirect all unencrypted traffic to HTTPS
Edit the Nextcloud config file
nano /etc/apache2/sites-available/nextcloud.conf
Add the following under ServerName
Redirect permanent / https://CHANGEME.server.com/
Now that all traffic is redirected to HTTPS, which we have configured to use the built-in Apache2 implementation, we also need to configure the Directory block within default-ssl.conf.
nano /etc/apache2/sites-available/default-ssl.conf
Add the following under the DocumentRoot statement.
<Directory /var/www/nextcloud/>
    Satisfy Any
    Require all granted
    AllowOverride All
    Options FollowSymLinks MultiViews

    <IfModule mod_dav.c>
      Dav off
    </IfModule>
  </Directory>
Enable HTTP Strict Transport Security (HSTS)
Re directing all traffic to HTTPS is good, it may not completely prevent man-in-the-middle attacks, therefore we will set the HSTS header.
As we have configured our HTTPS site under the built-in Apache2 SSL config then we will need to apply the changes within that default-ssl.conf file.
nano /etc/apache2/sites-available/default-ssl.conf
Add the following under the DocumentRoot statement.
<IfModule mod_headers.c>
  Header always set Strict-Transport-Security "max-age=15552000; includeSubDomains"
</IfModule>
Then reload Apache2
systemctl reload apache2
Cron jobs
The recommended approach is to use the system cron feature, to enable this we will edit the crontab for the www-data user.
crontab -u www-data -e
Select option 1 for Nano, and at the end add the following, which will execute every 5 minutes.
*/5 * * * * php -f /var/www/nextcloud/cron.php
The cron.php needs to be executed by the system account www-data, the below command will set the following permission
| Owner (U) | Group (G) | Others (O) | |
|---|---|---|---|
| Read (R) | Yes | Yes | Yes |
| Write (W) | Yes | No | No |
| Execute (X) | Yes | Yes | No |
chmod 754 /var/www/nextcloud/cron.php
Verify using the list command
crontab -u www-data -l
Then within Nextcloud > Administration > Basic Settings, set the background jobs to be “Cron (recommended)”.

Maintenance window
To avoid maintenance tasks being run at peak times we can configure a maintenance window.
Edit the Nextcloud config.php file
nano /var/www/nextcloud/config/config.php
Add the following value of 1 e.g. will only run these background jobs between 01:00 UTC and 05:00 UTC:
'maintenance_window_start' => 1,
Default Values
Phone Region
To validate phone numbers in the profile settings without a country code, we need to set a default phone region, this can be completed via the Nextcloud config.php file.
nano /var/www/nextcloud/config/config.php
Add the following value, setting your country code.
'default_phone_region' => 'GB',
Language
Add the following value, setting your language.
'default_language' => 'en',
Locale
Add the following value, setting your locale.
'default_locale' => 'en_GB',
Enable Memory Caching Local - APCu
For a small, or private home server its recommended to only use APCu.
Install the required PHP module
apt install -y php-apcu
Place the following into your Nextcloud config.php file.
nano /var/www/nextcloud/config/config.php
'memcache.local' => '\OC\Memcache\APCu',
We also need to modify our PHP configuration for our previously configured Cron background tasks
nano /etc/php/8.3/cli/php.ini
I added the following under the Miscellaneous section.
;Memory caching APCu
apc.enable_cli = 1
Enable Memory Caching Distributed & Locking - Redis
To enhance performance with transactional file locking we will utilise Redis.
Install the required packages
apt install -y redis-server php-redis
For enhanced security it is recommended to configure Redis to require a password. To set a password edit the Redis configuation file
nano /etc/redis/redis.conf
Uncomment requirepass and set a strong password for example
requirepass Super5trongPa$$word
While we are editing this configuration file we will also uncomment unixsocket and unixsocketperm, and changing the port value.
unixsocket /run/redis/redis-server.sock
unixsocketperm 770
Add the redis user to the www-data group.
usermod -a -G redis www-data
Restart the Redis server
systemctl restart redis-server
Place the following into your Nextcloud config.php file, under the APCu statement.
nano /var/www/nextcloud/config/config.php
'memcache.distributed' => '\OC\Memcache\Redis',
'memcache.locking' => '\OC\Memcache\Redis',
'redis' => [
     'host' => '/run/redis/redis-server.sock',
     'port' => 0,
     'password' => 'Super5trongPa$$word',
],
Restart the Apache service
systemctl restart apache2
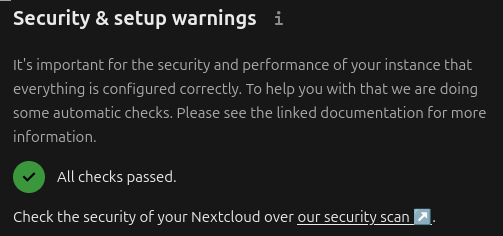
Nextcloud Security Scan
Once you have resolved any checks, then continue to use the provided Nextcloud Security Scan tool.
Misc
Cloudflare Notes
Using some of Cloudflare’s services can cause issues with NextCloud, for example ensure you have a configuration rule set to disable Email Obfuscation and Rocket Loader.
Additionally in some cases you may need to create a Page rule to set the Cache level to Bypass.
Forgotten Admin Password
Forgotten your admin password, reset it.
Additional commands can be found using the occ command. I did have to correct a permission for the OCC tool to be able to execute.
chmod 754 /var/www/nextcloud/occ
Then I could use this tool, for list all users for example
sudo -u www-data php --define apc.enable_cli=1 occ user:list
Run into issues, remember to review your Apache2 server logs
tail /var/log/apache2/error.log
Clear Nextcloud Logs
To clear the Nextcloud logs, use the below echo command.
echo "" > /var/www/nextcloud/data/nextcloud.log
Adding missing indices
You may see warnings of missing indices, these can be added by using the following command
runuser --user www-data -- /usr/bin/php /var/www/nextcloud/occ db:add-missing-indices