LXC Deluge with Conditional Start
26 Mar 2022
The purpose of this article, is to deploy a light-weight, headless BitTorrent service that provides a web interface for management. I will be creating a Proxmox VE 7 LXC, running Ubuntu 21.10 and deploying Deluge with a NFS mount to a TrueNAS server. Furthermore, I will be configuring a conditional that ensures Deluge is only running when the NFS mount is active, this provides assurance that downloads will be going to the correct location.
What is BitTorrent
“BitTorrent is a communication protocol for peer-to-peer file sharing (P2P)”, it is used to download files, such as your favourite Linux distribution from a collection of other “peer” users, this has the benefit of increased download speeds and reducing the burden on the distributions download servers.
Peer-to-peer technology is used for other services such as Microsoft Windows 10 for updates, it is called Delivery Optimization and is used for both local devices and non-local via the internet.
Deluge is a free, open-source and cross-platform BitTorrent client.
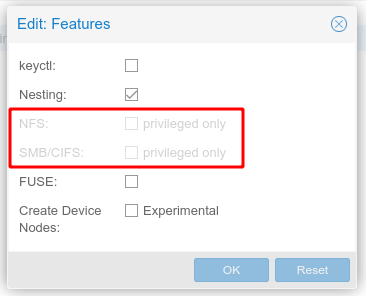
Create LXC
I will be creating a Privileged container, this is because I will be mounting a TrueNAS NFS later in the article, as shown below Proxmox LXC NFS feature is only supported in privileged only.
As I will be running additional services within this LXC I have created one with the following resources:
- CPU: 4 Cores
- RAM: 3072 MB (3 GB)
- Disk: 28 GB
These may be high, but over a month I monitored a peak of 2.3 GB in memory and a high of 67% CPU. This is due to the additional services, not deluge.
Update
As this is a LXC container the default user is root, therefore there is no requirement to prefix sudo.
First update the container repositories and packages
apt update && apt upgrade -y
Install Deluge
Install deluge daemon, the web and console packages.
apt install -y deluged deluge-web deluge-console
Create a service specific user
For security it is best to run a service with a specific user and group. You can create one using the following command:
adduser --system --gecos "Deluge Service" --disabled-password --group --home /var/lib/deluge deluge
This creates a new system user and group named deluge with no login access and home directory /var/lib/deluge which will be the default location for the config files.
In addition you can add to the deluge group any users you wish to be able to easily manage or access files downloaded by Deluge, for example:
usermod -aG deluge $USER
Daemon (deluged) service
Create the file
nano /etc/systemd/system/deluged.service
containing the following:
[Unit]
Description=Deluge Bittorrent Client Daemon
Documentation=man:deluged
After=network-online.target

[Service]
Type=simple
UMask=007

ExecStart=/usr/bin/deluged -d

Restart=on-failure

# Time to wait before forcefully stopped.
TimeoutStopSec=300

[Install]
WantedBy=multi-user.target
User configuration
To run the service using the previously created user e.g. deluge, first create the service configuration directory:
mkdir /etc/systemd/system/deluged.service.d/
Then create a user file
nano /etc/systemd/system/deluged.service.d/user.conf
with the following contents
# Override service user
[Service]
User=deluge
Group=deluge
Start deluged service
systemctl enable /etc/systemd/system/deluged.service

systemctl start deluged

systemctl status deluged
Web UI (deluge-web) service
Create the file
nano /etc/systemd/system/deluge-web.service
containing the following
[Unit]
Description=Deluge Bittorrent Client Web Interface
Documentation=man:deluge-web
After=network-online.target deluged.service
Wants=deluged.service

[Service]
Type=simple
UMask=027

ExecStart=/usr/bin/deluge-web -d

Restart=on-failure

[Install]
WantedBy=multi-user.target
User configuration
To run the service using the previously created user e.g. deluge, first create the service configuration directory:
mkdir /etc/systemd/system/deluge-web.service.d/
Then create a user file
nano /etc/systemd/system/deluge-web.service.d/user.conf
with the following contents
# Override service user
[Service]
User=deluge
Group=deluge
Start deluge-web service
systemctl enable /etc/systemd/system/deluge-web.service

systemctl start deluge-web

systemctl status deluge-web
Service logging
Create a log directory for Deluge and give the service user (e.g. deluge), full access:
mkdir -p /var/log/deluge

chown -R deluge:deluge /var/log/deluge

chmod -R 750 /var/log/deluge
Enable logging in the service files by editing the ExecStart line, appending -l and -L options:
Deluged
nano /etc/systemd/system/deluged.service
Edit ExecStart
ExecStart=/usr/bin/deluged -d -l /var/log/deluge/daemon.log -L warning --logrotate
Deluge-Web
nano /etc/systemd/system/deluge-web.service
Edit ExecStart
ExecStart=/usr/bin/deluge-web -d -l /var/log/deluge/web.log -L warning --logrotate
Restart the services:
systemctl daemon-reload

systemctl restart deluged

systemctl restart deluge-web
Conditionally start Deluged on mount points
If you have a network drive that may not be immediately available on boot or disconnected at random then you may want the deluged service to wait for mount point to be ready before starting. If they are unmounted or disconnected then deluged is stopped. When they become available again deluged is started.
NFS Client
apt install -y nfs-common
Mount the network drive
TrueNAS - Each pool or dataset is considered to be a unique filesystem. Individual NFS shares cannot cross filesystem boundaries. Adding paths to share more directories only works if those directories are within the same filesystem.
mkdir /mnt/Torrents
mount -t nfs 192.168.1.248:/mnt/Storage/Media/Torrents /mnt/Torrents
Automatically Mounting NFS File Systems with FSTAB
Edit the fstab file
nano /etc/fstab
Add your mount information
<storageHost>:<source> <destination> NFS Defaults 0 0
192.168.1.248:/mnt/Storage/Media/Torrents /mnt/Torrents nfs defaults 0 0
List the available drive mounts
systemctl -t mount
Look for your mount point in the Description column. Mounts are formatted similar to the mount point with -s replacing /s in the path. e.g.: media-xyz.mount
UNIT                                LOAD   ACTIVE SUB     DESCRIPTION
mnt-Torrents.mount                     loaded active mounted /mnt/Media
Modify the [Unit] section of the deluged.service script by adding the details below
nano /etc/systemd/system/deluged.service
[Unit]
Description=Deluge Bittorrent Client Daemon

# Start after network and specified mounts are available.
After=network-online.target mnt-Torrents.mount
Requires=mnt-Torrents.mount

# Stops deluged if mount points disconnect
BindsTo=mnt-Torrents.mount
Modify the [Install] section to ensure the deluged service is started when the mount point comes back online:
[Install]
WantedBy=multi-user.target mnt-Torrents.mount
Restart the service
systemctl daemon-reload

systemctl restart deluged
Web Panel
Now visit the Deluge web panel, the default password is deluge.
http://<IP Address>:8112/