HA Proxmox Cluster with Shared Storage
13 May 2021
In this guide I will be configuring a Proxmox lab using three HPE DL360 G7s servers with a QNAP NAS for shared storage and a Layer 2 VLAN capable switch interconnecting them. The aim is create a lab environment with High availability capability using existing equipment as a learning opportunity.
I will step through how I configured my networking, created a cluster, setup storage for the cluster and finally configured High Availability (HA).
I performed a standard Installation of Proxmox onto each server using a bootable USB stick and the latest copy of Proxmox VE.
Community Repository
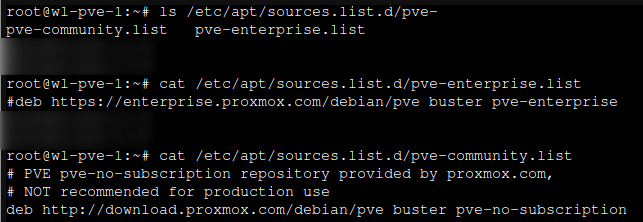
Add the community repository for each server, change directory to /etc/apt/sources.list.d/
- Comment out the
enterprise.list - Add a
community.list - Add the following to the list
# PVE pve-no-subscription repository provided by proxmox.com,
# NOT recommended for production use
deb http://download.proxmox.com/debian/pve buster pve-no-subscription
https://pve.proxmox.com/wiki/Package_Repositories
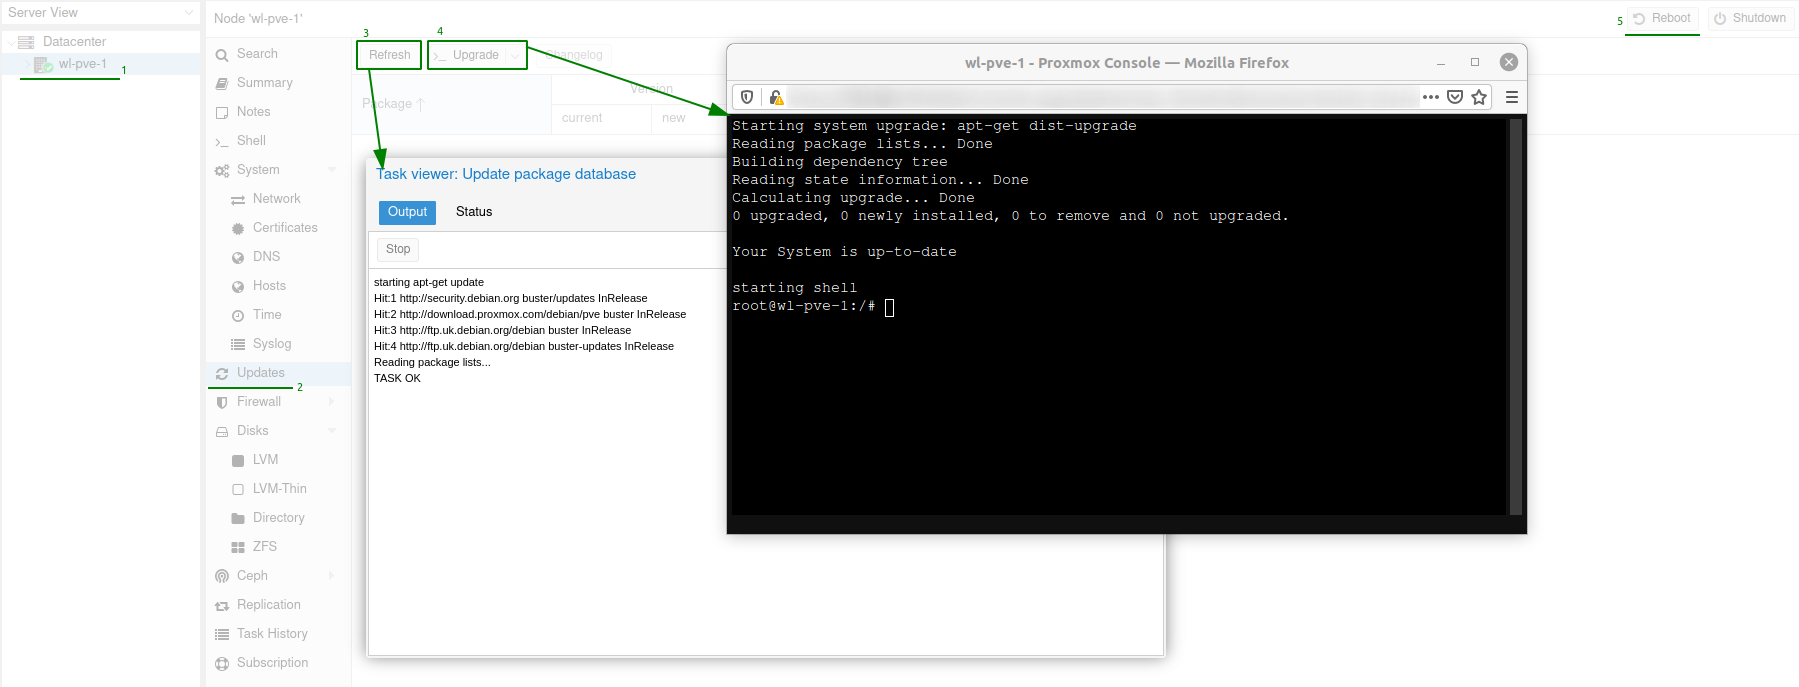
Perform an apt update and upgrade for each server. Go to the Proxmox server, select Updates from navigation pane.
- Refresh
- Upgrade
- Reboot
Network Configuration
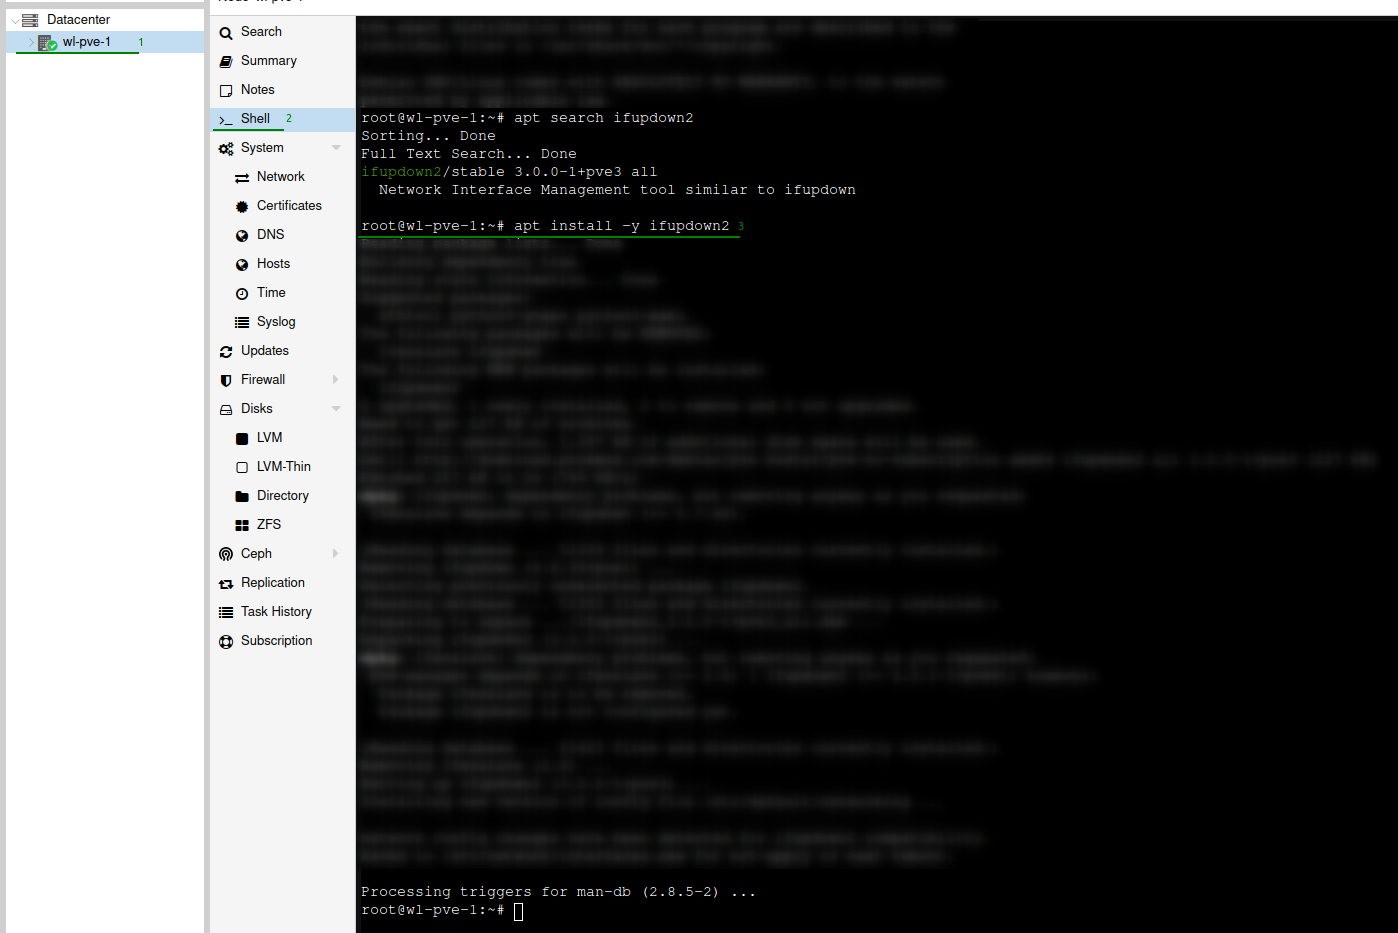
First install ifupdown2 on all servers using the following command from a shell prompt, this is required to perform network configuration changes without restarting the server.
apt install -y ifupdown2
IP Addressing Scheme
In my lab environment I have a layer 2 switch which has VLANs configured, which isolates the traffic based on interface port. There is no inter-VLAN routing within this setup, the only traffic that can be routed is the VLAN1 traffic.
Data Bond - VLAN 1
| DEVICE | INTERFACE | IP ADDRESS | GATEWAY |
|---|---|---|---|
| WL-PVE-1 | bond0 (enp3s0f0 / enp3s0f1) | ||
| WL-PVE-2 | bond0 (enp3s0f0 / enp3s0f1) | ||
| WL-PVE-3 | bond0 (enp3s0f0 / enp3s0f1) | ||
| QNAP NAS | 172.16.1.10 /24 | 172.16.1.1 |
Data Bridge - Virtual Switches
Using a interface bond under the bridge interface can be used to make the guest network fault-tolerant, as per Proxmox documentation.
| DEVICE | INTERFACE | IP ADDRESS | GATEWAY |
|---|---|---|---|
| WL-PVE-1 | bond0 | 172.16.1.11 /24 | 172.16.1.1 |
| WL-PVE-2 | bond0 | 172.16.1.12 /24 | 172.16.1.1 |
| WL-PVE-3 | bond0 | 172.16.1.13 /24 | 172.16.1.1 |
Cluster Network - VLAN 100
| DEVICE | INTERFACE | IP ADDRESS | GATEWAY |
|---|---|---|---|
| WL-PVE-1 | enp4s0f0 | 172.16.100.11/24 | |
| WL-PVE-2 | enp4s0f0 | 172.16.100.12/24 | |
| WL-PVE-3 | enp4s0f0 | 172.16.100.13/24 |
Storage Network - VLAN 150
| DEVICE | INTERFACE | IP ADDRESS | GATEWAY |
|---|---|---|---|
| WL-PVE-1 | enp4s0f1 | 172.16.150.11/24 | |
| WL-PVE-2 | enp4s0f1 | 172.16.150.12/24 | |
| WL-PVE-3 | enp4s0f1 | 172.16.150.13/24 | |
| QNAP NAS | 172.16.150.10/24 |
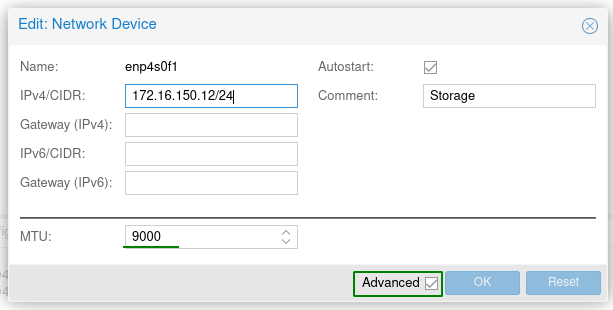
The below screenshot shows the Interfaces after they have been configured with the address scheme and Linux Bond.
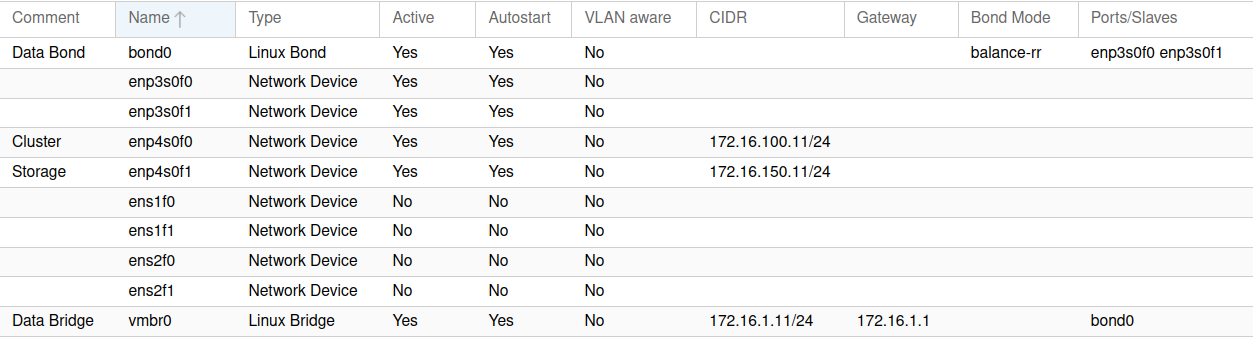
Jumbo frames have been configured on the switch for this VLAN so I needed to change the Maximum Transmission Unit (MTU) to match.
Setting jumbo frames on the storage network by checking the Advanced button and changing the default MTU value to 9000
Cluster
https://pve.proxmox.com/wiki/High_Availability_Cluster
Notes:
- Make sure to have auto-power on features enabled via BIOS as per device fencing requirements.
- On my HP DL360 G7’s this option can be found in the BIOS under “Server Availability” and “Automatic Power-On”, set this to “Enabled”.
- Use of redundant network connections for the cluster communication (bonding), to prevent a switch reboot from locking up the HA nodes.
- I am unable to do this in my lab setup as it would requirement a second switch and splitting the bond connections between them.
- Minimum of three networks:
- Cluster communication
- VM traffic (Called mine Data)
- Storage traffic
- Shared storage such as a SAN or NAS.
- I have use of a QNAP TS-831XU NAS
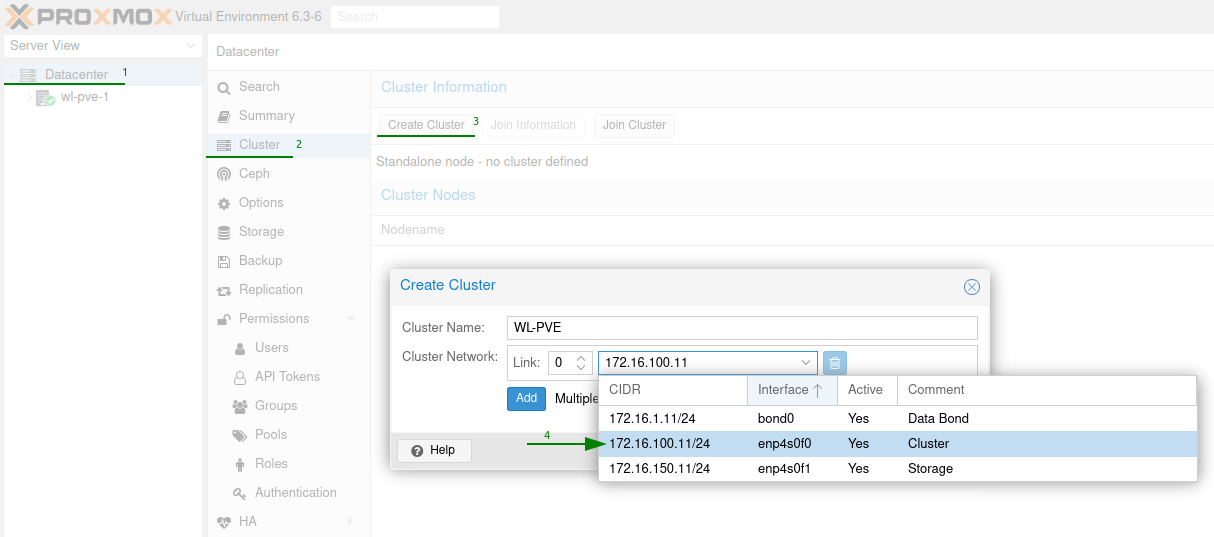
Creating the cluster on WL-PVE-1
Goto the “Datacenter”, select “Cluster” then “Create Cluster”. Provide a name for the cluster and change the cluster network to use our cluster interface.
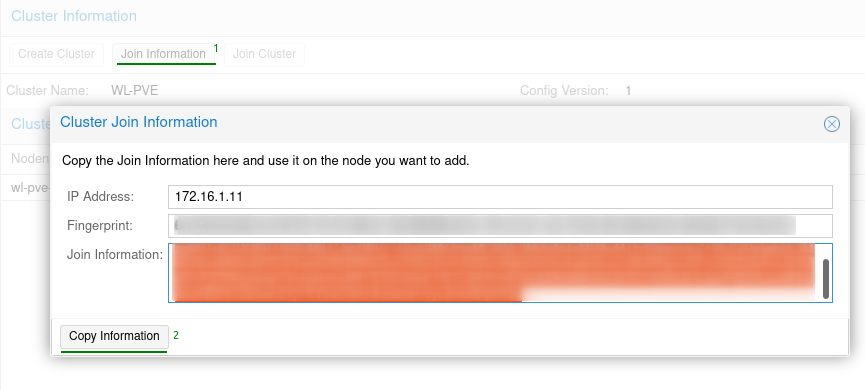
Once the cluster has been created make sure to copy the join information.
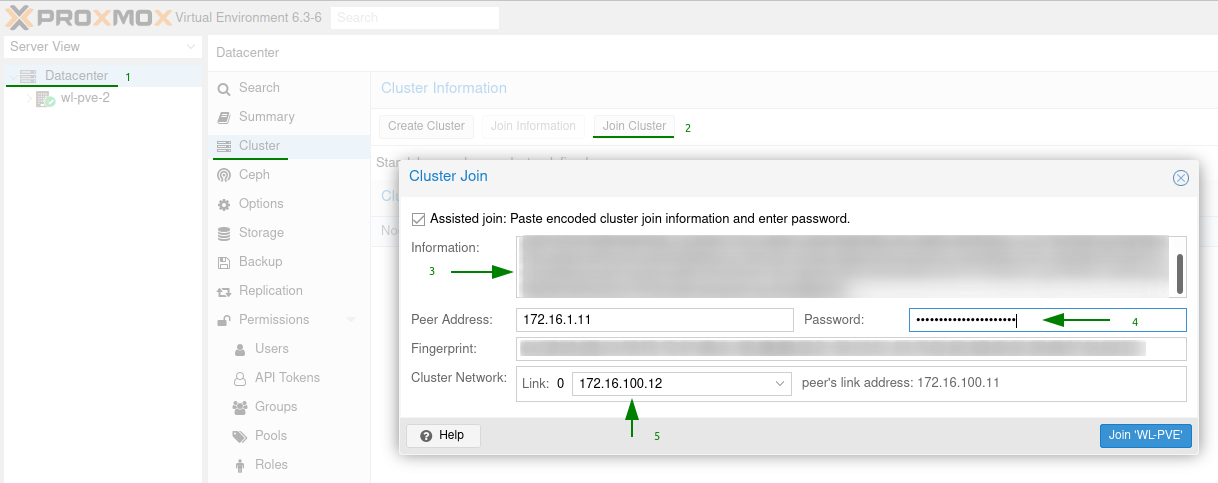
Move onto WL-PVE-2 and WL-PVE-3 and join them to the cluster by going to “Datacenter”, “Cluster” and selecting “Join Cluster”. Paste the join information into the supplied box and it will expand to request the root password and cluster network.
Once complete you should see all the nodes joined to the cluster.

Cluster Storage
Now that we have our servers in a cluster, we need to provide some central storage to allow virtual machines and containers to migrate between nodes.
One major benefit of storing VMs on shared storage is the ability to live-migrate running machines without any downtime, as all nodes in the cluster have direct access to VM disk images. There is no need to copy VM image data, so live migration is very fast in that case.
https://pve.proxmox.com/wiki/Storage
Shared storage options that offer support for Snapshots include:
- CephFS (File) or Ceph/RBD (Block)
- ZFS over iSCSI (Block)
Sadly my QNAP doesn’t support ZFS over iSCSI as my QNAP OS doesn’t support QuTS Hero I’ll be taking the standard iSCSI route and using LVM on top for a shared storage solution. Below you can see my iSCSI LUNs mapped ready for Proxmox.
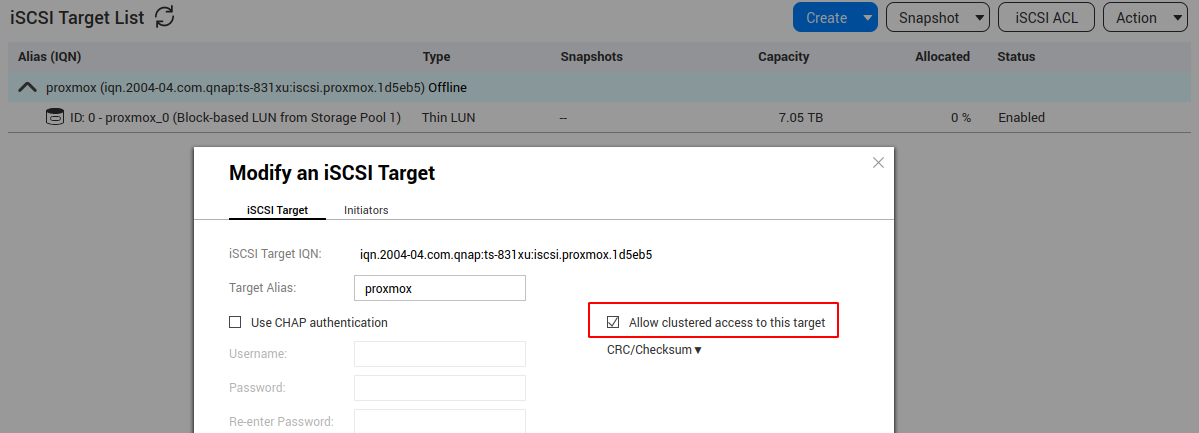
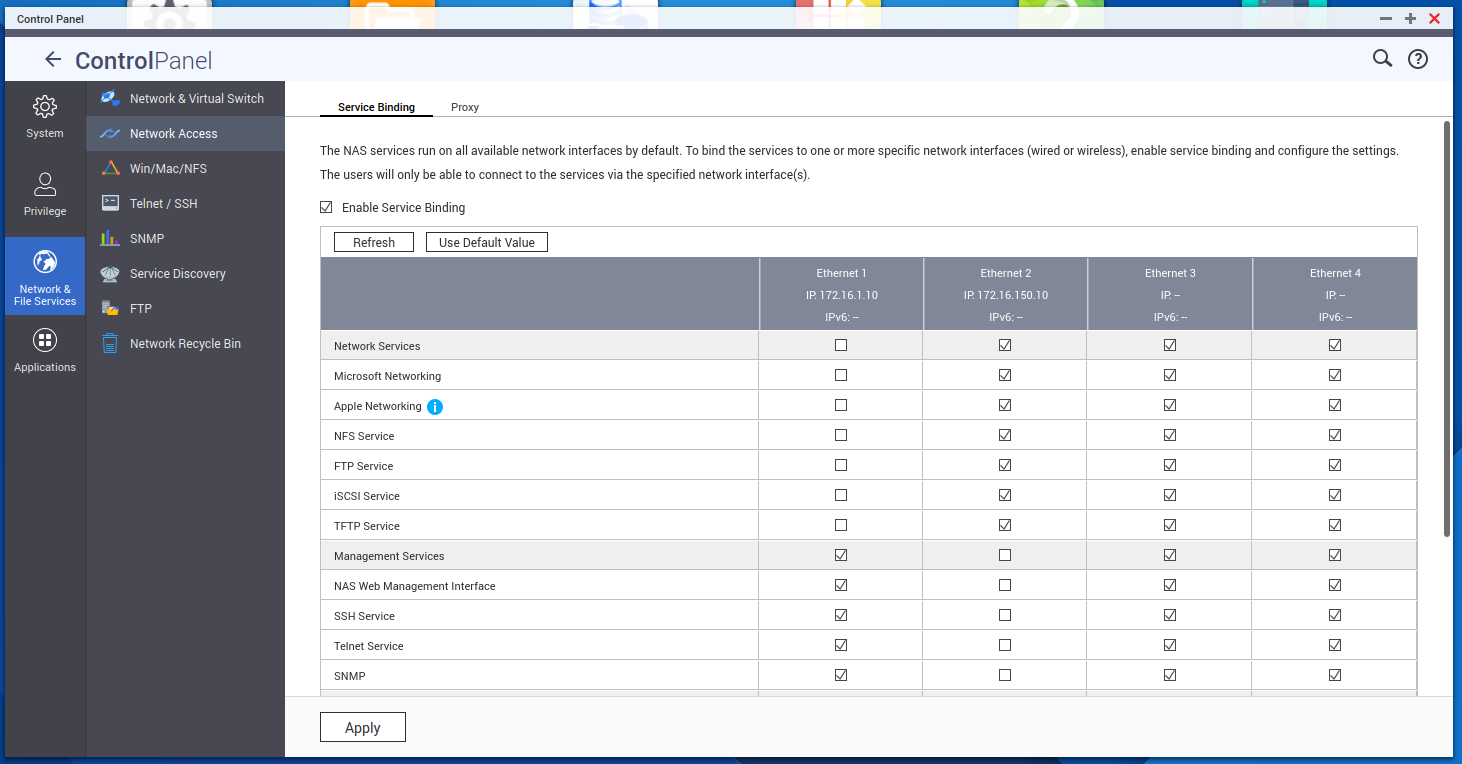
Because we have multiple interfaces its extremely important to configure the QNAP service binding to remove all the storage services from the Data VLAN.
You can find this under Control Panel > Network & File Services > Service Binding. Enable this feature and remove all other than Management services from our management interface, failing to do this step means that Proxmox will have multiple paths to our iSCSI and throw lots of errors.
Add iSCSI LUN to Proxmox
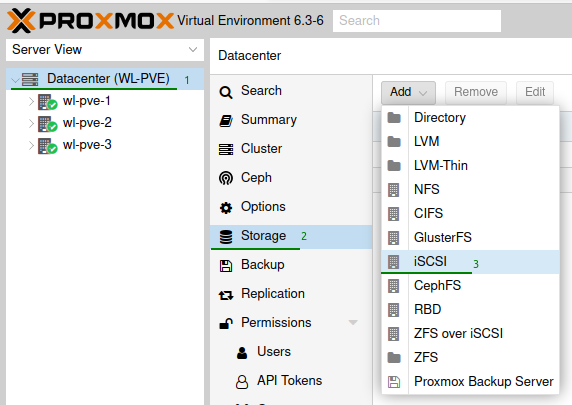
Within Promox go to “DataCenter” > “Storage”, select the add and iSCSI from the list.
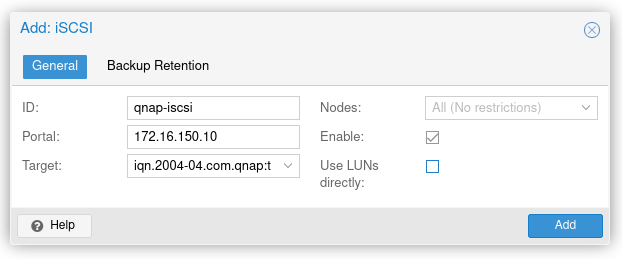
Enter an ID for the iSCSI, i’ve used ‘qnap-iscsi’ as its easy to identify. Make sure to uncheck use LUNs directly as we will be adding a LVM on top.
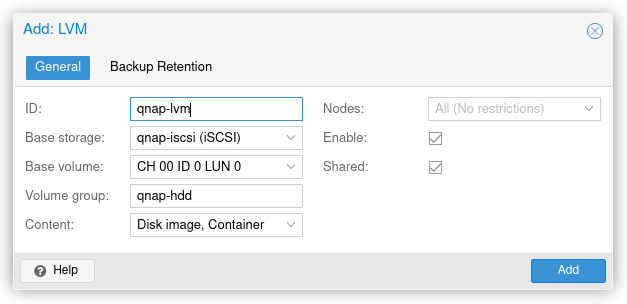
Add LVM on top of the iSCSI
After the iSCSI has been added go back to ‘Add’ and select ‘LVM’. Similar to the iSCSI provide an ID i’ve used ‘qnap-lvm’ just to keep things uniform and simple, same with the volume group.
Ensure that the shared box is checked.
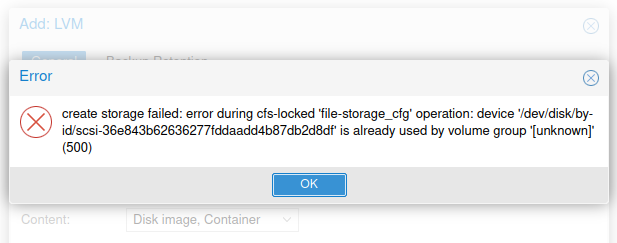
If you get an error here similar to “already used by volume group” please go back to your iSCSI target and check the service bindings.
If all goes well, you should have an attached iSCSI and LVM within storage.

I now unchecked the ‘Enable’ option for your local LVM disk to prevent Virtual Machines or Containers from being installed on anything other then the shared storage.
High Availability
As per Proxmox High Availability documentation the requirements are:
- at least three cluster nodes (to get reliable quorum)
- shared storage for VMs and containers (resources)
- hardware redundancy (everywhere)
- use reliable “server” components
- hardware watchdog - if not available we fall back to the Linux kernel software watchdog (
softdog) - optional hardware fencing devices
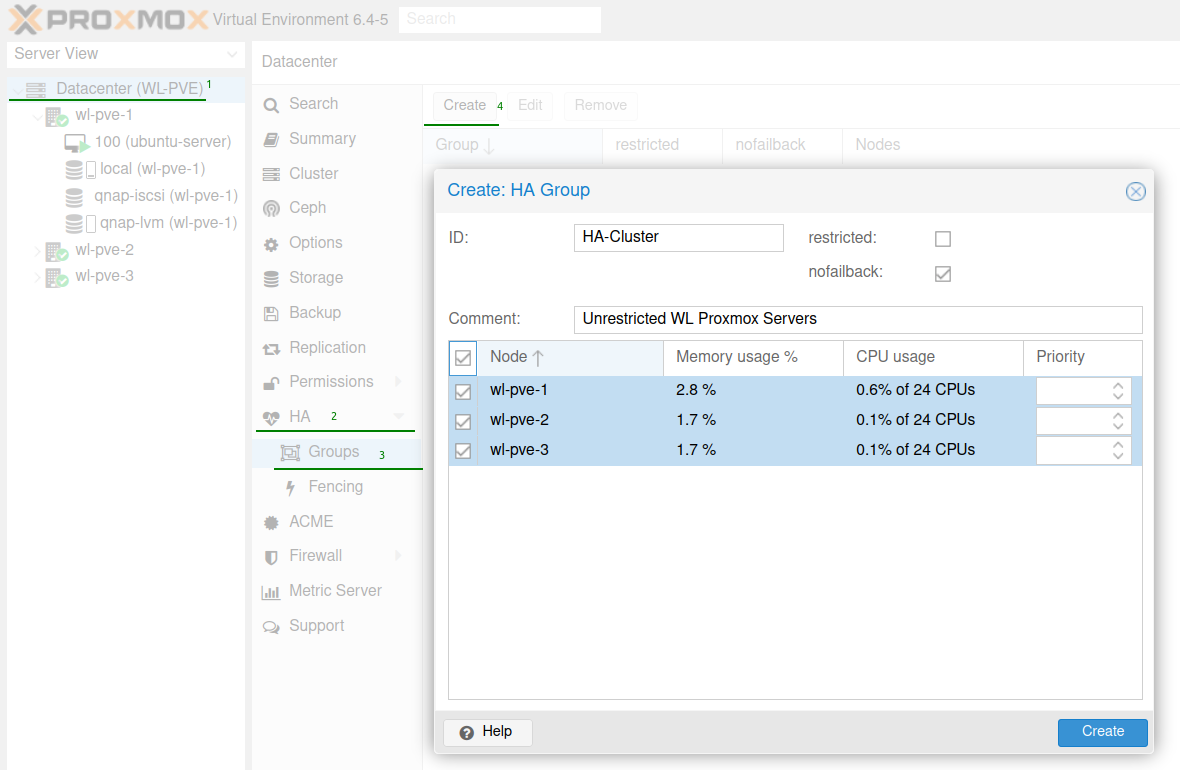
HA group
We will now create a HA group for our Proxmox servers, navigate to the correct menu by selecting Datacenter > HA > Groups and select Create. There are a few settings which need to be considered, these are:
- ‘Nofailback’ prevents services from moving to a node with the highest priority. This can be useful for unwanted resource movement.
- ‘Restricted’ means that resources need to be bound to the group, if no group members are available the resource is placed in a stopped state.
Fencing
On node failures, fencing ensures that the erroneous node is guaranteed to be offline. This is required to make sure that no resource runs twice when it gets recovered on another node. This is a really important task, because without this, it would not be possible to recover a resource on another node.
By default Proxmox will use the software watchdog (softdog) that is built-in. Hardware watchdogs are blocked for security reasons and requirement manual intervention to enable them but this is outside the scope of my lab as I do not have any hardware.
Testing HA using a Virtual Machine
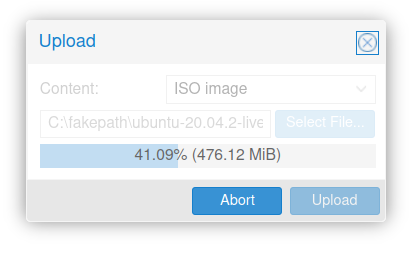
Now we are ready to deploy a test virtual machine or container so we can trial live migration and our high availability. Until I have a shared storage for ISO images I will be uploading a copy of Ubuntu server 20.04.2 and installing my Virtual machine from that.
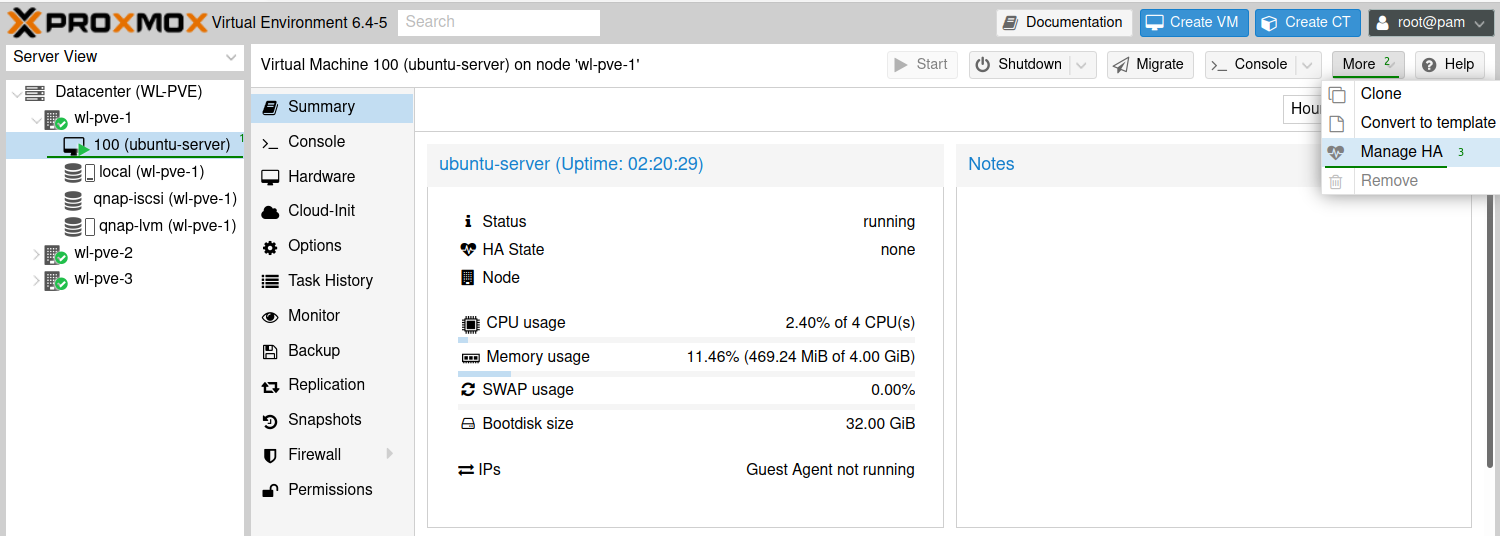
Once we have our test virtual machine installed we can then add it to our HA group. Navigate to the Virtual Machine > More > Manage HA.
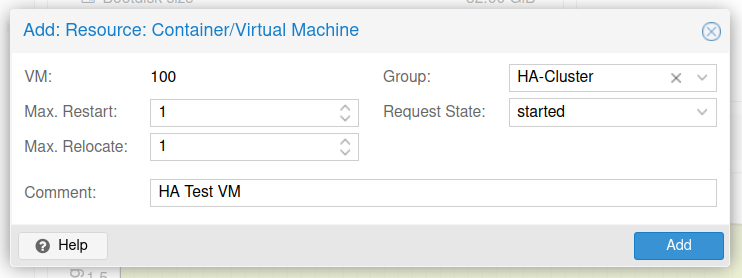
Add the Virtual machine to the HA group we previously created.
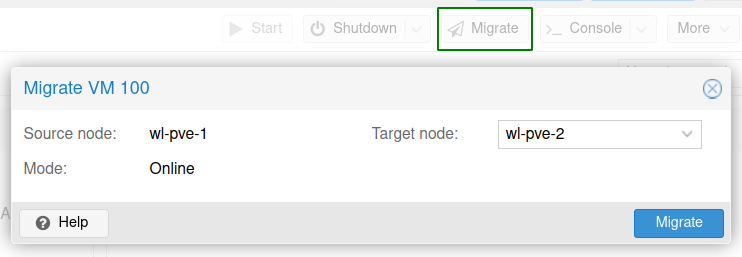
Now we will perform two tests, the first being a migration of the Virtual machine and the second turning off the server hosting the Virtual machine.
We can migrate a Virtual machine using the ‘Migrate’ button located in the Virtual machine panel. A small paper plane icon will appear next to the Virtual machine, which indicates its being migrated. After a few seconds, depending on transfer speeds the Virtual machine will be shifted to WL-PVE-2.
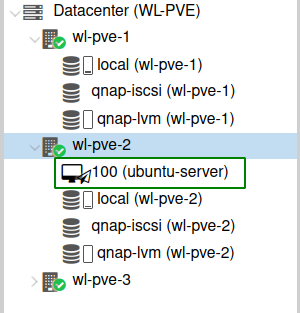
The next test I’ll be restarting the node which contains the Virtual machine and look for a migration before it restarting. As shown in the screenshot below you can see the migration icon before the node is restarted.
This is where I will conclude this post, from my testing I have successfully configured three Proxmox VE servers with shared storage using iSCSI with LVM and configured the setup for High Availability (HA).
Thank you for reading.