VLAN Simplified
10 Apr 2021
A brief summary of VLANs, what they are, why we use them, different types we use and how to configure using Cisco.
Contents
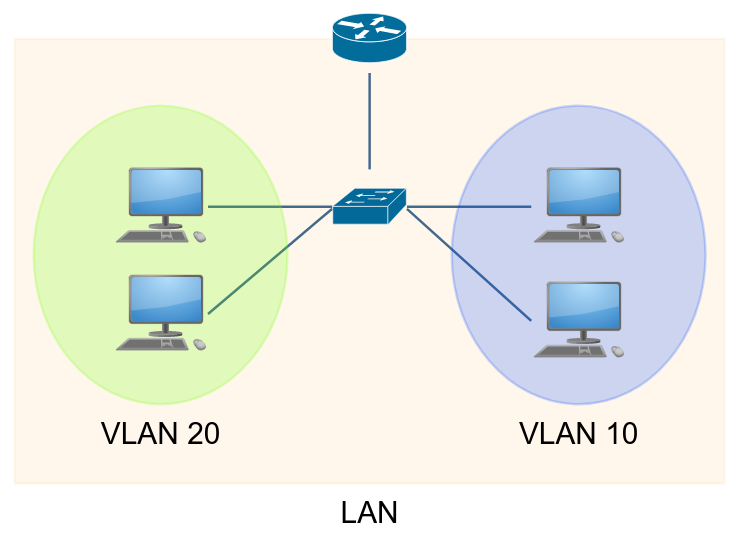
What is a VLAN?
VLAN stands for Virtual Local Area Network, its a logical separation of a physical network.
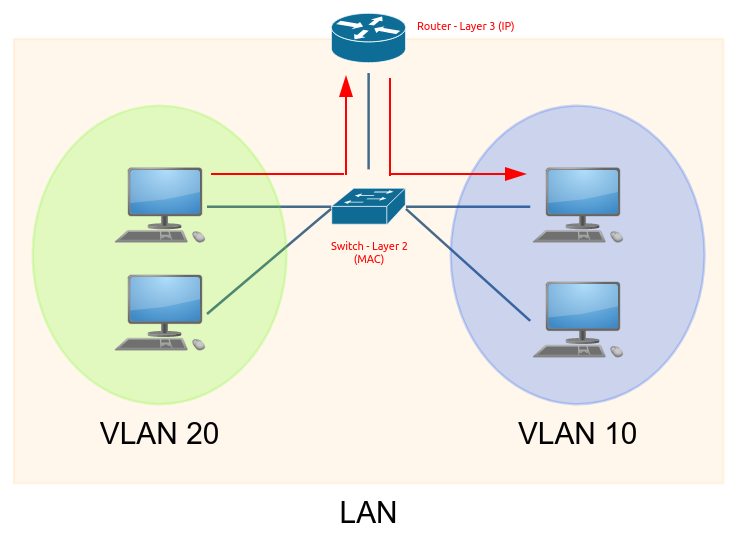
Layer 2 Switching
- Works at the OSI layer 2 (Data Link).
- Packets sent to a specific switch port base upon the destination MAC address.
- No routing is required for local peers.
Layer 3 Switching
- Routing of packets operates at the OSI layer 3 (Network).
- Cross VLAN communication requires routing either through a Router or Multi-layer Switch
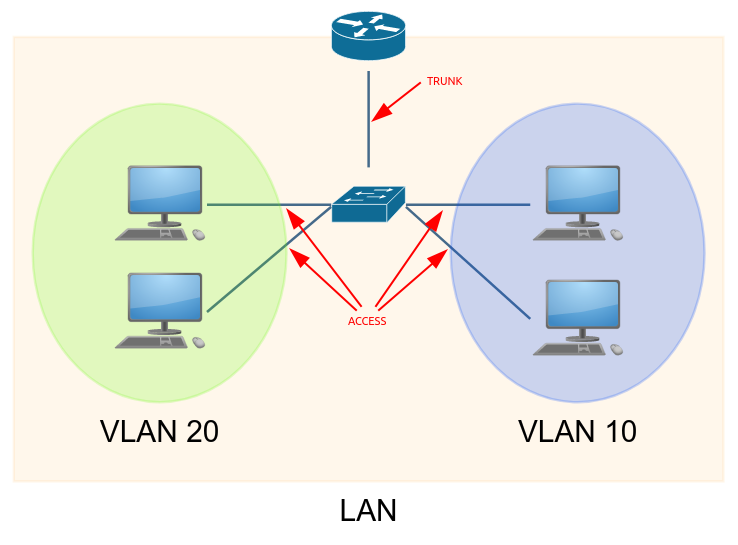
Trunks
A point-to-point connection that carries multiple VLANs’ traffic using tagging.
VLAN Tagging uses 802.11Q (Dot1q)
Trunk Port vs Access Port
Access ports handle traffic for one VLAN while Trunk ports can handle multiple VLANS.
Access ports send and receive untagged frames and are used from switch to client device.
Trunk ports must use tagging to correctly identify frames
Why use?
Using VLANs to segment the network can be useful for the following reasons:
- Efficiency
- Reduction in network traffic because devices that do not need to communicate with each other are separated.
- Reduction in broadcast traffic as broadcast domains are increased but smaller in size.
- Security
- Separation of devices brings improved security.
- Flexibility
- The network can become more flexible using logical networking over a flat network.
- Cost Savings
- As the network is more flexible we can save money through using our existing equipment.
- Bandwidth savings through a more efficient use of network traffic.
Different VLAN types?
- Default VLAN
- VLAN 1
- Cannot be removed, disabled or shutdown
- Native VLAN
- Used for devices that do not support VLANs
- No VLAN Tagging
- Cisco recommend that the Native VLAN is something other than VLAN 1
- Data VLAN
- General traffic
- Management VLAN
- Much smaller contained VLAN within the regular network
- Improves security for device management or monitoring traffic
- Use of Access Control Lists (ACL) to tighten security.
- Voice VLAN or Auxiliary VLAN
- Allows access ports to accept a second VLAN tagged traffic for VoIP
How to use?
Cisco Configuration - Switch Access Port
Cisco switches by default are part of the default VLAN which is VLAN1
Create VLANs
Switch> enable
Switch# configure terminal

Switch(config)# vlan 10
Switch(config-vlan)# name admin

Switch(config-vlan)# vlan 20
Switch(config-vlan)# name student

Switch(config)# end
Switch# show vlan
Output of show vlan
VLAN Name                             Status    Ports
---- -------------------------------- --------- -------------------------------
1    default                          active    Fa0/1, Fa0/2, Fa0/3, Fa0/4
                                                Fa0/5, Fa0/6, Fa0/7, Fa0/8
                                                Fa0/9, Fa0/10, Fa0/11, Fa0/12
                                                Fa0/13, Fa0/14, Fa0/15, Fa0/16
                                                Fa0/17, Fa0/18, Fa0/19, Fa0/20
                                                Fa0/21, Fa0/22, Fa0/23, Fa0/24
                                                Gig0/1, Gig0/2
10   admin                            active
20   student                          active
1002 fddi-default                     active
1003 token-ring-default               active
1004 fddinet-default                  active
1005 trnet-default                    active
Assign interface mode and VLAN ID
Switch#configure terminal

Switch(config)#interface fastEthernet 0/1
Switch(config-if)#switchport mode access
Switch(config-if)#switchport access vlan 10

Switch(config)#interface fastEthernet 0/2
Switch(config-if)#switchport mode access
Switch(config-if)#switchport access vlan 20

Switch(config-if)#end
Switch#show vlan
Output of show vlan
VLAN Name                             Status    Ports
---- -------------------------------- --------- -------------------------------
1    default                          active    Fa0/3, Fa0/4, Fa0/5, Fa0/6
                                                Fa0/7, Fa0/8, Fa0/9, Fa0/10
                                                Fa0/11, Fa0/12, Fa0/13, Fa0/14
                                                Fa0/15, Fa0/16, Fa0/17, Fa0/18
                                                Fa0/19, Fa0/20, Fa0/21, Fa0/22
                                                Fa0/23, Fa0/24, Gig0/1, Gig0/2
10   admin                            active    Fa0/1
20   student                          active    Fa0/2
1002 fddi-default                     active
1003 token-ring-default               active
1004 fddinet-default                  active
1005 trnet-default                    active
Cisco Configuration - Switch Trunk Port
Configure the interface as a trunk
Switch> enable
Switch# configure terminal
Switch(config)# interface g0/1
Switch(config-if)# switchport mode trunk
Set Native VLAN
If you do not configure this parameter, the trunk port uses the default VLAN as the native VLAN ID.
Switch(config-if)# switchport trunk native vlan 2
Add allowed VLANs
Switch(config-if)# switchport trunk allowed vlan 10
Switch(config-if)# switchport trunk allowed vlan add 20
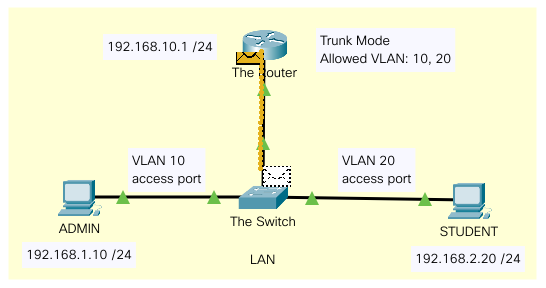
Cisco Configuration - Router on Stick
We’ll need to configure the router to use sub-interfaces and the encapsulation method of dot1q.
Router> enable
Router# configure terminal

Router(config)# interface g0/0/0.10
Router(config-subif)# encapsulation dot1Q 10
Router(config-subif)# ip address 192.168.1.1 255.255.255.0
Router(config-subif)# exit

Router(config)# interface g0/0/0.20
Router(config-subif)# encapsulation dot1Q 20
Router(config-subif)# ip address 192.168.2.1 255.255.255.0

Router(config-subif)# exit
Router(config)# interface g0/0/0
Router(config-if)# no shut
The client machines; ADMIN and STUDENT now need to use their respective default gateways and the traffic will be sent over to the router and cross-VLAN.
Cisco Configuration - Multi-Layer Switch
Enable routing
Switch> enable
Switch# configure terminal
Switch(config)# ip routing
Create Switched Virtual Interfaces (SVI)
Switch(config)# interface vlan 10
Switch(config-if)# ip address 192.168.1.1 255.255.255.0
Switch(config-if)# exit

Switch(config)# interface vlan 20
Switch(config-if)# ip address 192.168.2.1 255.255.255.0
Switch(config-if)# exit
Configure interfaces as Access ports
Switch(config)# interface fa0/1
Switch(config-if)# switchport mode access
Switch(config-if)# switchport access vlan 10
Switch(config-if)# exit

Switch(config)# interface fa0/2
Switch(config-if)# switchport mode access
Switch(config-if)# switchport access vlan 20
Switch(config-if)# exit
The client machines; ADMIN and STUDENT now need to use their respective default gateways and the traffic will be sent over to the router and cross-VLAN.
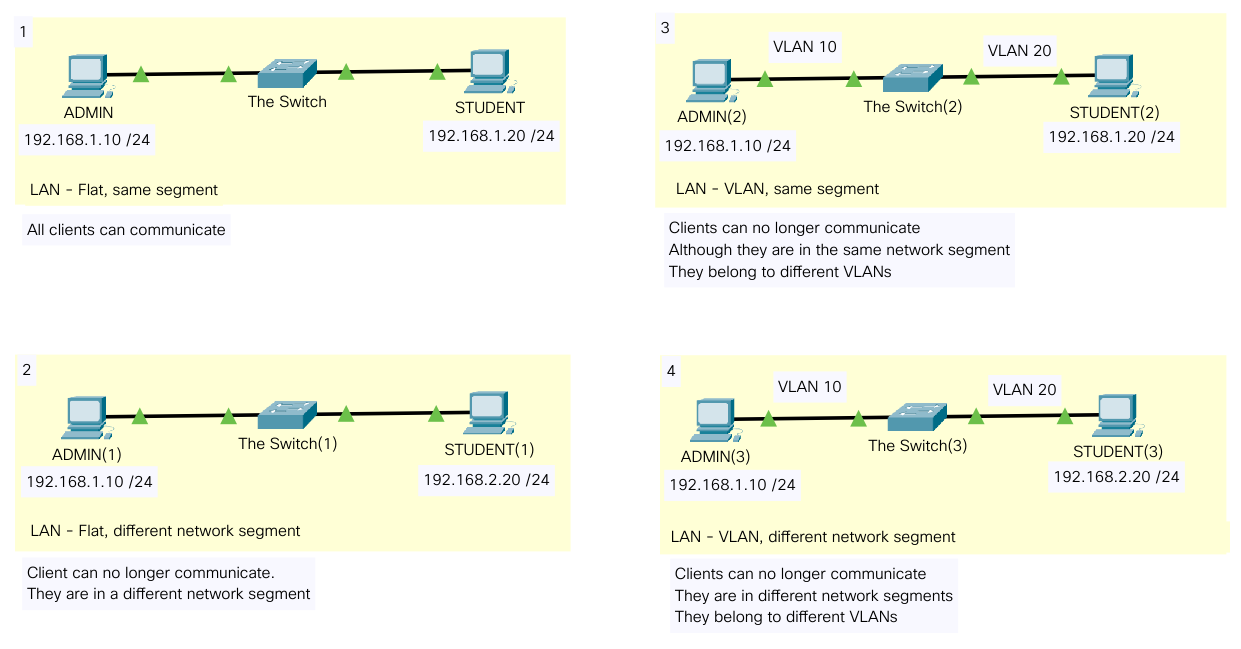
Example Files
Flat Network, Network Segmentation and VLAN
Link to this Packet Tracer file.
Switch Trunk and Router on a Stick
Link to this Packet Tracer file.
Multi-Layer Switch

Link to this Packet Tracer file.
References and Resources
- What is VLAN? Types, Advantages, Examples - Guru99
- VLANs and Trunks for Beginners - Part 1 - DansCourses
- Layer 3 vs Layer 2 Switching - Cisco
- Understanding VLAN Trunking - SolarWinds MSP
- What is a management VLAN? - NETGEAR
- Voice VLAN - Auxiliary VLAN - Practical Networking
- Configuring Access and Trunk Interfaces - Cisco
- How to Configure Cisco Router-on-a-stick with Switch - Networks Training
- Inter-VLAN Routing using a Multi-Layer Switch - Cisco CCNA 200-301 - Keith Barker