TP-Link Omada Enterprise Deployment
28 Jun 2021
The purpose of this article is to cover deploying the TP-Link Omada series as a Wireless solution for my organization, this solution came in under budget with a total cost of roughly £13,500 compared to other solutions which had quotes of £37,000-40,000. The requirements were to provide Wi-Fi coverage for all three sites with support for 802.11ax. We also wanted to change how to authenticate our clients, therefore this solution required a captive portal with voucher (guest usernames) support, RADIUS authentication while still maintaining features such as Rate Limiting and Scheduling.
TP-Link Omada ticked all of our requirement boxes therefore we purchased two EAP660 HD access points and a OC300 controller for prototyping, the article below are the steps taken in our demonstration before we committed to purchasing 60 more access points. Its worth noting that our existing switching infrastructure does not support the listed 2.5G Ethernet of the EAPs, but we wanted to invest in something that could last 5-10 years.
The equipment used in the full solution:
- 1x TP-Link Omada OC300 Controller
- 62x TP-Link Omada EAP660 HD Access Point
- Virtual Windows Server for NPS (RADIUS)
Contents
- Controller Install
- TP-Link Welcome Wizard
- Fixing Cloud Access
- Update Firmware
- Auto Backup
- Creating Wireless Networks
- Testing
- Student Wireless Network
- Misc
Controller Install
Firstly, start by unboxing the OC300 controller and rack mounting it, providing mains power and Ethernet connectivity to our switch. The controller will automatically request an IP address from our DHCP server, which I will reserve going forward.

TP-Link Welcome Wizard
When we navigate to the IP address in a browser, we are greeted by the Welcome splash screen.
We’ll step through the wizard to setup our device. - We can also skip this wizard and configure manually.
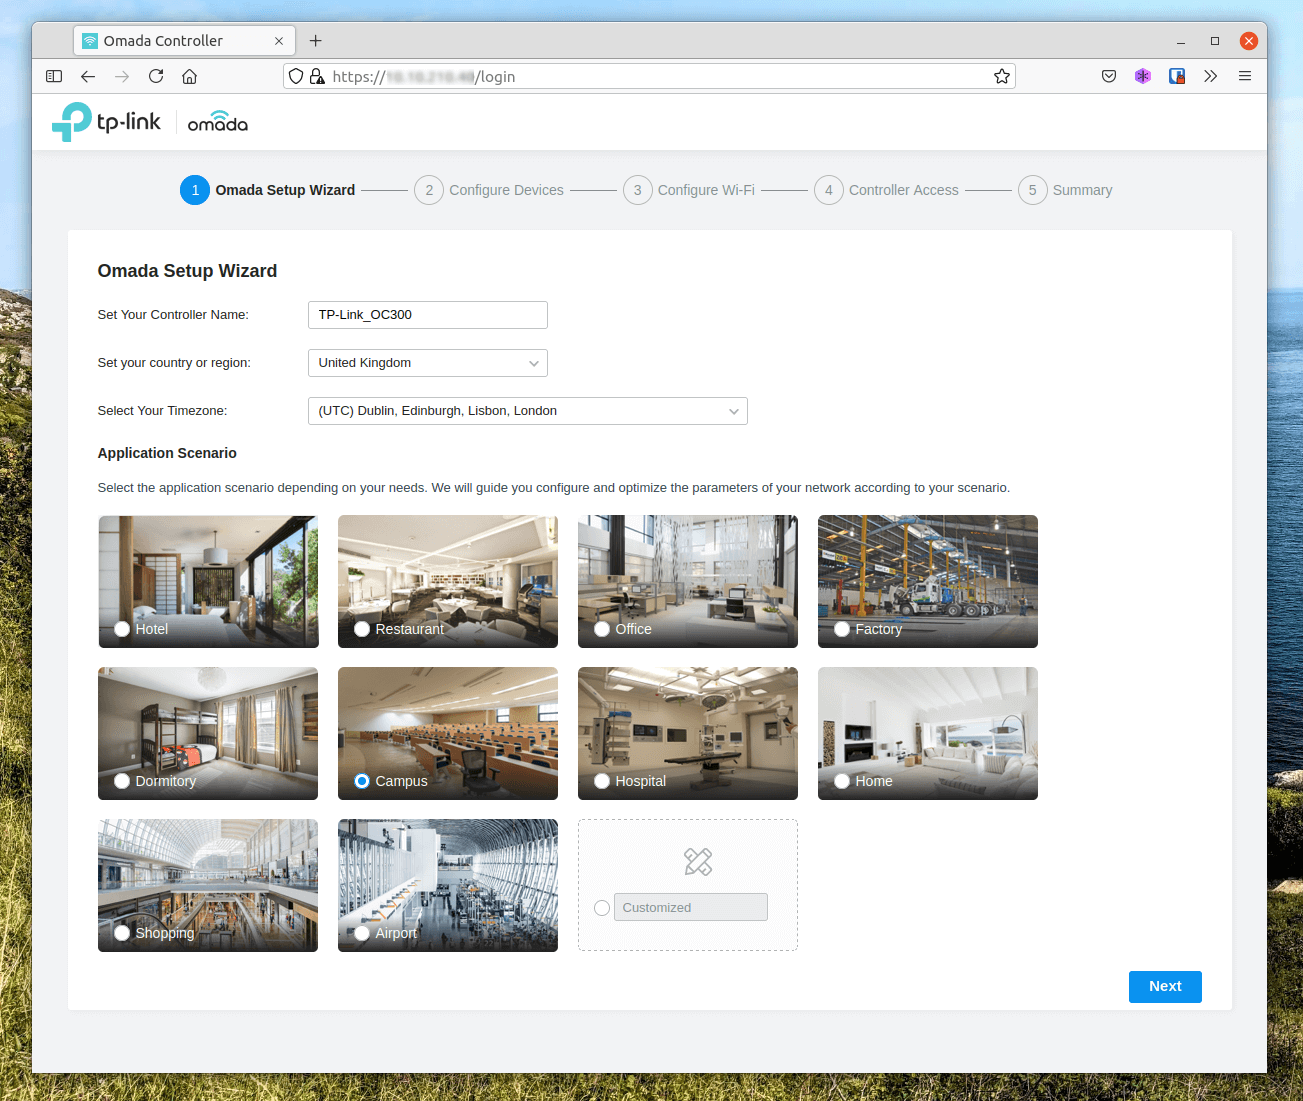
The first step is where we configure the device name, set our region and timezone.
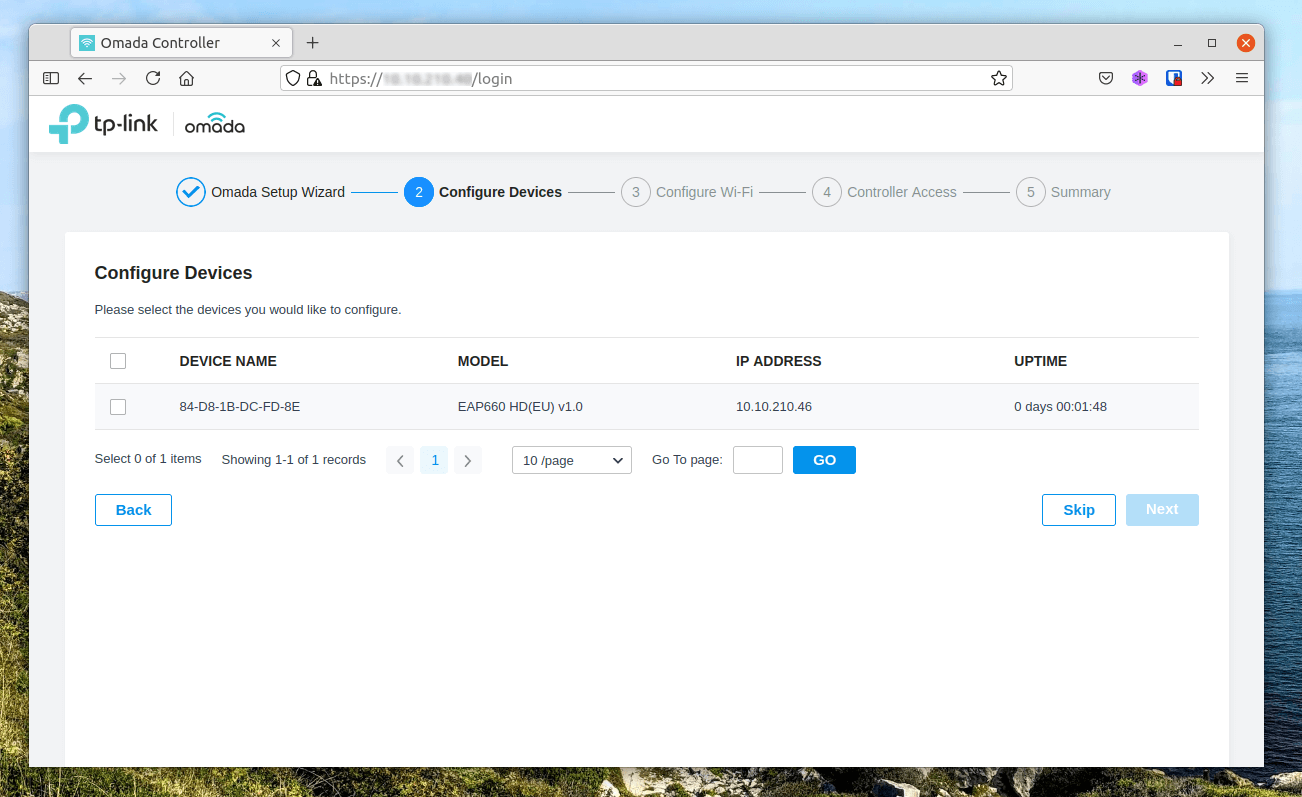
For the initial setup I have plugged a single EAP660 HD access point into the network, providing power using PoE.
On the next screen you’ll see all the detected access points, here we can check the devices and select Next to continue the configuration. - You can skip this step and add the EAPs at a later time if you wish.
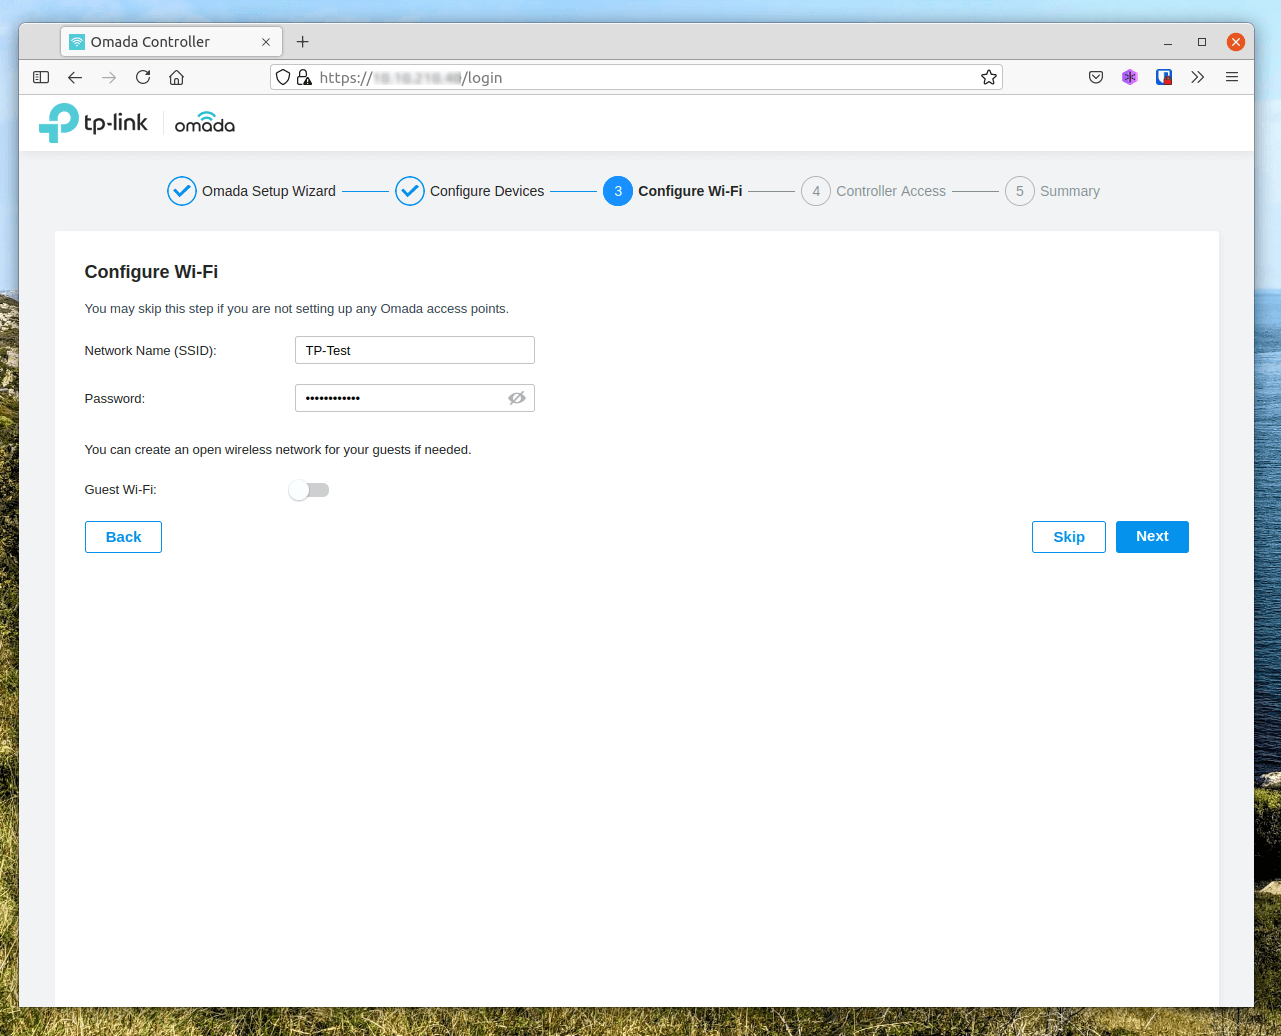
We’ll setup a test Wi-Fi just for the initial setup, I have provided an SSID of “TP-Test” and a basic password. - You can skip this step and configure your wireless at a later time if you wish.
Next we’ll provide an administrators name, email and password for our OC300 controller.
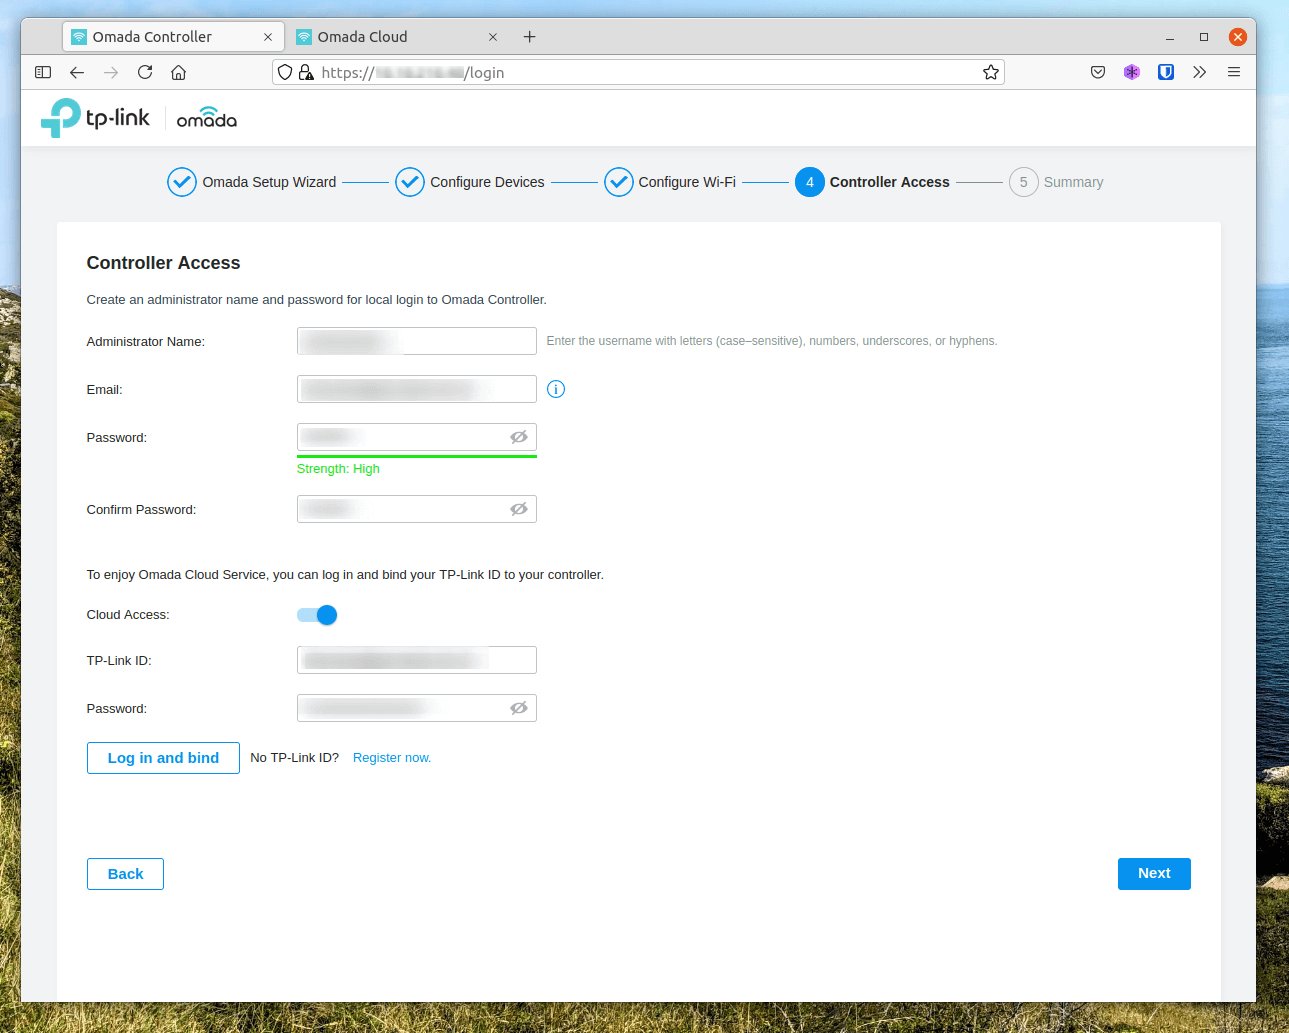
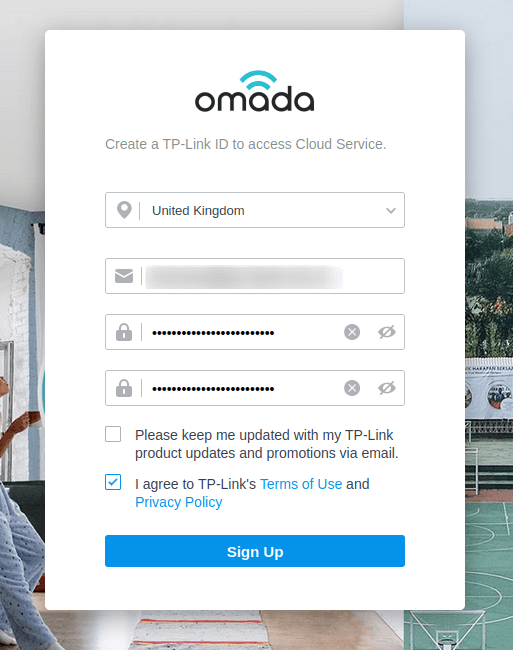
To enable cloud access we’ll need to register for a TP-Link ID using the “Register now” button. Registration is simple, just provide an email address and password. You’ll be sent an activation email, make sure to accept it.
Then populate the TP-Link ID and password fields and select “Log in and bind”.
I ran into problems here where the bind would not complete, no errors were given and at the time I couldn’t see what could be causing the issue, so I continued without Cloud Access.

The last page is the summary so you can confirm everything, then you’ll be returned to a login screen. Login using the credentials you configured during the setup wizard.
Fixing Cloud Access
After reviewing my network configurations I found that the organisation’s VLANs had no internet access for their wireless management, the previous wireless controllers was local only and firmware upgrades were completed manually. Although the TP-Link Omada does not depend on an internet connection it would be nice to utilise cloud access and semi-automatic firmware upgrades.
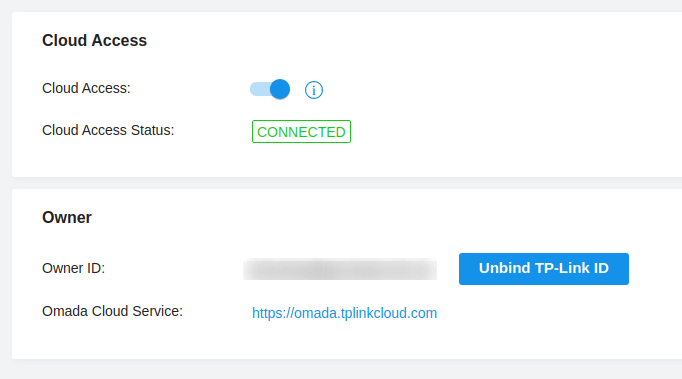
I added the TP-Link OC300 to the internet VLAN and I was able to connect to the TP-Link servers. You can connect to Cloud Access via the menu Settings > Cloud Access and entering the credentials from when we created our account.
This is something unique to our organisation and will require discussion about how to resolve this in the future. - EDIT: This has now been resolved and our controller now has internet access.
Update Firmware
At the time I did not fix my Cloud Access, so I could not update the system. I downloaded the latest firmware from the TP-Link Firmware web page and updated the controller manually until I resolved the Cloud Access issue.
Navigate to Settings > Maintenance > Hardware Controller use the Manual upgrade box, select the downloaded bin file and let the controller complete the update.
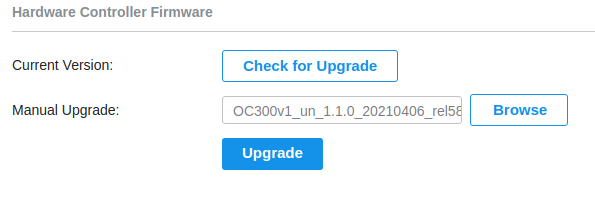
If the devices have internet access they can check for upgrades and update using the internet connection.
Auto Backup
The OC200 and OC300 come with a USB port on the front of the controller, we can attach some storage and use this to performed automatic backups of our controller configuration.
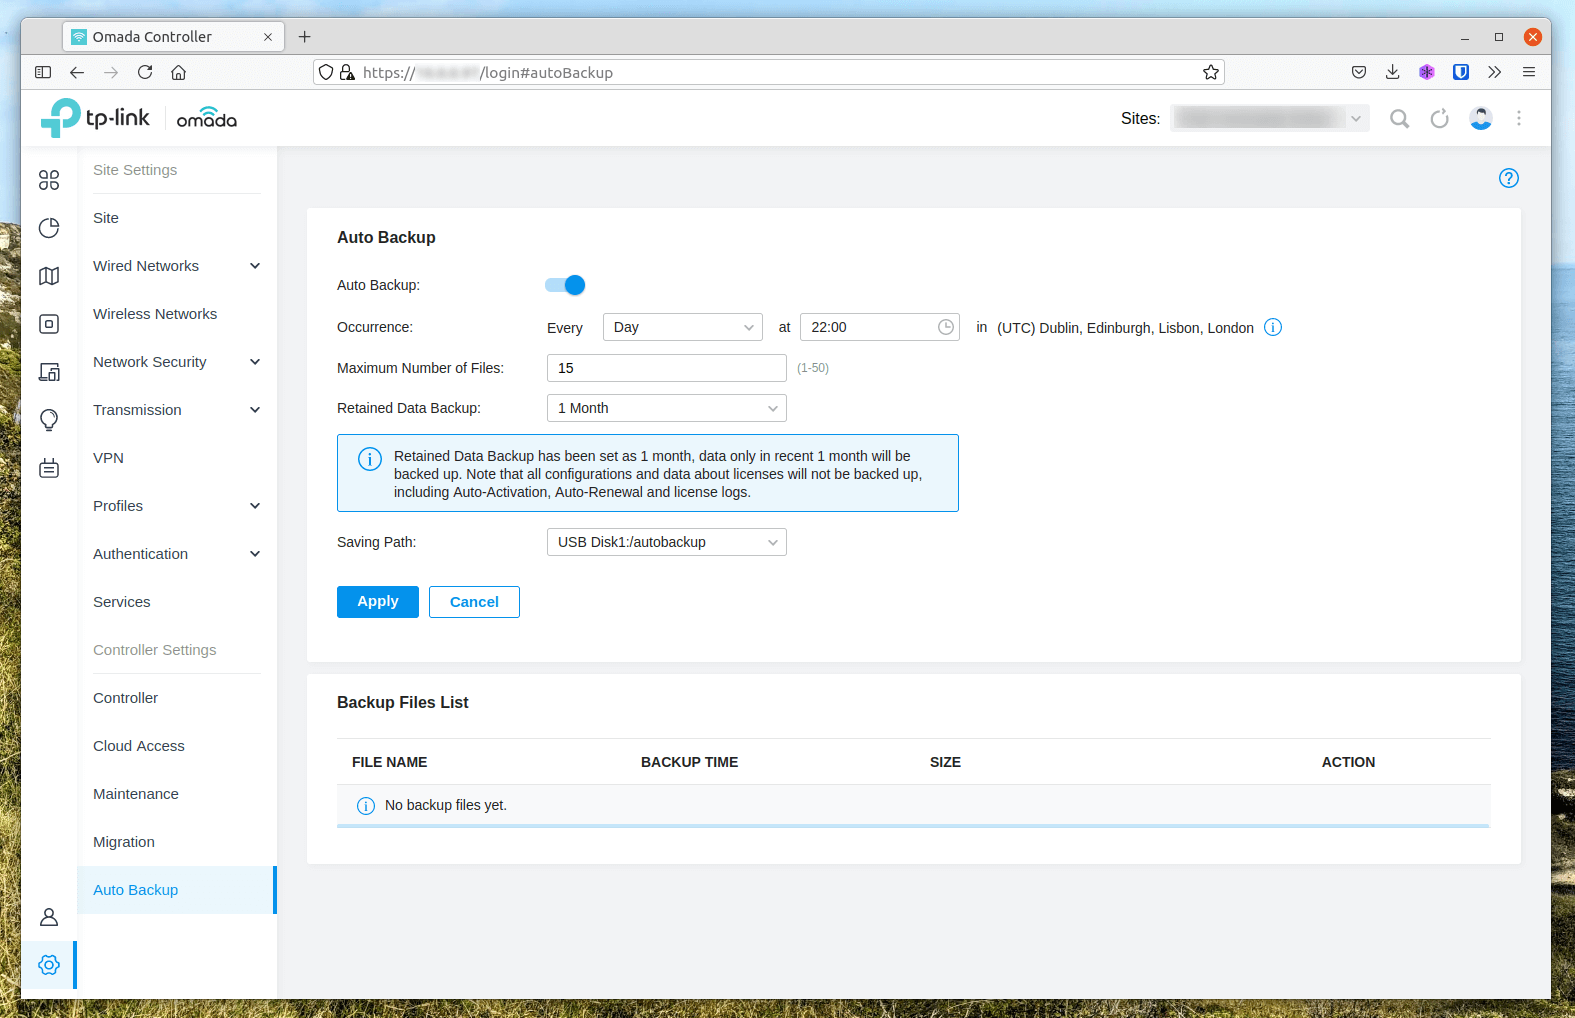
Navigate to Settings > Auto Backup and enable the service by checking the top box.
I am performing a daily backup at 22:00, with a maximum of 15 and retain data backup for 1 month. The saving path is set to a 32GB USB Flash Storage.
Creating Wireless Networks
Creating a PSK Wireless Network
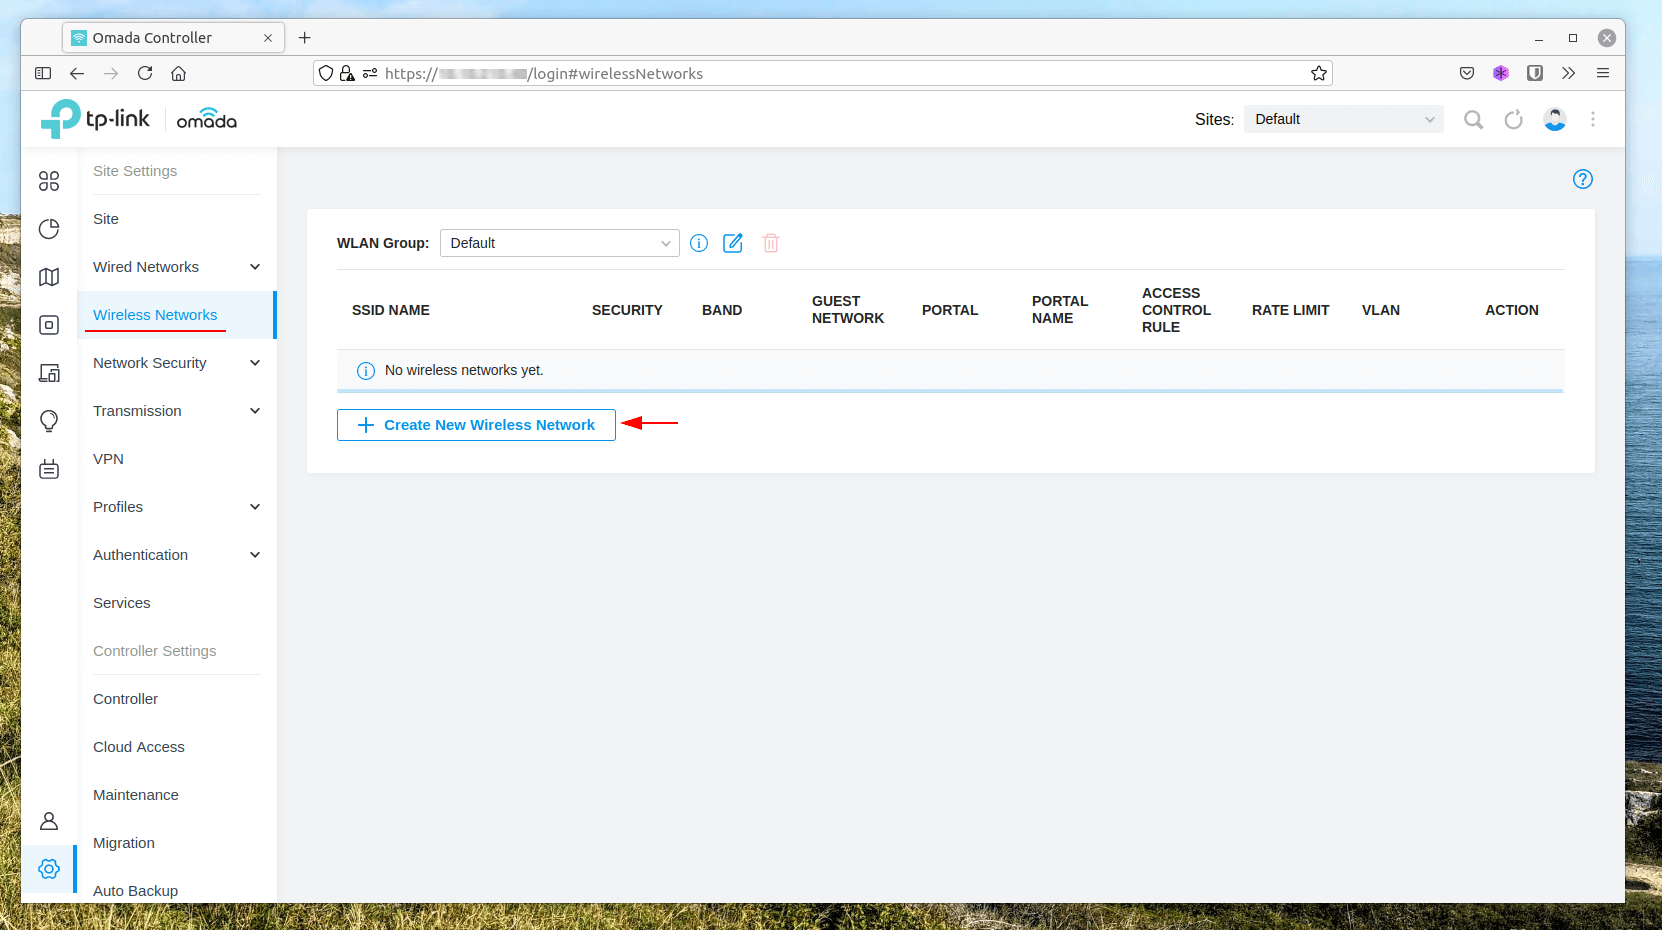
A Pre-Shared Key wireless is the simplest to configure, navigate to Settings > Wireless Networks and select Create New Wireless Network.
Providing a Network Name (SSID), we’ll be using both 2.4GHz and 5GHz bands and WPA-Personal with our password. In my evironment I’ll be to configure a VLAN for this network, this setting can be found under Advanced Settings and VLAN, i’ll be setting mine from the default VLAN 1 to VLAN 100.
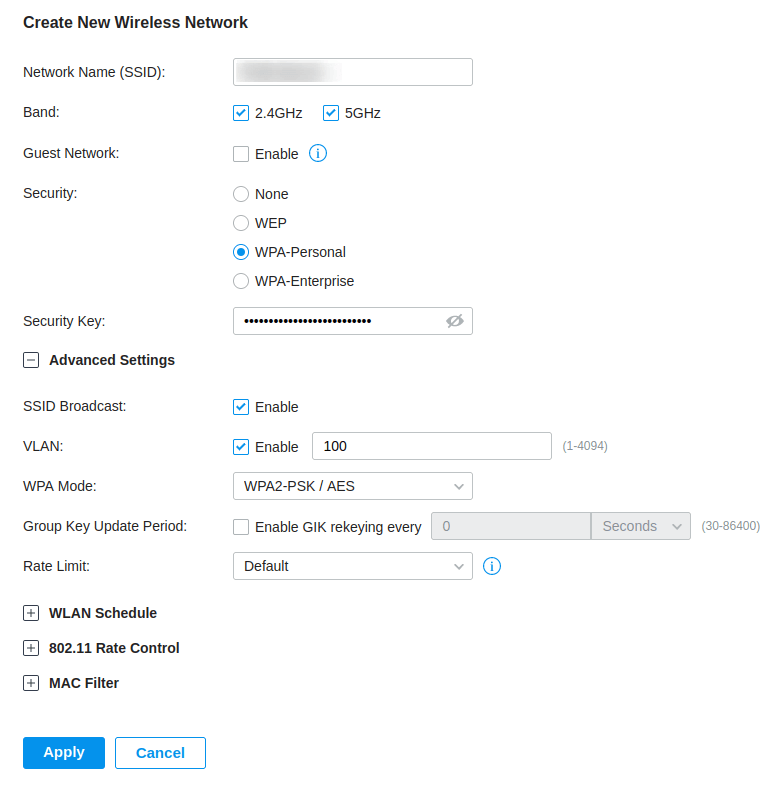
Click Apply and we are done, Pre-Shared Key (PSK) wireless networks and quick and easy to configure.
Creating a Voucher based Captive Portal Wireless Network
In our previous setup, we had a guest network where our community staff could generate a username and password for guests to log into our network. We wanted to continue this and TP-Link provide a voucher option where codes can be generated and used as a 1-off, this type of authentication is called a Voucher.
There are three steps required to create one of these networks;
- Create a Wireless Network
- Create a Portal
- Generate vouchers
- Create Operator account (Optional)
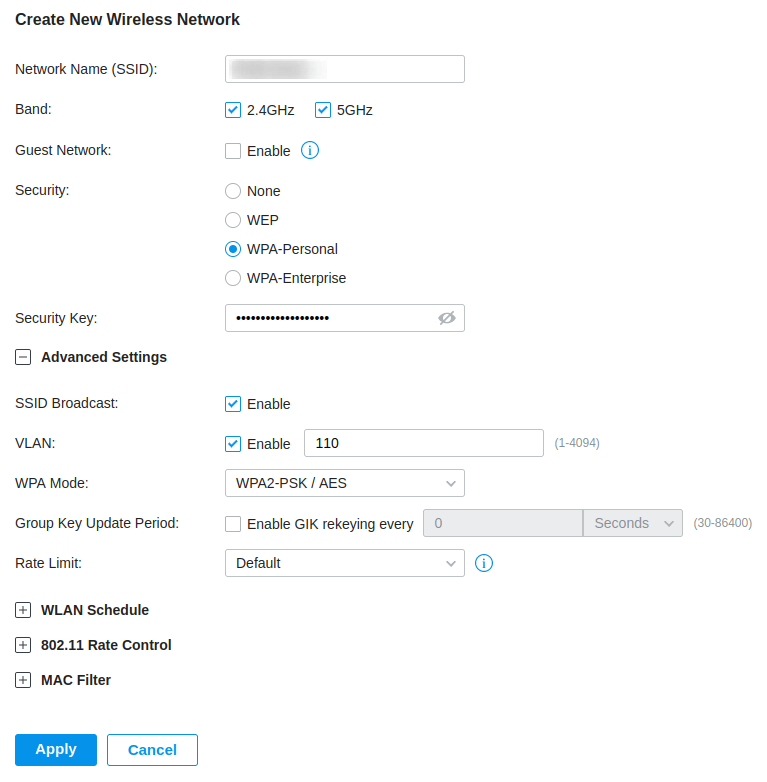
We needed to create a new Wireless Network due to our VLAN setup, guests have their own VLAN separate from the rest of the network. As you can see from the screenshot, I have created a Wireless Network similar to the PSK network, but changed the VLAN to VLAN 110. I have kept the password, as this will ensure that devices do not see this as an “open” network, which will cause users to see security warnings.
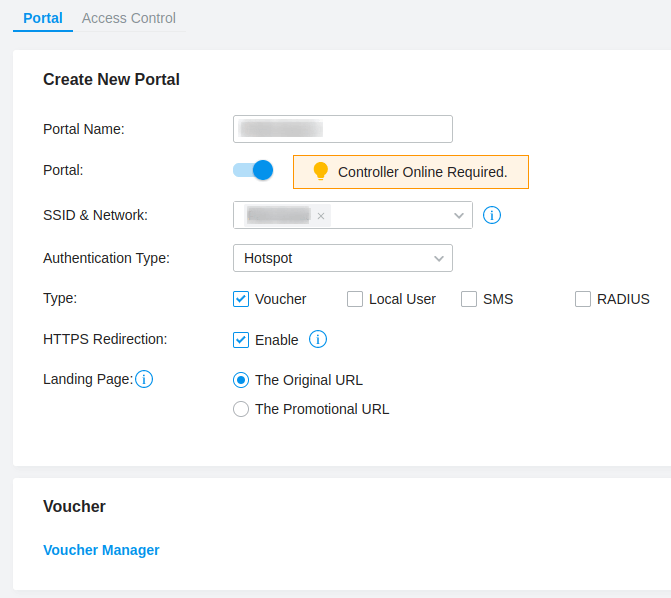
Next we need to create the Portal, navigate to Settings > Authentication > Portal and select Create New Portal.

We will configure this voucher based portal by providing a Portal name and selecting the SSID & Network that we previously created and changing the Authentication Type to Hotspot, this reveals the Types available where we can check Voucher. I’ll be enabling HTTPS redirection as well.
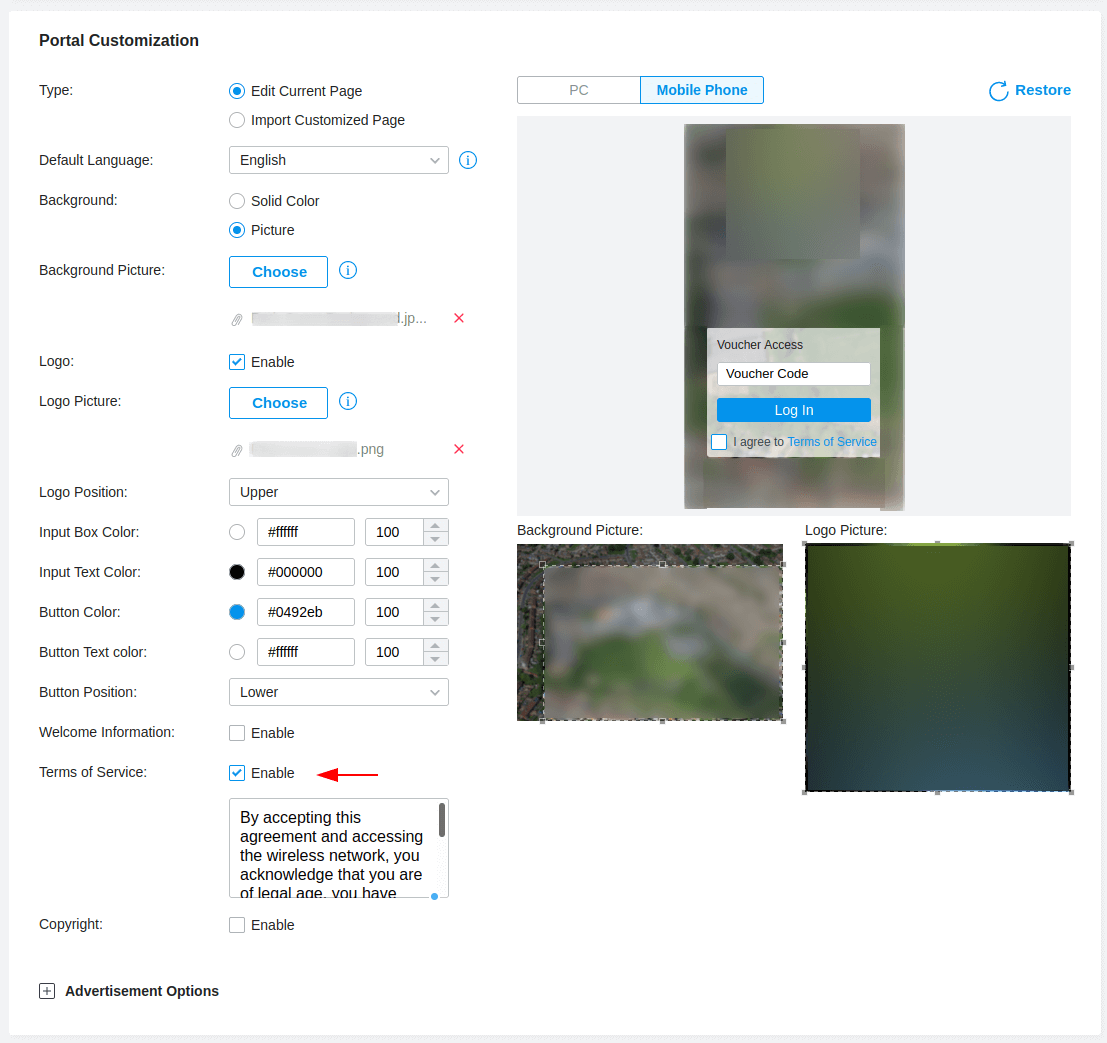
The next section contains the portal customisation, all I have done here is change the background image and logo, their positions to upper and lower and enabled the Terms of Service which forces the guest to accept the terms before they can log in.
I can recommend using TinyPNG to ensure your images are well compressed and a small file size as you are limited to 2MB for the background and logo, although my attempts limited me to 1MB.
Once completed apply your changes and we can move on to the last step which is generating voucher codes. You can find a link to the Voucher Manager as shown in the first portal screenshot or navigate to https://tp-link_oc300/hotspot/login, changing the URL to match your controller host name or IP address.
A page similar to below should open in a new tab. We can create vouchers by selecting the Create Vouchers button, we can also delete or print our vouchers from this page using the options in the top right of the panel.

Voucher creation is easy, we have a few options that are worth tweaking to fulfil our requirements these are, changing the type to 1 voucher for 1 online user, the ability to change the duration from minutes, hours and days.
The last option is Rate Limit, I have created a Guest Profile which limits to 2MB down and 2MB up per voucher.

The last step for me was to create a user for our community staff to issue vouchers to guests. We can create an Operator from the Hotspot web page.
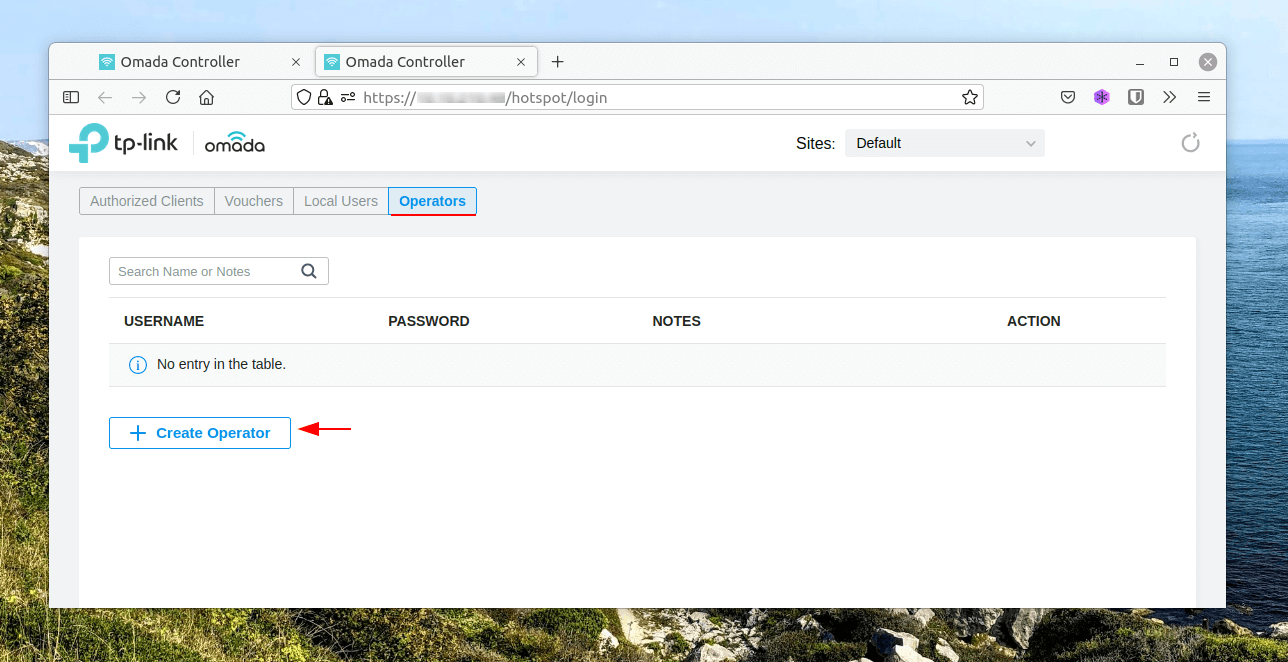
Make sure to switch to the Operators tab located at the top then Create Operator, providing a username and password. You can limit Operators based upon site if required.
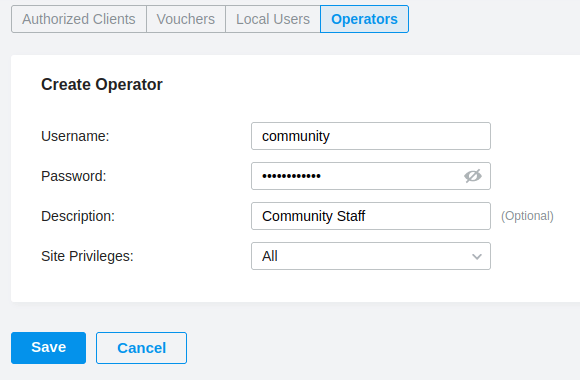
Click Save and now you have a Operator account that can manage the Vouchers without providing Administrator access to the rest of the Wireless solution.
Creating a Windows Radius Wireless Network
The purpose of this wireless network is to allow staff to connect their devices to our network by authenticating using their Active Directory account credentials. I will be using a Microsoft Server configured with Network Policy Server (NPS), then configuring our TP-Link controller to use RADIUS to authenticate user credentials.
Configuring Windows RADIUS
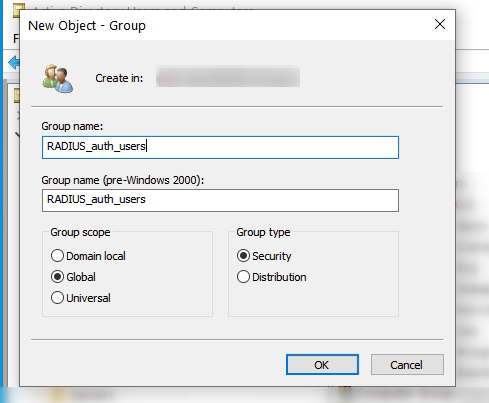
AD Group
Start by creating your Active Directory group, this will be used within the NPS configuration for authenticated users. I have placed a single user in this group for testing purposes.
Roles and Features
On our RADIUS server we will require 3 roles these are:
- Active Directory Certificate Services
- Network Policy and Access Services
- Remote Access
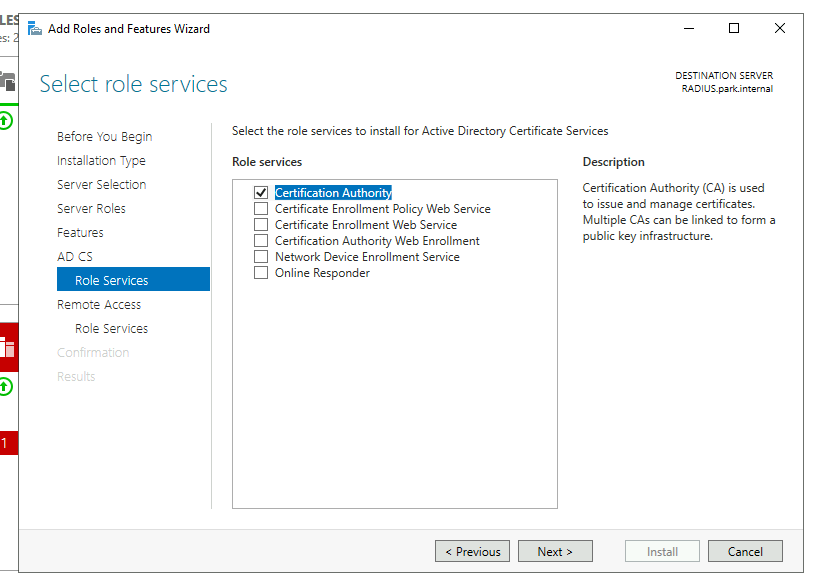
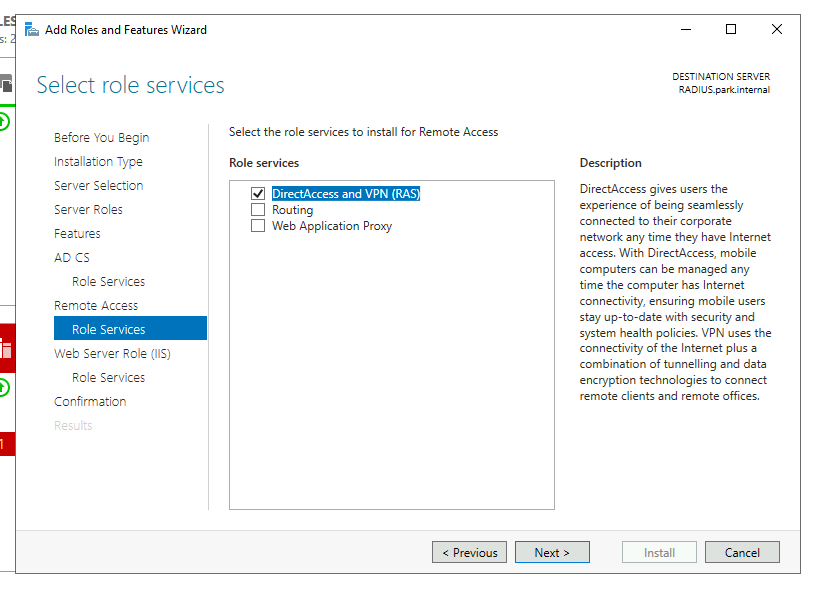
For the Certificate Servers we’ll only need the Certification Authority role added and for Remote Access we’ll only need DirectAccess and VPN (RAS) role service. We’ll add all the requirements and leave the IIS role as default values.
We will come back to complete post configuration after we have configured our Firewall.
Firewall Rules
We will need to open some ports on our RADIUS server for communication, this can be done in the Windows Defender Firewall with Advanced Security panel.
Control Panel > Update & Security > Windows Security > Firewall & Network Protection > Advanced Settings
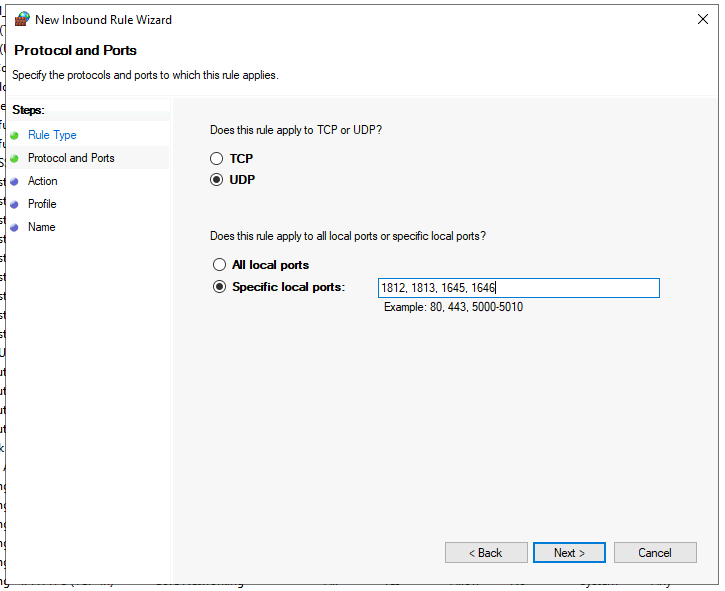
The rule we will be creating is:
- Direction: Inbound
- Type: Port
- Protocol: UDP
- Ports: 1812, 1813, 1645, 1646
- Action: Allow the connection
- Profile: Domain, Private
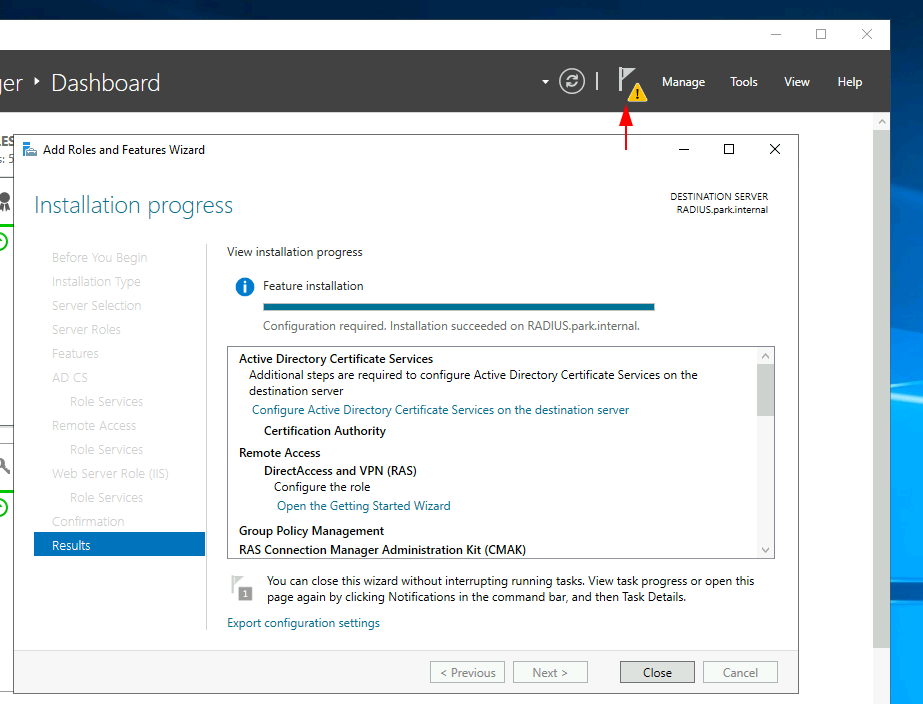
Post Configurations
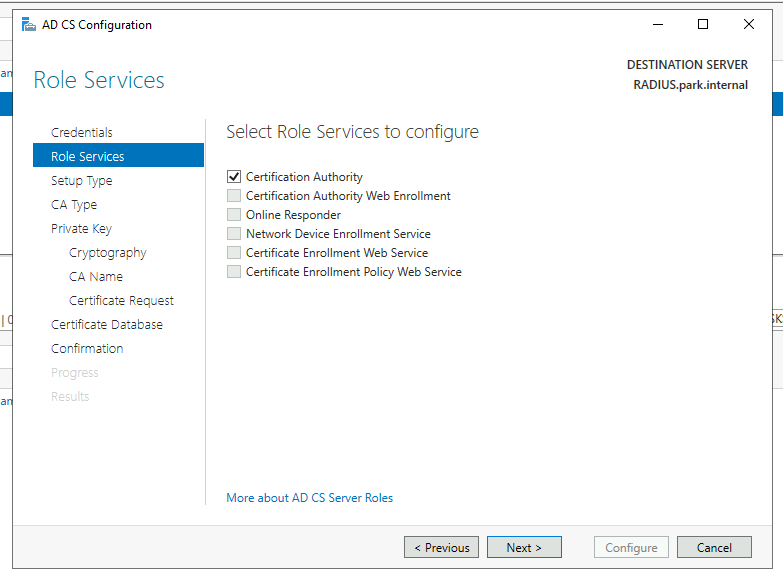
Now we will complete the post configurations from our server role installs. Starting with Active Directory Certification Services (AD CS).
In production use another account other than the defaulted domain administrator account and ensure that the Certification Authority box is checked on the Role Services.
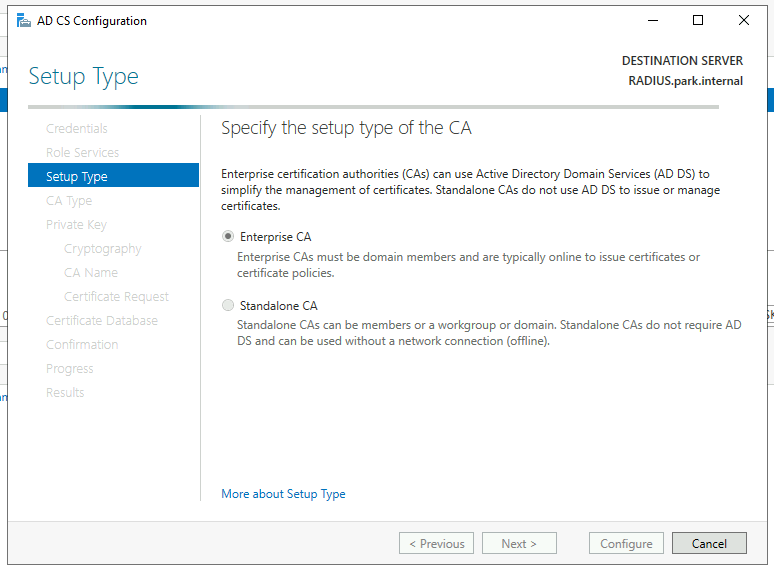
We will be using an Enterprise CA.
- Enterprise CA for Domain
- Standalone CA for Non-Domain
We will be using this server as a Root CA as we do not have one already deployed as part of a PKI.
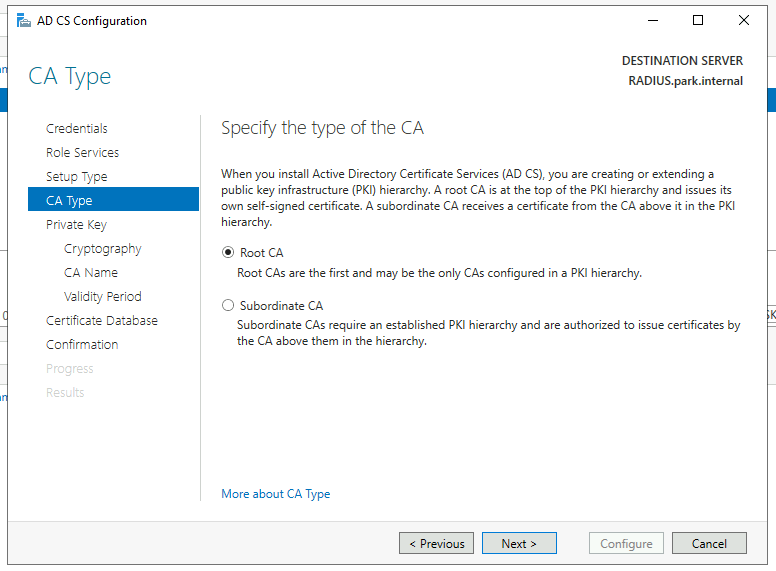
We’ll be creating a new private key and we’ll continue with the default SHA256, for the purpose of this demonstration i’ll also continue with the default CA names and a 5 year validity period.

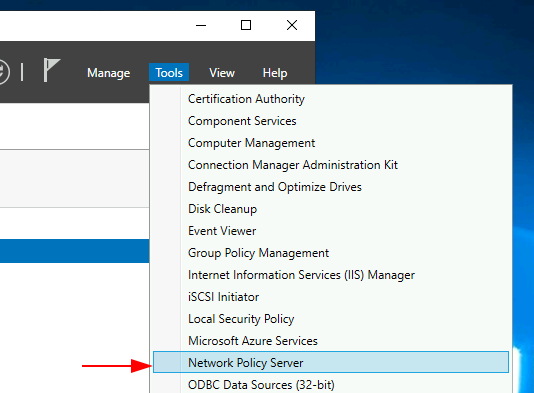
Now we will configure NPS, Open the Network Policy Server from Server Manager > Tools.
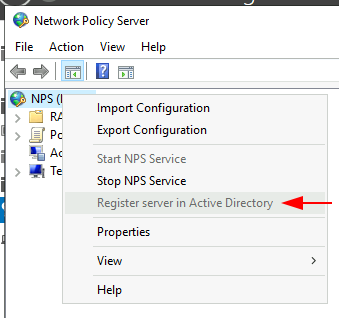
Make sure to Register your NPS with Active Directory, you can do this by right clicking the NPS icon and selecting Register server in Active Directory.
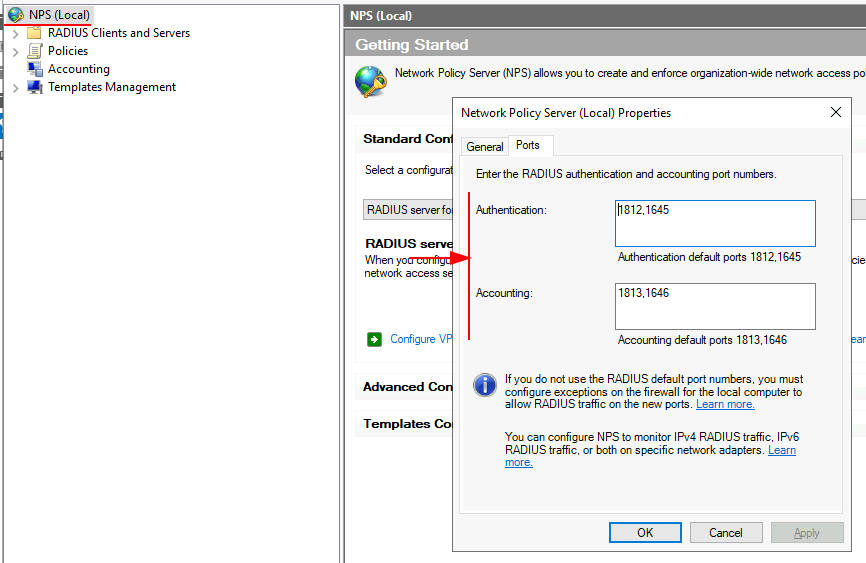
You can also check your configured ports from selecting Properties and Ports, the default values are:
- Authentication: 1812, 1645
- Accounting: 1813, 1646
From the Getting Started panel, change the standard configuration from the drop down menu to RADIUS server for 802.1X Wireless or Wired Connections.
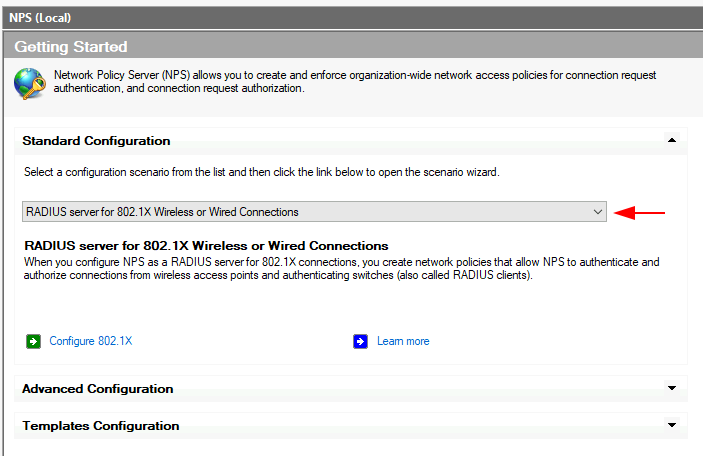
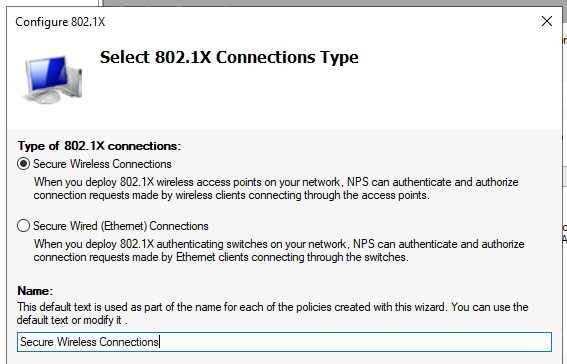
Then click the Configure 802.1X button just below. A wizard box will appear and we’ll step through this now. We’ll be configuring a Secure Wireless Connection and for the demonstration purpose keeping the default name.
The next window we will be asked to provide our RADIUS clients, this is our TP-Link OC300 controller. Click the Add button, provide a Friendly name, address and create a Shared Secret (Make sure you write your Shared Secret down, you’ll need it)
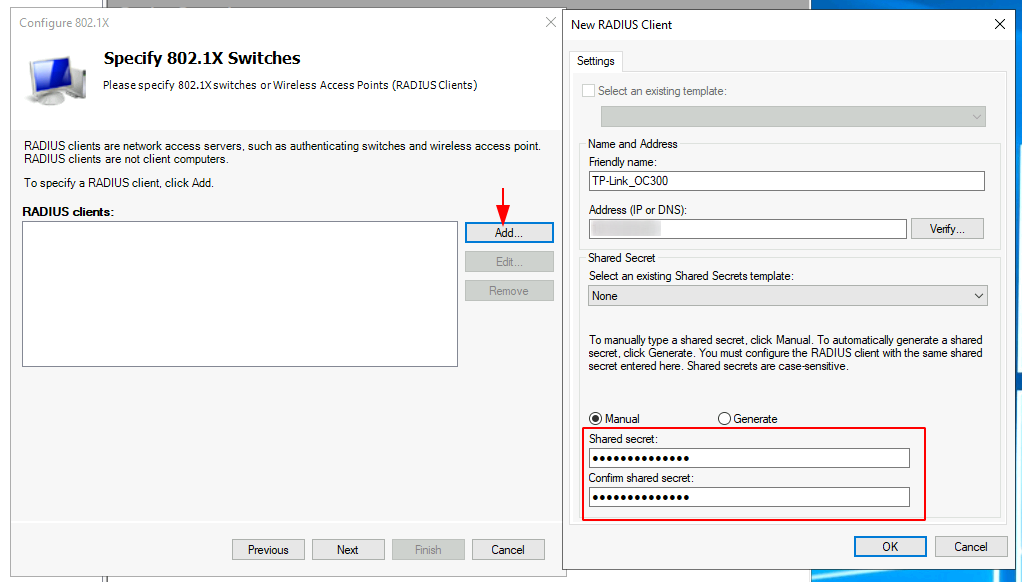
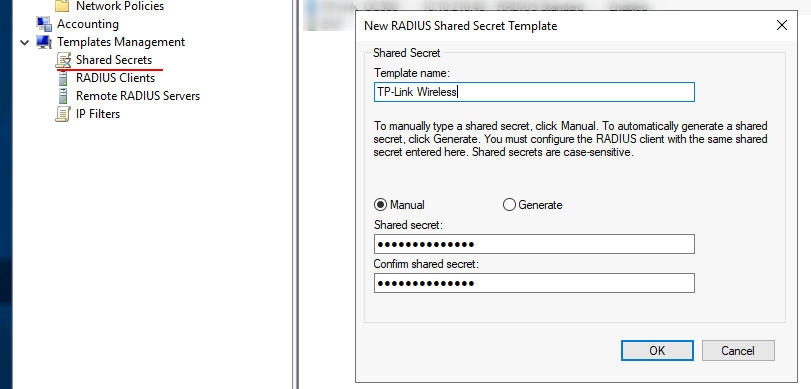
As a side note we can also template this secret for when we mass deploy the EAPs, this can be configured in the Templates Management section and creating a new Shared Secret.
We’ll be using PEAP for our authentication method.

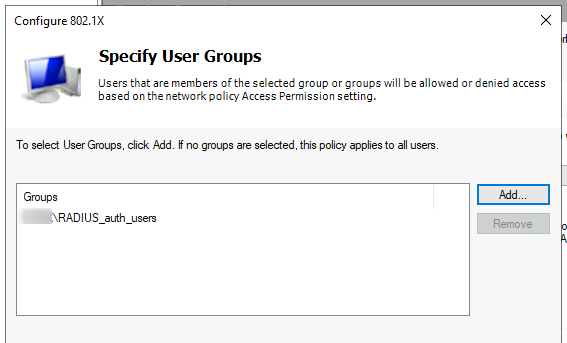
Then we’ll be asked to specify our user group, this is the same group we created at the start. Use the add button and enter the name of the group you created, mine was RADIUS_auth_users.
Now follow the rest of the wizard to completion. I did not do any Traffic Controls, instead I skipped this. I then continued to configure the TP-Link Controller and test the solution using AD user authentication, this worked perfectly!
I created an additional Active Directory group for our domain connected machines, in the screenshot below we can see my group, which contains a single test laptop.
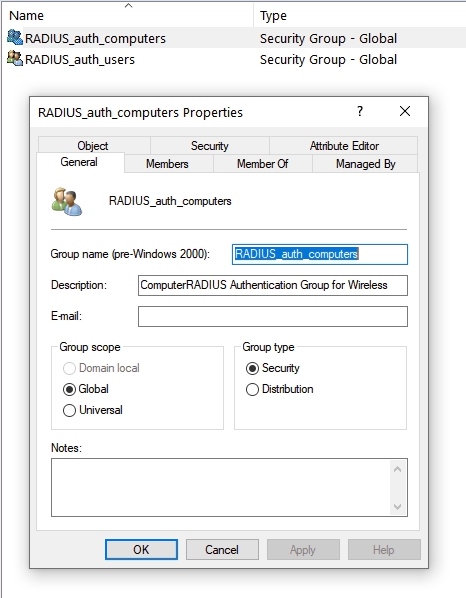
Now run through the same steps as previously shown in the Network Policy Server, swapping the group for the device instead of the user.
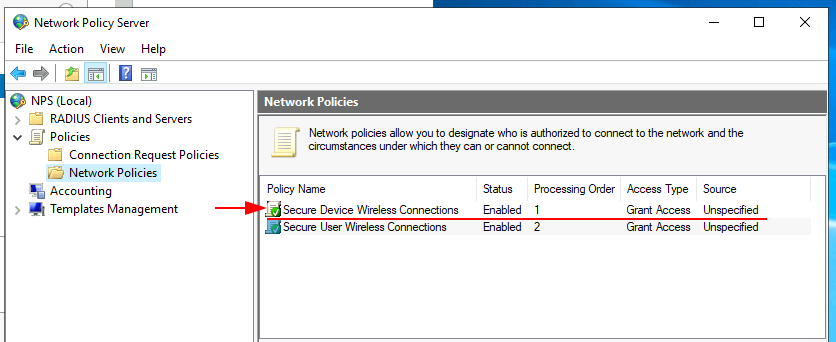
You should end up with two policies as shown in the screenshot below.
For our domain connected machines we’ll need to create a computer Group Policy Object (GPO), which can be pushed to our machines when we PXE build them or initially connect via a wired connection.
Create a new GPO, then modify the security filtering so this policy will only apply to the RADIUS_auth_computers group members.

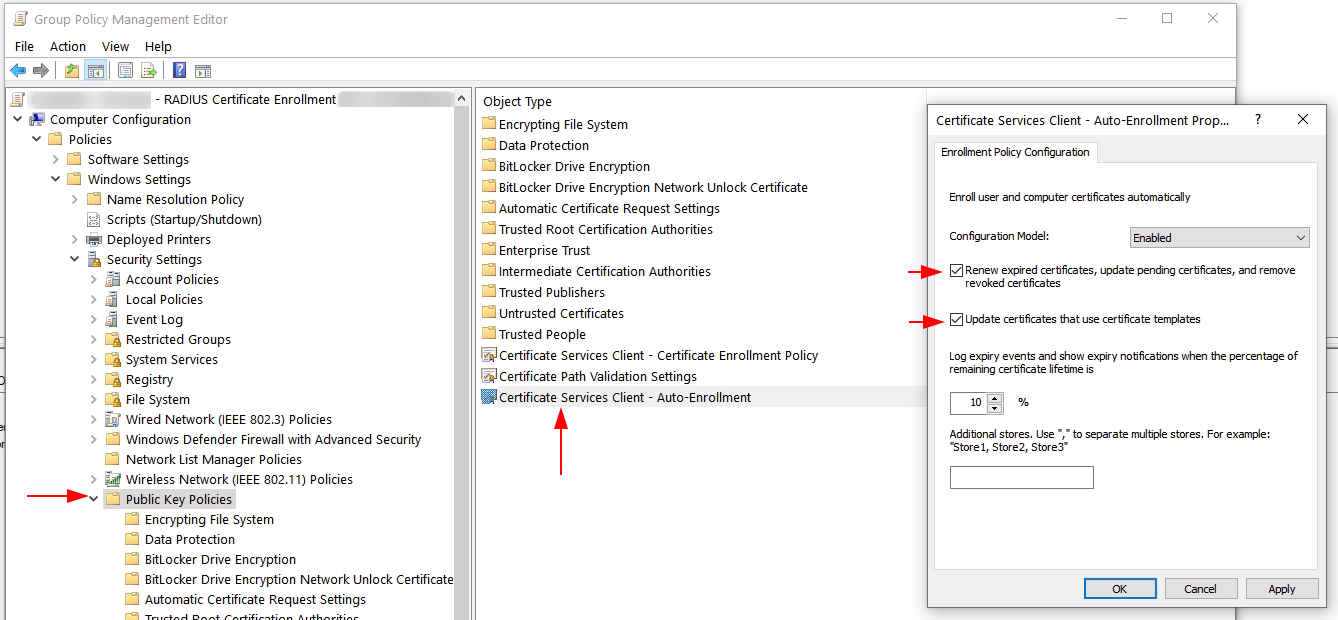
Now we will modify two settings, the first is Certificate Services Client - Auto Enrollment, we will be enabling and checking the two boxes below for;
- Renew expired certificates, update pending certificates, and remove revoked certificates.
- Update certificates that use certificate templates.
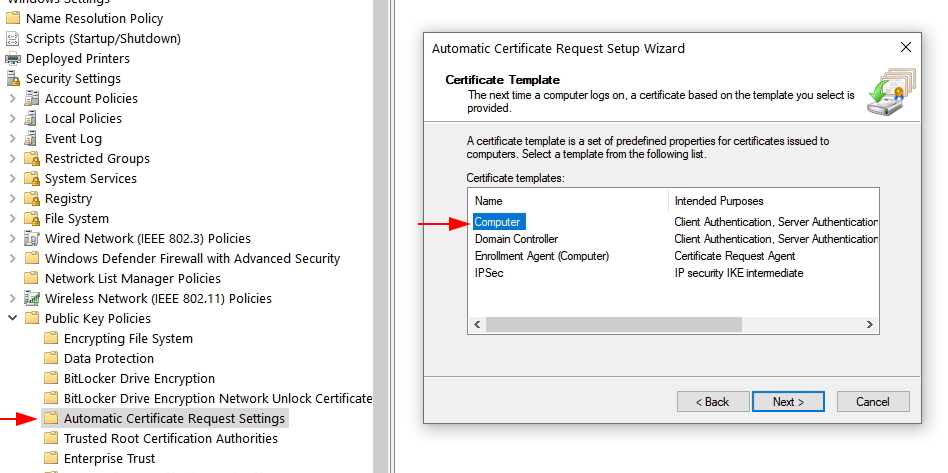
The second setting is Automatic Certificate Request, we will create a new computer certificate template.
Organisation Owned iPads
I will be deploying our newly configured wireless network to our organizationally owned iPads using Apple Configurator 2, I’ll create a profile containing the wireless information, RADIUS username and password with a trust certificate for our server.
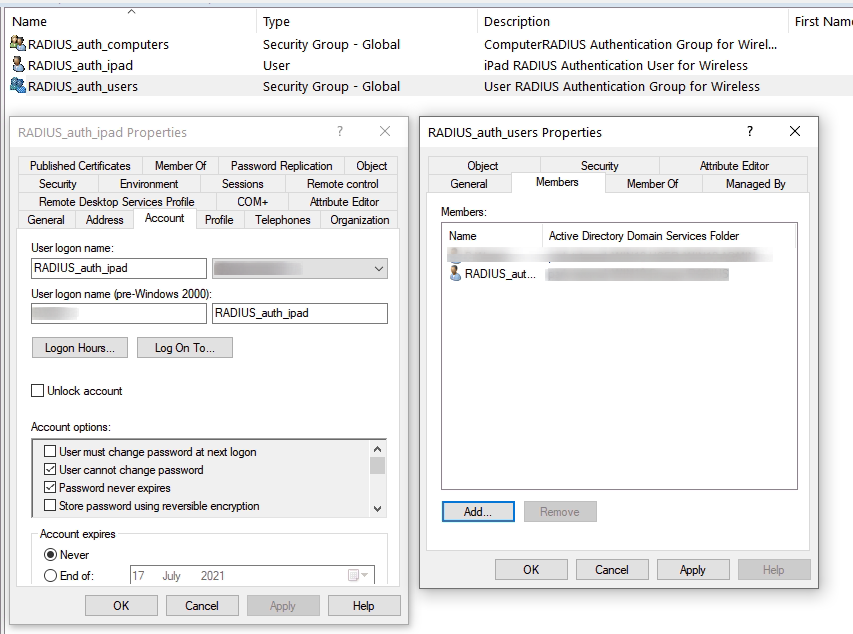
We’ll need to create a new user in Active Directory to use for authentication, I have created a user called “RADIUS_auth_ipad” and made it a member of the “RADIUS_auth_users” group that we previously created.
Its worth noting that this user account has a very strong password that cannot be changed or expire.
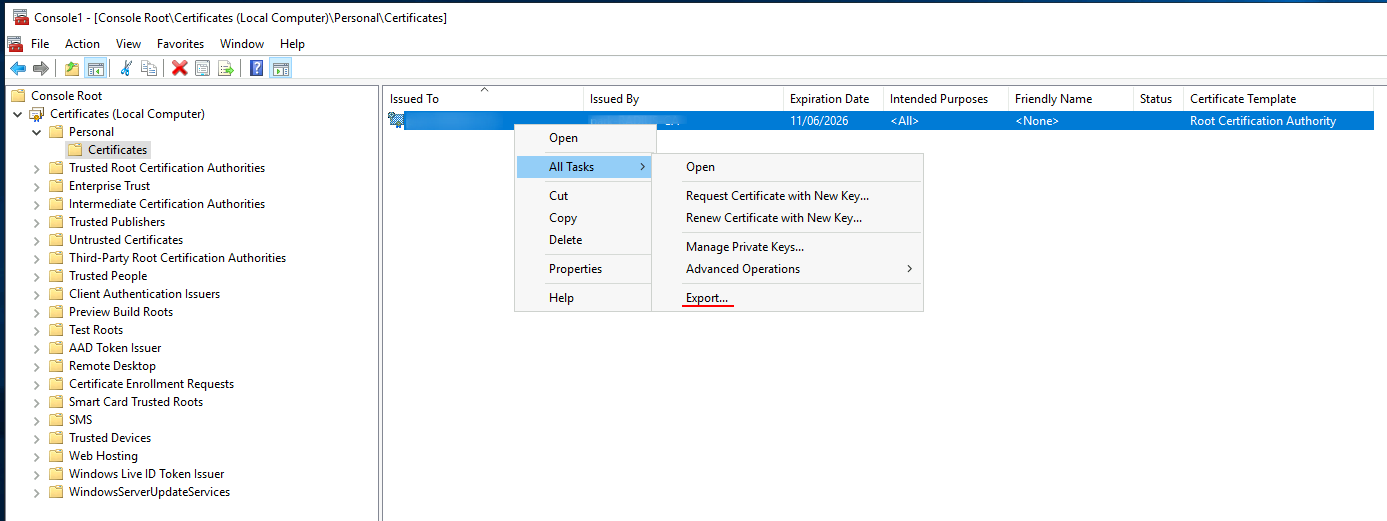
We’ll need to export our certificate from our CA server. We can do this through MMC.exe, add the Certificate snap-in for the Computer Account and export certificate from either your Personal or Trusted Root Certification Authorities.
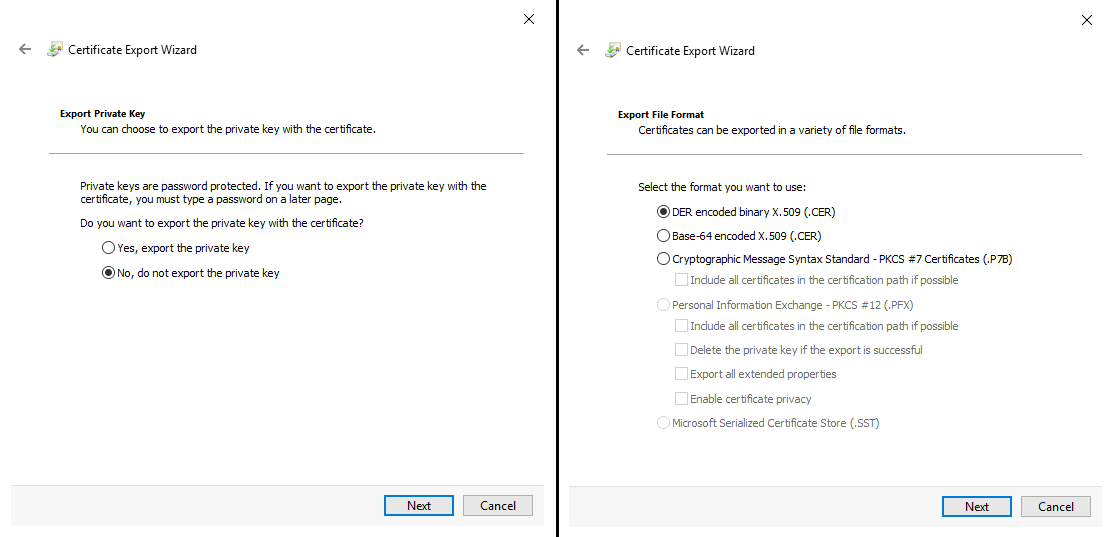
We do not require the Private key and we’ll export the DER encoded binary X.509 (.CER)
Lastly move the certificate over to the Apple Configurator server.
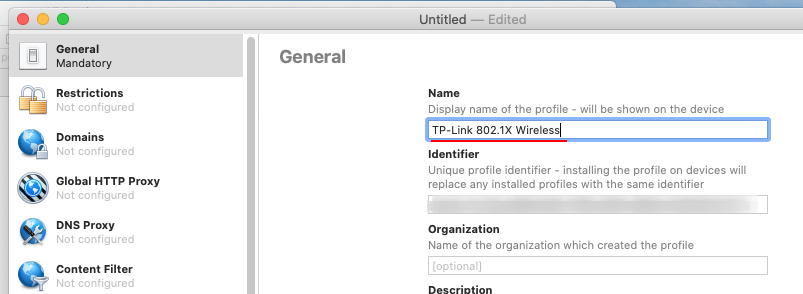
Now we will create a new profile within Apple Configurator 2 by going to File and selecting New Profile.
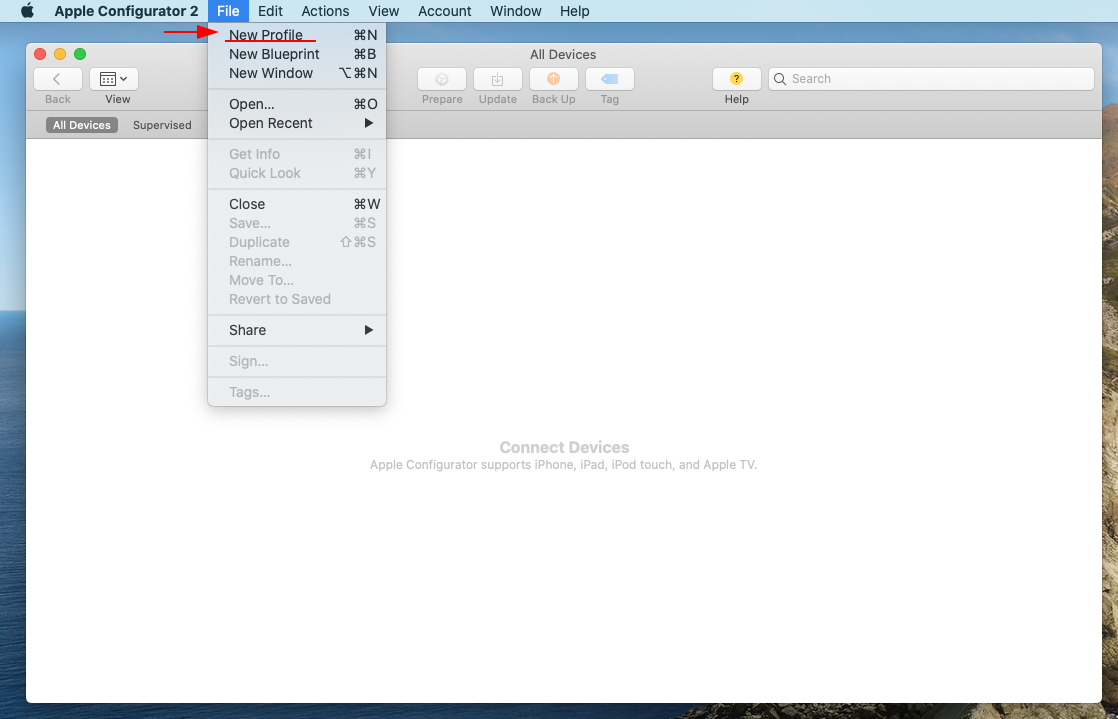
Provide a descriptive name for the new profile, I have called mine “TP-Link 802.1X Wireless”.
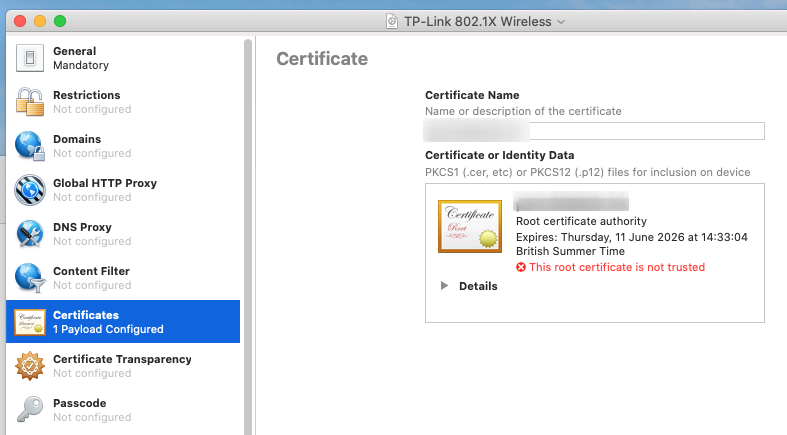
In the Certificates section in the left pane we’ll be adding our certificate. The warning of the certificate not be trusted is because its a PKI CA certificate from our RADIUS server and has not been installed and trusted on our Configurator 2 server.
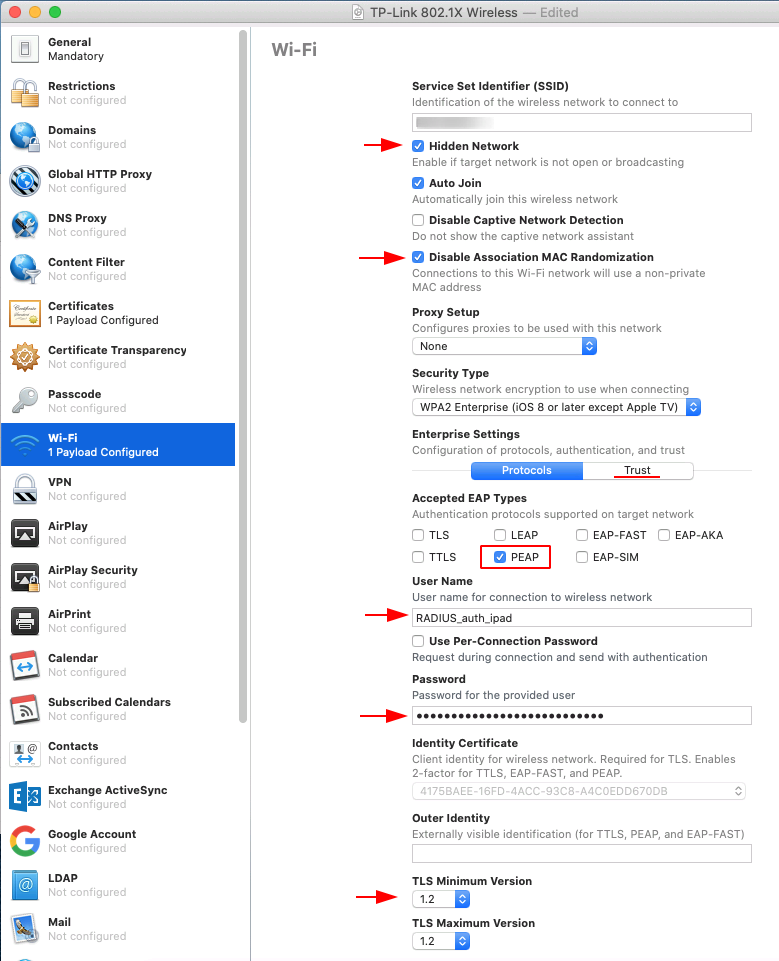
Now in the Wi-Fi section in the left pane we’ll be creating a new payload. In this section we’ll need to change a few settings:
- Provide the SSID you want the iPad to connect too.
- Disable Association MAC Randomization ensures that we are using the original MAC address of the iPad.
- Change the security type to WPA2 Enterprise
- Enable PEAP under Accepted EAP Types
- Provide the username and password of our Active Directory user.
- Change the TLS Minimum Version to 1.2
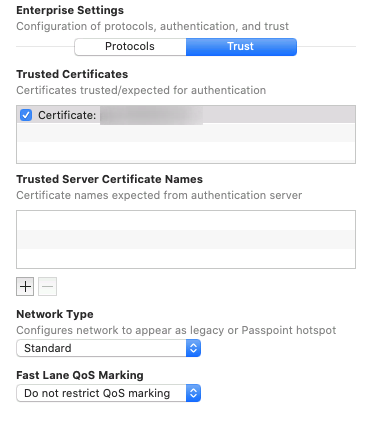
- In the Trust tab check the installed certificate
Apple DEP and Profile Manager
To ease Apple’s DEP onboarding, I will be using Apple Configurator 2 to load a temporary Wi-Fi and restore the device, this will cause the iPad to automatically enrol to our DEP and Profile Manager server.
On our Profile Manager server, I have configured a device group which applies the same RADIUS Wi-Fi as above.
The end result is one that allows us to quickly and very easily restore any Apple iPad with automatic restore of Student Wi-Fi to a hidden SSID authenticated against Windows NPS (RADIUS).
NPS Accounting
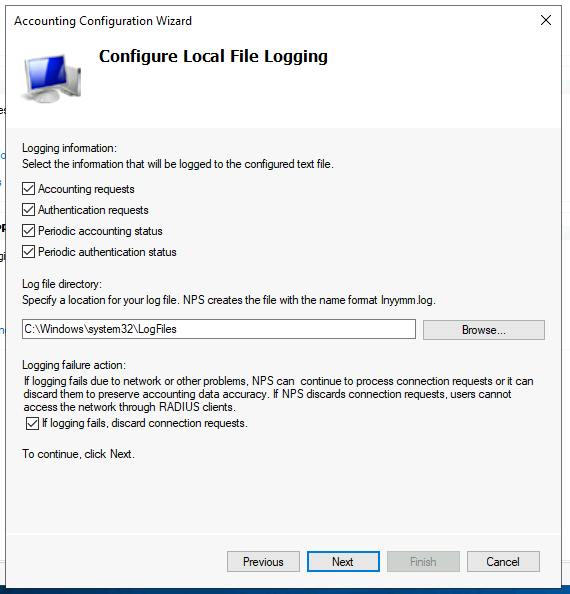
I have configure NPS accounting which keeps a log of the selected requests, status and failures. In this demonstration I am logging to a text file on our RADIUS server.
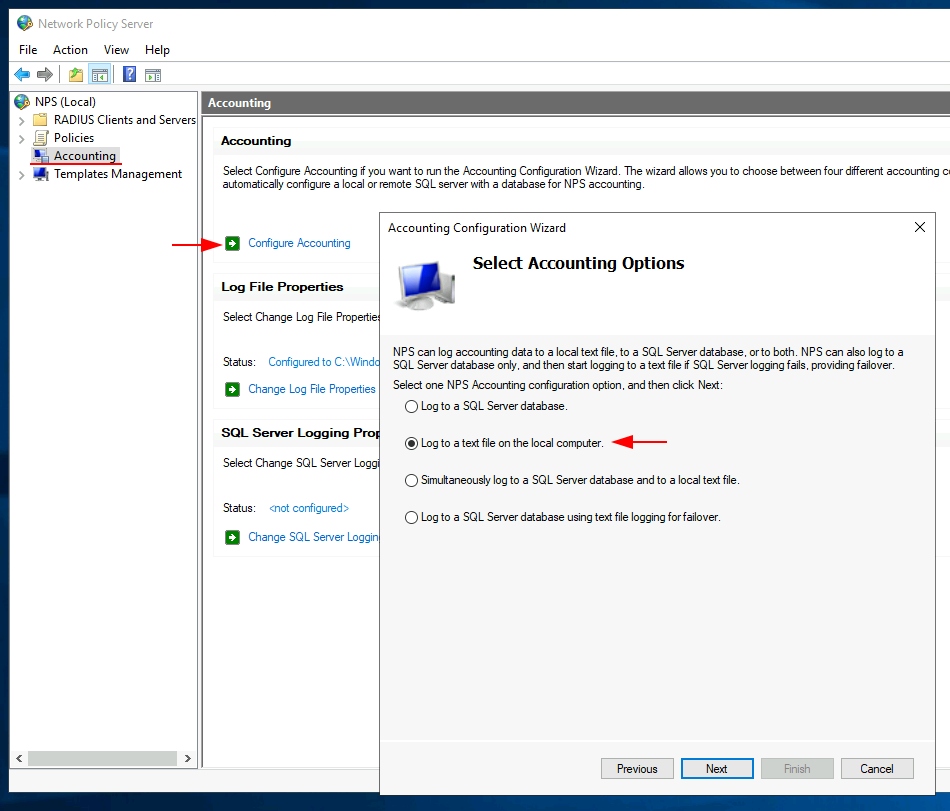
I have kept the default options, which will log everything and store this in Windows > System32 > Logfiles. Continue through to completion and the accounting aspect has been setup.
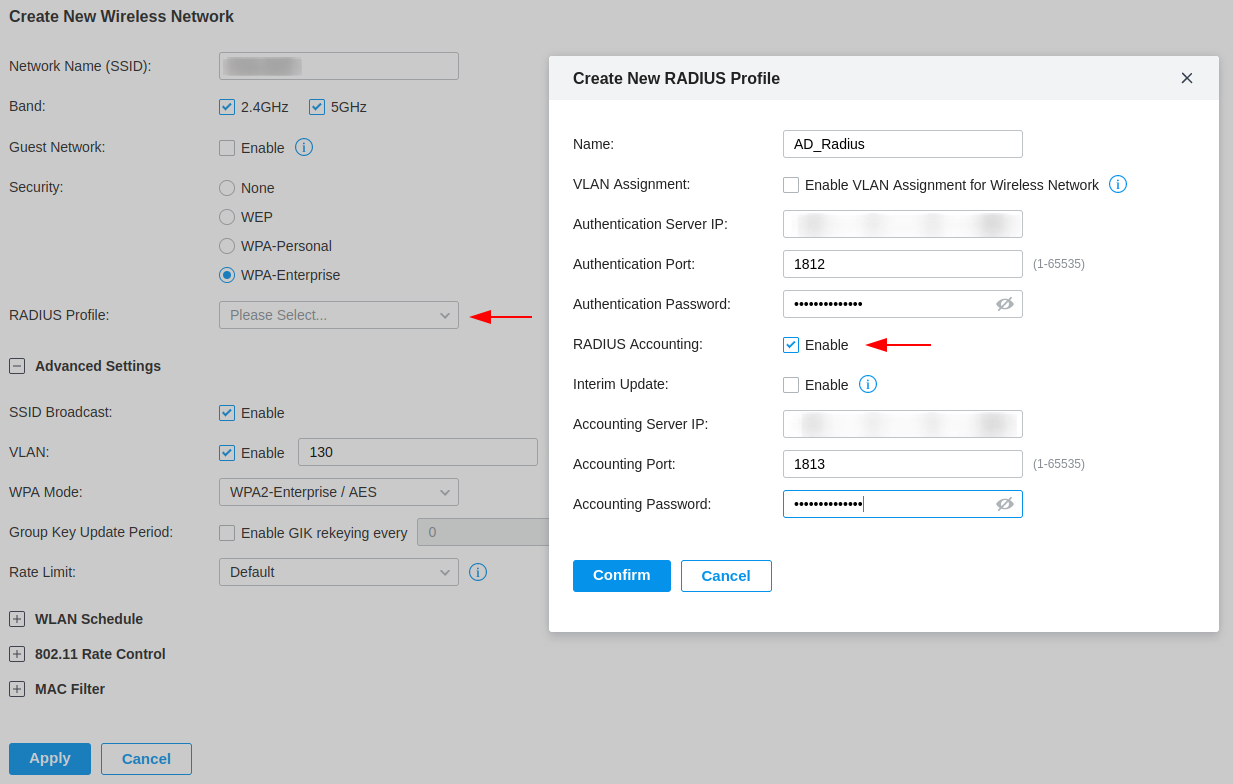
Configure TP-Link Controller
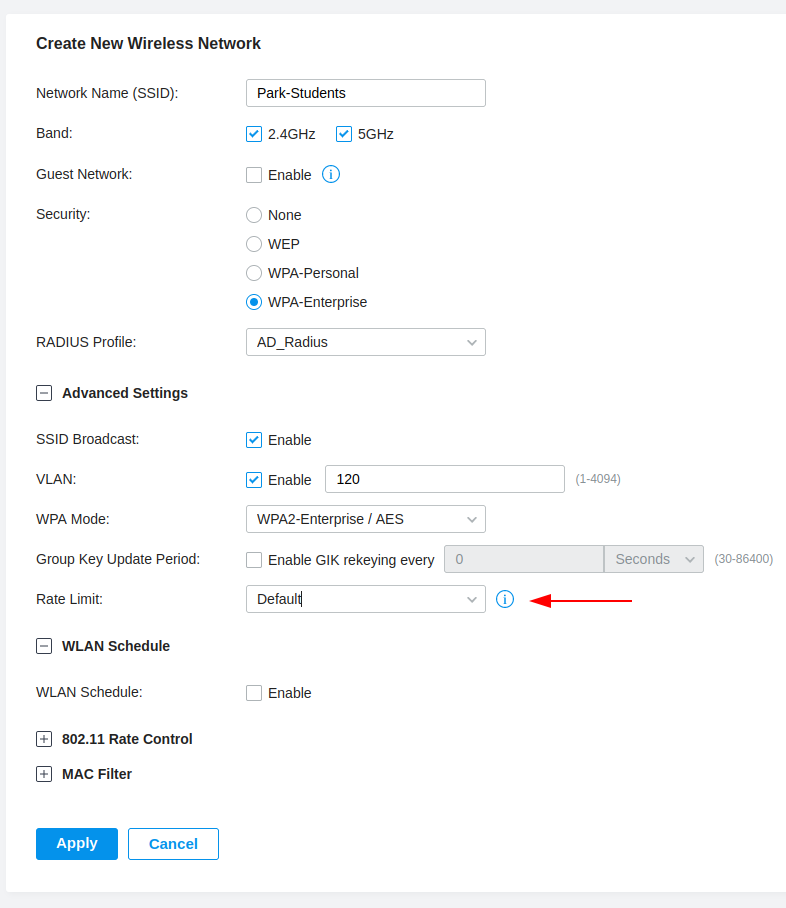
Now we will configure the TP-Link OC300 controller with our RADIUS profile. In the screenshot below I am creating a new Wireless Network, I have selected WPA-Enterprise for the Security option which provides a drop-down menu for a RADIUS profile.
In this menu, you can create a new RADIUS profile, which I am doing. I have enabled the RADIUS accounting, providing the IP address of the RADIUS server and the shared secret from when we configured NPS.
Testing
Testing RADIUS AD User Authentication
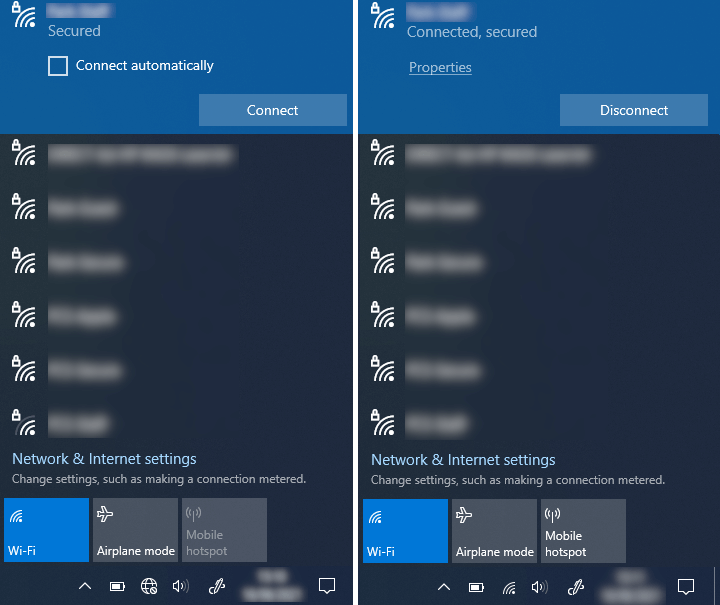
We can now test our wireless network by connecting a device to it. I have demonstrated this using an iPhone, when we connect to our network we are greeted by a username and password box, providing the credentials of a user included within our Active Directory group will allow access to this network.
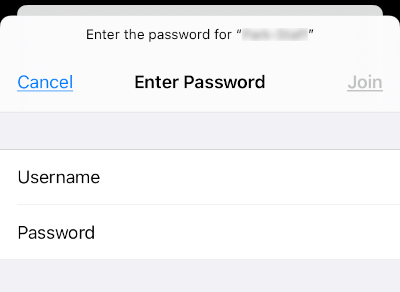
At this point I am using a self signed certificate which causes the iPhone to request the user to trust the certificate, this will be resolved when we deploy using a globally trusted CA.
Testing RADIUS AD Device Authentication
Using my test laptop I double check that the group policy has been applied then attempt to connect the laptop to the wireless network. Everything works and the device automatically connects without prompting for a password.
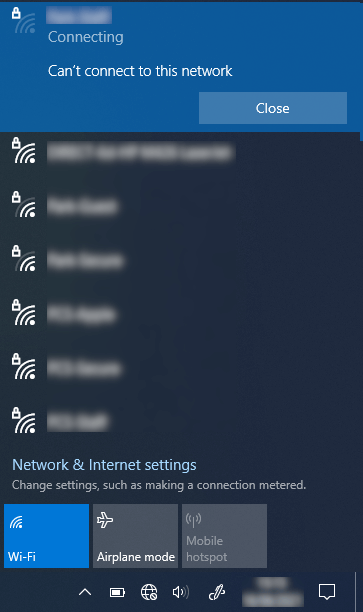
I also tested by removing the computer from the RADIUS_auth_computers group and attempted to connect and it fails.
Student Wireless Network
WLAN Schedule and Rate Limiting
I have used the WLAN schedule ability to only bring a wireless networking online between a set of times, this allow us to create a limited student wireless network where they have access before and after school hours with a throttled amount of bandwidth.
Rate Limit
When creating a Wireless Network there is an option under the advanced tab to apply a Rate Limit profile. I’ll be creating a new profile.
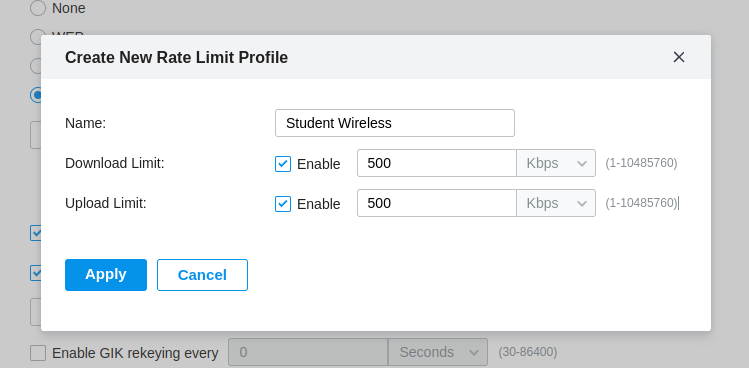
Rate Limit profiles consist of a name and the ability to limit either Download or Upload or both, in the figure below I have created a Rate Limit profile for the Student Wireless with a Download and Upload limited to 500Kbps.
Its worth mentioning that this Rate Limit is per client not for the whole Wireless Network.
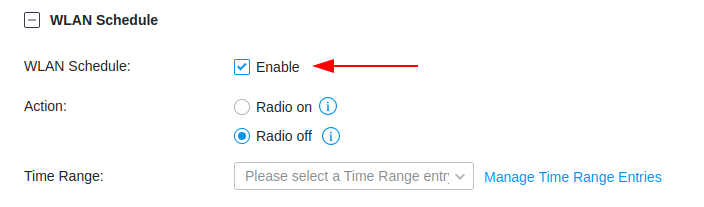
WLAN Schedule
The WLAN Schedule has its own tab after the Advanced tab, you’ll need to enable this feature and create a new Time Range Entry, which can be selected from the drop down menu.
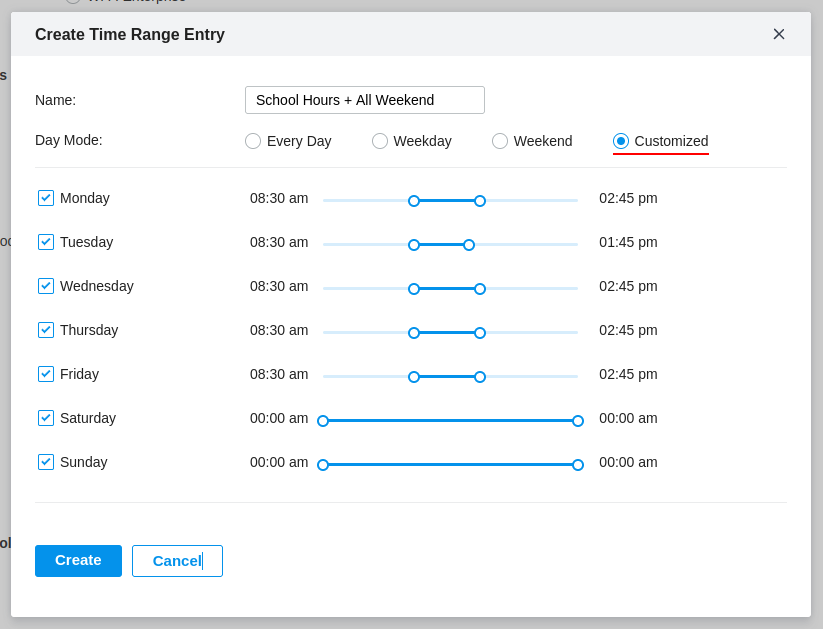
In the figure below I have configured a custom Time Range Entry which contains the school hours, including all of the weekend, this is because we are turning off the Wireless Network and we do not want it running over the weekend.
I thought the WLAN Schedule was a little crude, only allowing me to configure 1 time per day, I would of preferred the ability to create a small time window before and after the school hours, for example only allowing access for 30 min before and after. - Hopefully this will be updated in the future
Misc
Adopting or Resetting an EAP
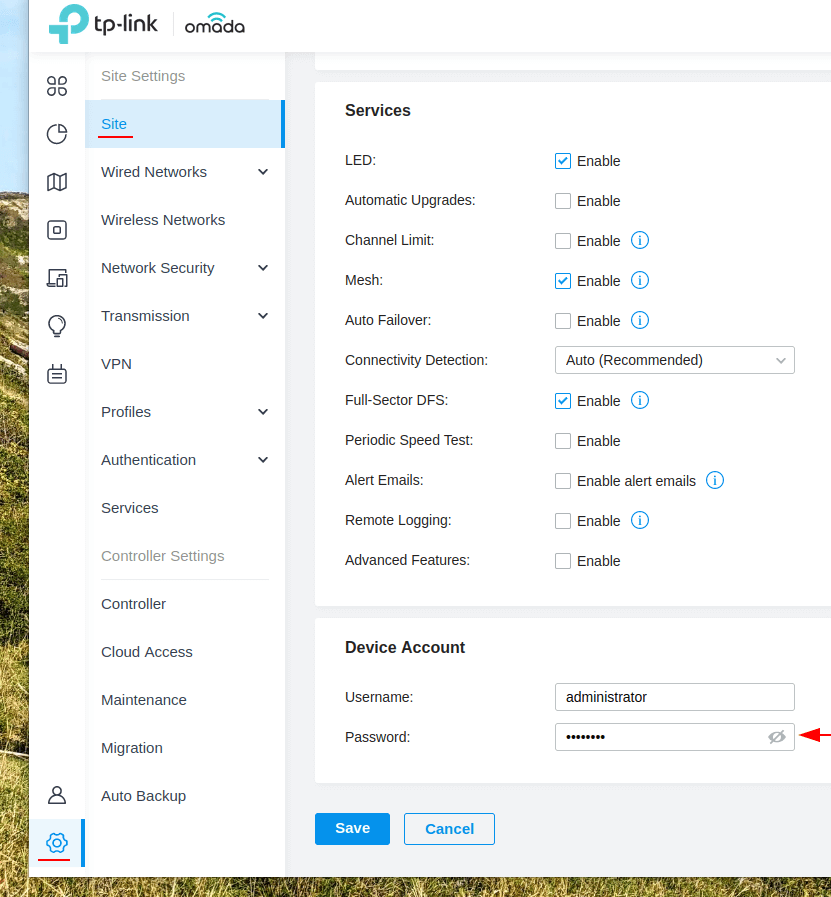
If you ever need to adopt an EAP you’ll need the username and password which is given to the devices when they are managed, you can find this username and password in Settings > Site, scroll down to Device account and use the username and password provided there, I’d also suggest making note of this just in-case you need to change or reset the controller.
Failing that you may need to reset to EAP, you can do this by pressing and holding the reset button for a few seconds, this can be found next to the Ethernet and Power sockets. Once the device has been reset its like its just been unboxed and you can provision it using controller.
Fast Roaming
Is the ability to roam between EAPs in a seamless manner, it will only take affect if the client also supports fast roaming. TP-Link Omada supports 802.11k and v.
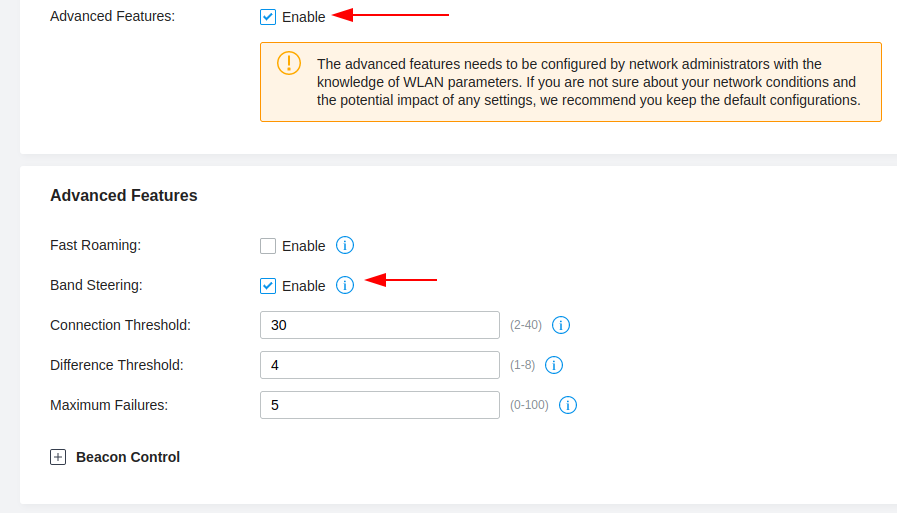
You can enable this by navigating to Settings > Site, check the Advanced Features box then enable Fast Roaming as shown in the figure below.
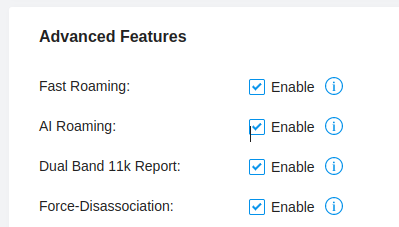
- AI Roaming - improves the roaming experience of clients
- Dual Band 11k Report - Provides neighbour list that contains both 2.4GHz and 5Ghz bands
- Force-Disassociation - forces clients to roam whether or not they have the feature enabled.
As per TP-Links warning, advanced features can negatively impact the performance of the wireless network and need to be configured by network administrators with knowledge of the WLAN parameters.
Band Steering
Band Steering is an advanced feature, which allows dual-band clients (2.5GHz and 5GHz) to be directed to the 5GHz when appropriate, this feature can improve network performance as the 5GHz band supports a larger number of non-overlapping channels.
You can enable this by navigating to Settings > Site, check the Advanced Features box then enable Band Steering as shown in the figure below.
Adding more EAPs
The process of adding new EAPs is easy, simply connect a new EAP into your network and configure any switch VLAN configuration and the TP-Link OC300 will detect the newly added device, here we can click the Adopt button.
Because we have RADIUS authentication enabled, we also need to add the newly added EAP to our clients list on our Windows Network Policy server (NPS).
Right-click the RADIUS Clients from the NPS and select New.
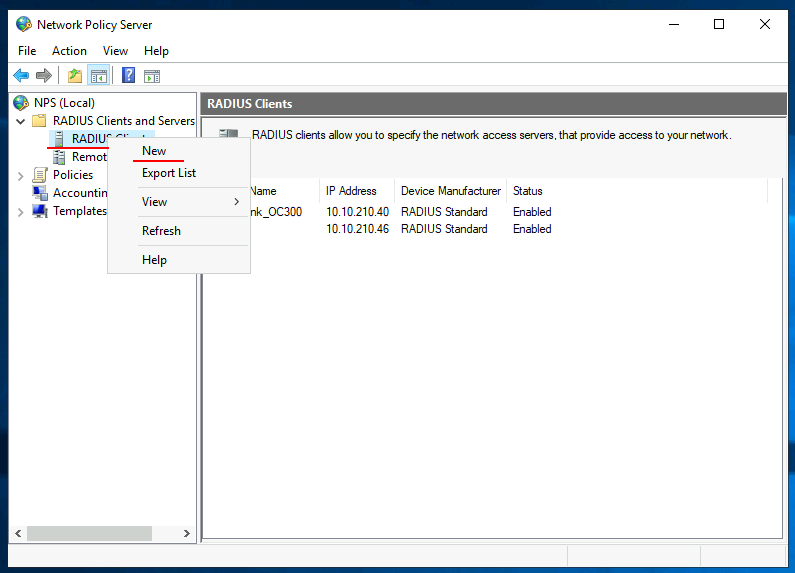
Populate the Friendly name, IP address of the newly added EAP and provide your shared secret, I have created a Shared Secrets Template to ease onboarding.
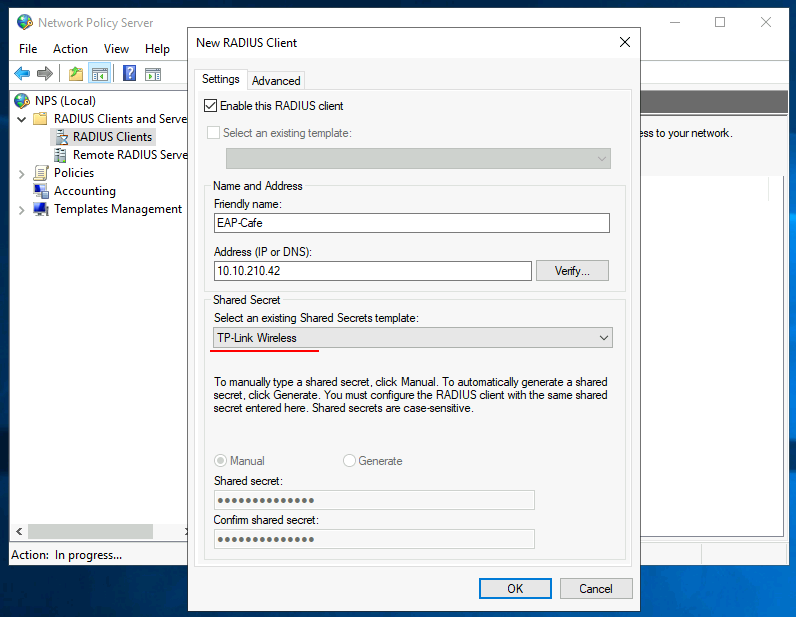
Now the new EAP will be able to authenticate users against our NPS server.