Network Management
29 Nov 2020
Cisco Discovery Protocol (CDP)
Cisco proprietary Layer 2 protocol that is used to gather information about Cisco devices which share the same data link.
CDP is enabled by default. For security reasons, it may be desirable to disable CDP either globally or per interface. Its recommended to do not advertise to external networks.
Router# show cdp

Router(config)# no cdp run

Router(config)# interface ga 0/0/1
Router(config-if)# cdp disable
Show commands for displaying neighbour information
Router# show cdp neighbors
Router# show cdp interface

Router# show cdp neighbors detail
Link Layer Discovery Protocol (LLDP)
LLDP does the same thing as CDP, but it is not specific to Cisco devices.
To enable LLDP globally on a Cisco network device
Router(config)# lldp run
LLDP must be configured separately to transmit and receive LLDP packets.
Router(config)# interface ga0/1
Router(config-if)# lldp transmit
Router(config-if)# lldp receive
The show commands are the same as Cisco’s CDP
Router# show lldp

Router# show lldp neighbors
Router# show lldp neighbors detail
Network Time Protocol (NTP)
It is important to synchronise the time across all devices on the network because all aspects of managing, securing, troubleshooting, and planning networks require accurate time stamping.
Manually set time and date
R1# clock set 16:01:00 sept 25 2020
NTP can be set up to synchronize to a private master clock, or it can synchronize to a publicly available NTP server on the internet.
NTP uses UDP port 123.
NTP networks use a hierarchical system of time sources. Each level in this hierarchical system is called a stratum.
Stratum 0
- Stratum 0 devices such as atomic and GPS clocks are the most accurate authoritative time sources.
- Stratum 0 devices are non-network high-precision timekeeping devices.
- Accurate and with little or no delay associated with them.
Stratum 1
- Stratum 1 devices are network devices.
- Directly connected to the authoritative time sources.
- Primary network time standard.
Stratum 2 and Lower
- Stratum 2 servers synchronise their time by using the NTP packets from stratum 1 servers.
- Could also act as servers for stratum 3 devices.
The max hop count for Stratum servers is 15. A stratum 16, the lowest stratum level, indicates that a device is unsynchronized.
Time servers on the same stratum level can be configured to act as a peer with other time servers.
Configuring NTP
show clock provides the currently set date and time and if the system was manually (user) set or configured with NTP
R1# show clock detail
20:55:10.207 UTC Fri Nov 15 2019
Time source is user configuration
Set the NTP server.
R1(config)# ntp server 209.165.200.225
Review various details about the configured NTP server using the below commands.
R1# show ntp associations

R1# show ntp status
Set the Router as NTP master
R1(config)# ntp master 1
Simple Network Management Protocol (SNMP)
SNMP is an application layer protocol that provides a message format for communication between managers and agents.
The SNMP system consists of three elements:
- SNMP manager
- SNMP agents (managed node)
- Management Information Base (MIB) - client device side
SNMP agents collect and store information about the device locally in the MIB.
The SNMP manager polls the agents and queries the MIB on UDP port 161.
SNMP agents send any SNMP traps to the SNMP manager on UDP port 162.
There are two primary SNMP manager requests, get and set.
| Operation | Description |
|---|---|
| get-request | Retrieves a value from a specific variable. |
| get-next-request | Retrieves a value from a variable within a table; the SNMP manager does not need to know the exact variable name. A sequential search is performed to find the needed variable from within a table. |
| get-bulk-request | Retrieves large blocks of data, such as multiple rows in a table, that would otherwise require the transmission of many small blocks of data. (Only works with SNMPv2 or later.) |
| get-response | Replies to a get-request, get-next-request, and set-request sent by an Network Monitoring Sysytem (NMS). |
| set-request | Stores a value in a specific variable. |
An NMS periodically polls the SNMP agents that are residing on managed devices using the get request.
SNMP agents can generate and send traps to inform the NMS immediately of certain events.
SNMP Versions
- SNMPv1 - legacy
- SNMPv2c - uses a community-string (ro, rw), minimal security.
- SNMPv3 - secure access to devices by authenticating and encrypting packets, ensuring packets are not tampered.
MIB Object ID
The MIB organizes variables hierarchically, similar to a system registry. Each variable as an object ID (OID).
Cisco SNMP Object Navigator tool (Login Required)
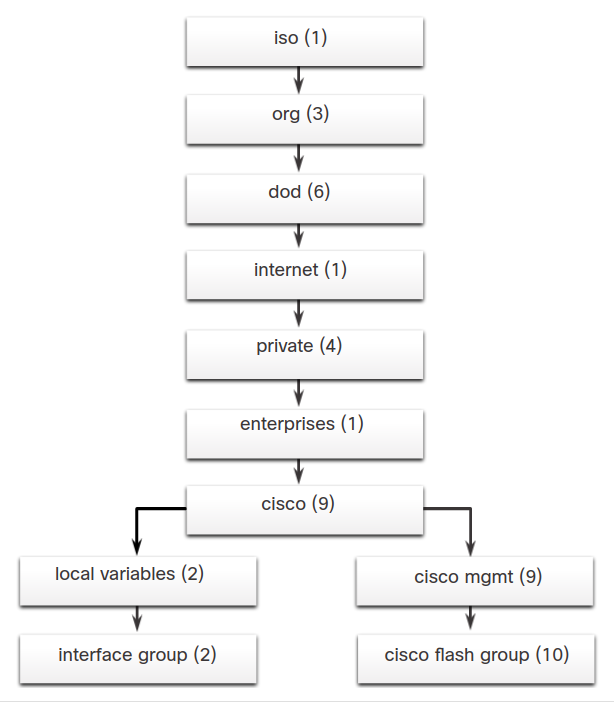
OIDs are numbered, example:
- .iso (1)
- .org (3)
- .dod (6)
- .internet (1)
- .private (4)
- .enterprises (1)
- .cisco (9)
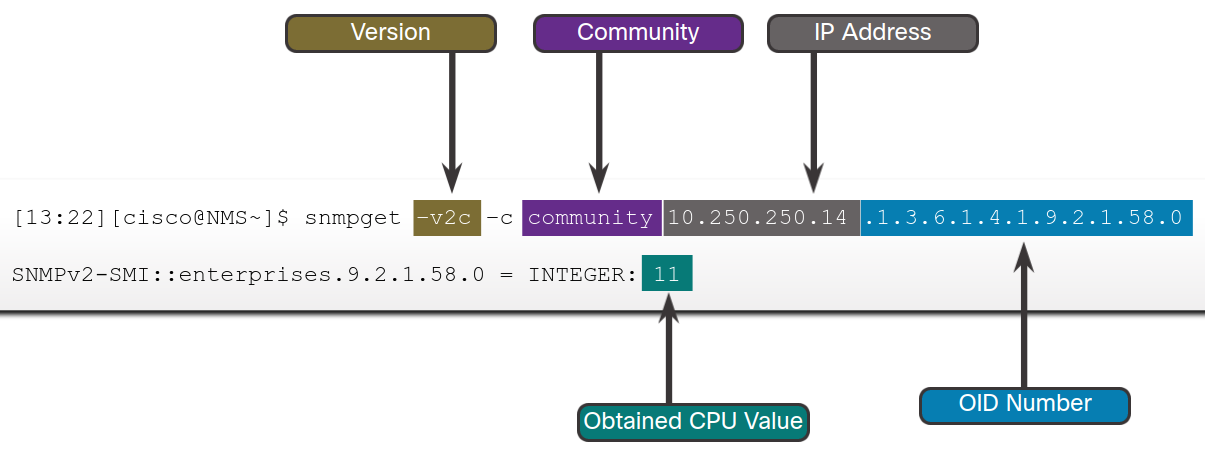
Therefore, the OID is 1.3.6.1.4.1.9.
Data is retrieved via the snmpget utility
Syslog
The most common method of accessing system messages is to use a protocol called syslog.
Syslog uses UDP port 514 to send event notification messages across IP networks
Syslog Levels
Nothing more important that level 0
| Severity Name | Severity Level | Explanation |
|---|---|---|
| Emergency | Level 0 | System Unusable |
| Alert | Level 1 | Immediate Action Needed |
| Critical | Level 2 | Critical Condition |
| Error | Level 3 | Error Condition |
| Warning | Level 4 | Warning Condition |
| Notification | Level 5 | Normal, but Significant Condition |
| Informational | Level 6 | Informational Message |
| Debugging | Level 7 | Debugging Message |
Syslog Facilities
Syslog facilities are service identifiers
Some common syslog message facility codes reported on Cisco IOS routers include:
- IF - generated by an interface.
- IP - generated by IP.
- OSPF - generated by the OSPF routing protocol.
- SYS - generated by the device operating system.
- IPSEC - generated by the IP Security encryption protocol.
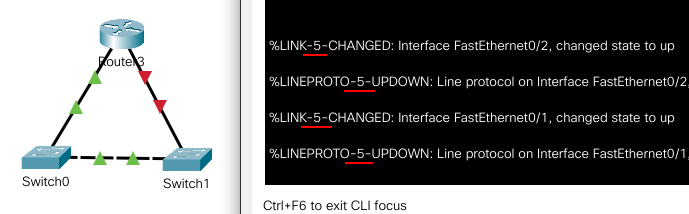
- LINK - interface
- LINEPROTO - line protocol
%LINK-3-UPDOWN: Interface Port-channel1, changed state to up
Using Timestamps
By default log messages are not timestamped to enable
R1(config)# service timestamps log datetime
Router and Switch File Maintenance
Router# show file systems
This command provides useful information such as the amount of total and free memory, the type of file system, and its permissions.
Other common commands to navigate the directory include:
dir
pwd
cd
Backup and Restore
- Use a text editor - applications like Terra Term and PuTTY allow for copying directly into a text file.
- TFTP - backup using the copy command to a TFTP server and restore by switching the source and destination.
R1# copy running-config tftp
Remote host []?192.168.10.254
Name of the configuration file to write[R1-config]? R1-Jan-2019

Write file R1-Jan-2019 to 192.168.10.254? [confirm]
Writing R1-Jan-2019 !!!!!! [OK]
- USB Port
copy running-config usbflash0:
Destination filename [running-config]? R1-Config
Password Recovery Procedure
-
Enter the ROMMON mode.
Ctrl+Breakfor PuTTY
-
Change the configuration register.
-
 rommon 1 > confreg 0x2142
 rommon 2 > reset
-
-
Copy the startup-config to the running-config.
-
Change the password.
-
Save the running-config as the new startup-config.
-
 R1(config)# config-register 0x2102
 R1(config)# end
 R1# copy running-config startup-config
-
-
Reload the device.
IOS Image Management
Backing up the IOS
RTA-1# copy flash tftp:

Source filename []? c1900-universalk9-mz.SPA.151-4.M4.bin
Address or name of remote host []? 172.16.1.2
Destination filename [c1900-universalk9-mz.SPA.151-4.M4.bin]? <cr>
Upgrade the IOS
copy the new IOS bin file to the device
R1# copy tftp: flash:

Address or name of remote host []? 172.16.1.2
Source filename []?  isr4200-universalk9_ias.16.09.04.SPA.bin
Destination filename [isr4200-universalk9_ias.16.09.04.SPA.bin]
Switch the boot system to use the new .bin file and reload the device.
R1# configure terminal
R1(config)# boot system flash0:isr4200-universalk9_ias.16.09.04.SPA.bin
R1(config)# exit

R1# copy running-config startup-config

R1# reload