Intro to Kubernetes and MicroK8s
08 Jan 2022
In this article I discuss some of the fundamentals of Kubernetes its core components and architecture including Master and Worker nodes. I then introduce MicroK8s and step through how we can install and configure a 3-node cluster with ease.
Introduction to Kubernetes
With the rise of containerisation, managing 100s or 1000s of containers was difficult. A proper set of tools were required to help with orchestration, enter Kubernetes.
Kubernetes can be used on physical servers, virtual servers and cloud infrastructure.
Kubernetes brings:
- High Availability
- Scalability
- Disaster recovery - Backup and restore
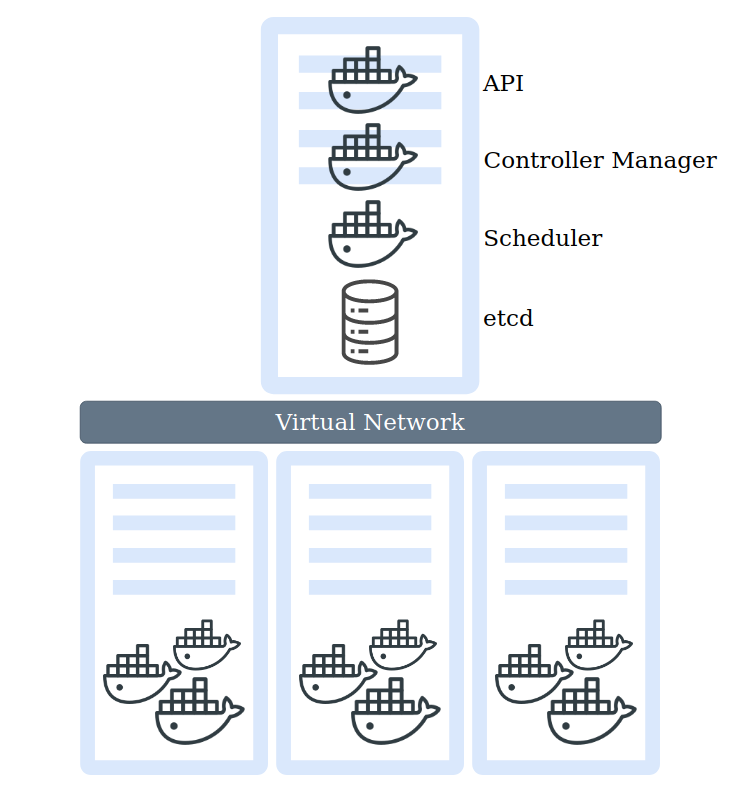
A cluster is made up of at least 1 master node (2+ masters for production), worker nodes and a virtual network.
Worker Nodes
Worker nodes have a kubelet process running on them, which enables cluster communication and the ability for the master to execute tasks on nodes.
Worker nodes container docker containers, which our applications and workloads run on.
Master Nodes
Master nodes contain critical processes to enable running and managing our cluster such as:
- API Server (ran as an container) - Entrypoint to the Kubernetes Cluster, used by Kubernetes clients such as Dashboard or API (Scripting) and CLI (Kubectl).
- Controller Manager - Control loop that watches the shared state of the cluster through the apiserver and makes changes attempting to move the current state towards the desired state.
- Scheduler - Pod placement per node, based upon current workloads and available resources
- Etcd - Key value storage, holds the current status of the Kubernetes cluster, including nodes.
Virtual Network
Lastly the Virtual Network, which creates a unified machine with the sum of all resources.
Pods and Containers
A pod is an atomic unit, a wrapper around our container(s), they are self contained with their own internal IP address.
Administrators do not create containers, they only work with pods. A pod usually runs relatively tightly coupled applications.
When pods are “restarted”, a new pod is created to replace the old one. This new pod also gets a new internal IP address.
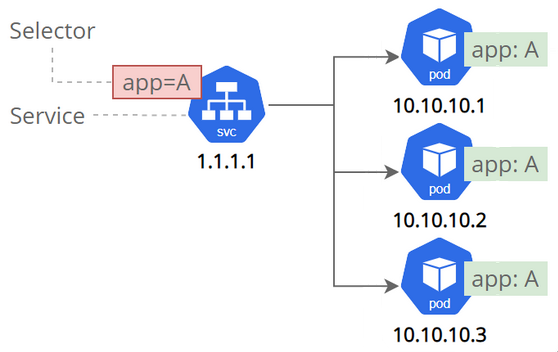
Services and Ingress
A Service is an abstraction which defines a logical set of Pods and a policy by which to access them.
Services allow your applications to receive traffic.
Services can be exposed in different ways by specifying a type in the ServiceSpec:
- ClusterIP (default)
- NodePort
- LoadBalancer
- ExternalName
An ClusterIP Service (Internal) sits in front of the pod, therefore when a pod is renewed the service is still in tack and nothing breaks. A service also acts as:
- Permanent IP address
- DNS name
- Load Balancer
A NodePort Service opens a service externally to the Kubernetes cluster, this would provide a node IP address and port number.
A Load Balancer Service
An ExternalName Service
Ingress (Reverse Proxy) is used to route traffic into the Kubernetes cluster, which sits in front of the service providing a secure connection and domain names for offered services.
ConfigMap and Secret
Configuration map usually contains URLs of a database, which can be connected to a pod. When a URL changes you simply update the map instead of rebuilding the whole pod.
Secret is a place for storing credentials, certificates or other sensitive data, which are stored unencrypted in a BASE64 encoded format, which can be encrypted by third party tools.
Note: Secrets need to be manually encoded into BASE64, this is not an automated process.
echo -n mysecretusername | base64
echo -n mysecretpassword | base64
Which return:
bXlzZWNyZXR1c2VybmFtZQ==
bXlzZWNyZXRwYXNzd29yZA==
Volumes
As in containers volumes are used to store data to make it persistent through renewals.
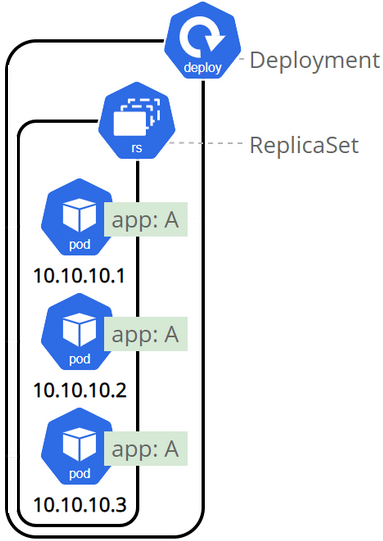
Deployments and StatefulSet
Deployments or Blueprints are used to create the services, pods and replicas.
Deployments are an abstraction over pods.
Databases cannot be replicated using Deployments as they maintain a state. To avoid data corruption of data we can use StatefulSet, to handle scaling of the database and synchronising of data between databases.
StatefulSets are complex and it is often seen to host databases outside of Kubernetes.
Configurations
Configurations are made up of 3 parts
- API version
- Kind
- Metadata
- Specification
- Status (automatically added by Kubernetes, used for the self-healing feature)
Configuration files are normally stored along side your code in a version controlled setting such as Git.
EXAMPLE KUBERNETES CONFIGURATION FILES
- ConfigMap - MongoDB Endpoint
- Secret - MongoDB username and password
- Deployment - MongoDB Application with internal service*
- Service*
- Deployment - WebApp with external service*
- Service*
ConfigMap - mongo-config.yaml
apiVersion: v1
kind: ConfigMap
metadata:
  name: mongo-config
data:
  mongo-url: mongo-service
Secret - mongo-secret.yaml
apiVersion: v1
kind: Secret
metadata:
  name: mongo-secret
type: Opaque
data:
  mongo-user: dXNlcm5hbWU=
  mongo-password: QDg1MDN3MHJk
Deployment & Service - mongo.yaml
apiVersion: apps/v1
kind: Deployment
metadata:
  name: mongo-deployment
  # Labels are Key value pairs, used to identify components
  labels:
    app: mongo
spec:
  # How many Pods to create
  replicas: 1
  # MatchLabels are used to match pods to deployments in Kubernetes
  selector:
    matchLabels:
      app: mongo
  # Blueprint for Pods - Configures the Pod
  template:
    metadata:
      labels:
        app: mongo
    spec:
      containers:
      - name: mongodb
        image: mongo:5.0
        ports:
        - containerPort: 27017
        # Environment Variables from Secrets
        env:
        - name: MONGO_INITDB_ROOT_USERNAME
          valueFrom:
            secretKeyRef:
              name: mongo-secret
              key: mongo-user
        - name: MONGO_INITDB_ROOT_PASSWORD
          valueFrom:
            secretKeyRef:
              name: mongo-secret
              key: mongo-password
---
apiVersion: v1
kind: Service
metadata:
  name: mongo-service
spec:
  # Used to find the Pods related to Deployment
  selector:
    app: mongo
  ports:
    - protocol: TCP
      # Endpoint Port
      port: 8080
      # Port of the Pods
      targetPort: 27017
Deployment & Service - webapp.yaml
apiVersion: apps/v1
kind: Deployment
metadata:
  name: webapp-deployment
  # Labels are Key value pairs, used to identify components
  labels:
    app: webapp
spec:
  # How many Pods to create
  replicas: 1
  # MatchLabels are used to match pods to deployments in Kubernetes
  selector:
    matchLabels:
      app: webapp
  # Blueprint for Pods - Configures the Pod
  template:
    metadata:
      labels:
        app: webapp
    spec:
      containers:
      - name: webapp
        image: nanajanashia/k8s-demo-app:v1.0
        ports:
        - containerPort: 3000
        # Environment Variables from Secrets and ConfigMap
        env:
        - name: USER_NAME
          valueFrom:
            secretKeyRef:
              name: mongo-secret
              key: mongo-user
        - name: USER_PWD
          valueFrom:
            secretKeyRef:
              name: mongo-secret
              key: mongo-password
        - name: DB_URL
          valueFrom:
            configMapKeyRef:
              name: mongo-config
              key: mongo-url
---
apiVersion: v1
kind: Service
metadata:
  name: webapp-service
spec:
  # External Service
  type: NodePort
  # Used to find the Pods related to Deployment
  selector:
    app: webapp
  ports:
    - protocol: TCP
      # Endpoint Port
      port: 3000
      # Port of the Pods
      targetPort: 3000
      # nodePort has a pre-defined ranged 30000-32767
      nodePort: 30100
Creating the files in Kubernetes
kubectl apply -f mongo-config.yaml
kubectl apply -f mongo-secret.yaml
kubectl apply -f mongo.yaml
kubectl apply -f webapp.yaml
kubectl get all
kubectl get configmap
kubectl get secret
Checking the logs of the Pod
kubectl logs <pod name>
Accessing the Service
kubectl get service
kubectl get node -o wide
Troubleshooting with kubectl
- kubectl get - list resources
- kubectl describe - show detailed information about a resource
- kubectl logs - print the logs from a container in a pod
- kubectl exec - execute a command on a container in a pod
Installing a MicroK8s cluster
Ubuntu is the world’s most popular cloud operating system across public cloud.
MicroK8s
-
Light weight, Minimal footprint
-
Production grade
-
Conformant Kubernetes
-
Over the Air Updates and Security fixes
MicroK8s can run anywhere from:
- Supporting Intel and ARM architectures
- Single node or multi node cluster
- Join 3+ nodes together and MicroK8s automatically becomes Highly Available (HA)
Node Installation
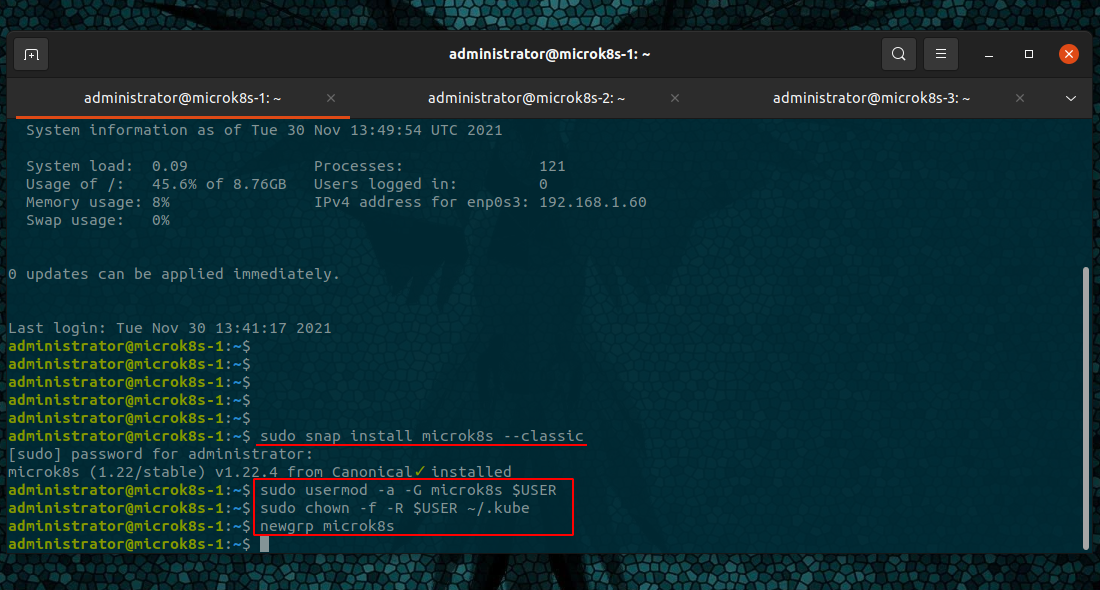
Install the snap package
sudo snap install microk8s --classic
Add your user to the MicroK8s group
sudo usermod -a -G microk8s $USER

sudo chown -f -R $USER ~/.kube

newgrp microk8s
Inspect the installed and running services - useful for troubleshooting
microk8s inspect
built-in tools - use tab for auto suggestions
microk8s

such as cluster information
microk8s.kubectl cluster-info
Firewall Ports
A full list of services and ports can be found on the MicroK8s website.
Firewall rules for ports:
- 16443/tcp - API server
- 10250/tcp - Kubelet
- 10255/tcp - Kubelet
- 25000/tcp - Cluster-agent
- 12379/tcp - Etcd
- 10257/tcp - Kube-controller
- 10259/tcp - Kube-scheduler
- 19001/tcp - Dqlite
If we were to use UFW we would add allow rules.
sudo ufw allow 16443/tcp
sudo ufw allow 10250/tcp
sudo ufw allow 10255/tcp
sudo ufw allow 25000/tcp
sudo ufw allow 12379/tcp
sudo ufw allow 10257/tcp
sudo ufw allow 10259/tcp
sudo ufw allow 19001/tcp
Clustering Nodes
Obtain add node information
microk8s.add-node

On one node, run the given command
From the node you wish to join to this cluster, run the following:
microk8s join 192.168.1.82:25000/xxxxxxxxxxxxxxxxxxxxxxxxxxxxxxxxxxxxxxxxxxxxxx

After the first node completes, verify using
microk8s.kubectl get nodes

Then go through the process again, starting from
microk8s.add-node
We’ll need a new add-node token per host we add, its also advised to only add one node at a time.
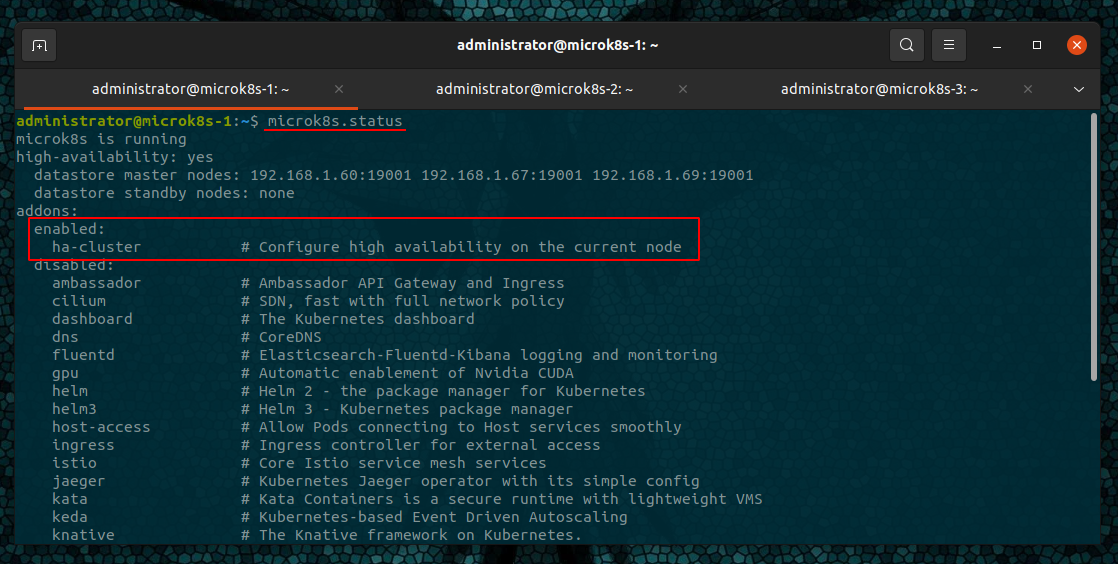
Once we have all our three nodes clustered we can view the MicroK8s status to see if the automatic High-Availability has been enabled
microk8s.status
From the figure we can see that the ha-cluster is enabled.
Verify the cluster
microk8s.kubectl cluster-info

Addons
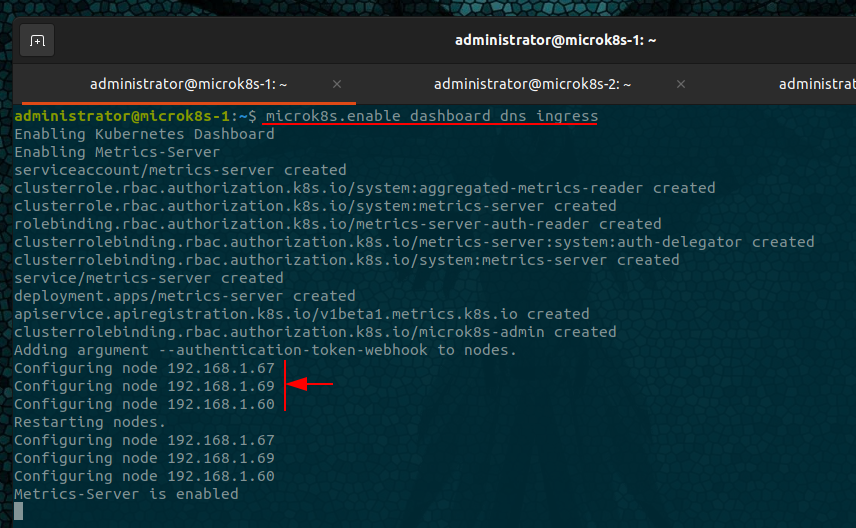
Enable built-in workloads - addons
microk8s.enable dashboard dns ingress rbac
-
dashboard: The standard Kubernetes Dashboard.
-
dns: Deploys CoreDNS. It is recommended you always enable it.
-
ingress: A simple ingress controller for external access, similar to how reverse proxies work.
-
rbac: Enable Role Based Access Control for authorisation.
-
registry: Deploy a private image registry and expose it on localhost:32000.
-
metallb: Deploys the MetalLB Loadbalancer.
Add-ons will be installed across all nodes within the cluster, so there is no requirement to run the enable command on each node.
As shown below, we can see each node being configured from the single command.
MetalLB will prompt for a pool of addresses
Enabling MetalLB
Enter each IP address range delimited by comma (e.g. '10.64.140.43-10.64.140.49,192.168.0.105-192.168.0.111'):
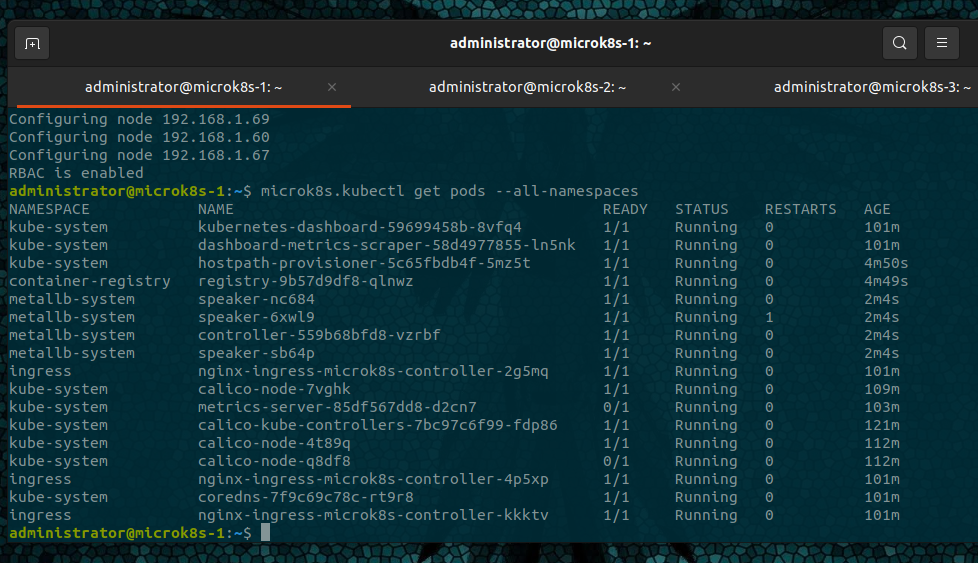
Verify Addon installation
microk8s.kubectl get pods --all-namespaces
pods will take time to finish installing, refresh the get pods commands to see the progress.
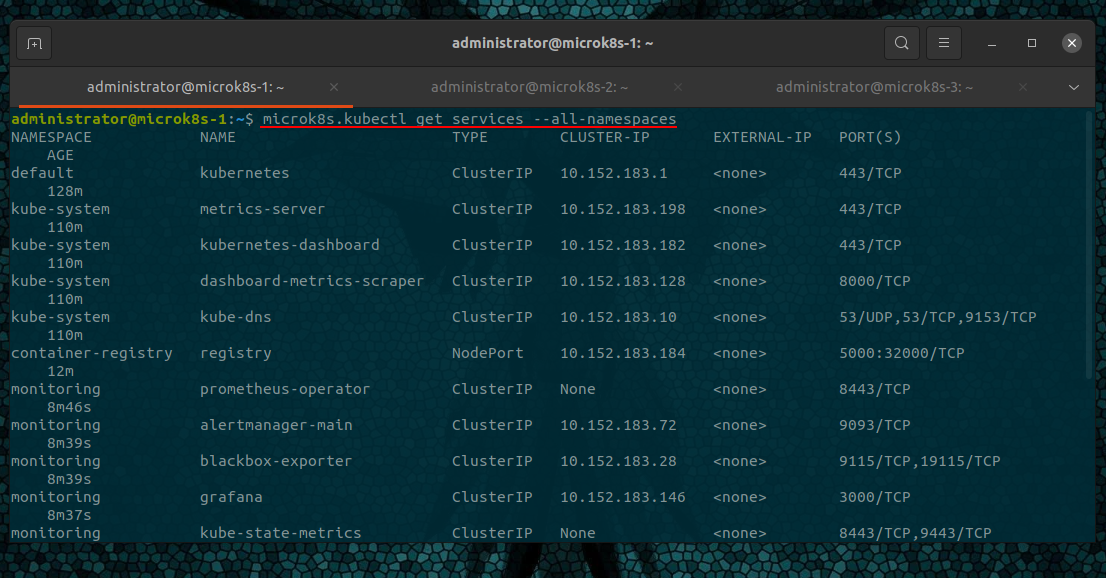
microk8s.kubectl get services --all-namespaces
Accessing the Dashboard
Create a proxy to your nodeIP
microk8s.kubectl port-forward -n kube-system service/kubernetes-dashboard 10443:443 --address 192.168.1.60
Visit your Node IP address and port number
https://192.168.1.60:10443
Enter your Token
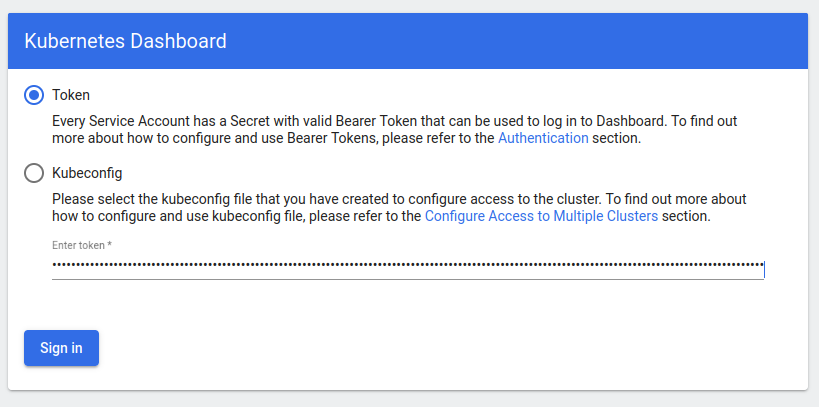
And you will be presented with the Kubernetes Dashboard.